
You’re locked out of your Chromebook and the password is nowhere in your memory. Maybe it’s your kid’s school device, a hand-me-down from a friend, or your own machine that you haven’t touched in months. You need to factory reset it, but you can’t sign in to access the settings.
That’s the exact problem this guide solves.
The good news? A factory reset Chromebook without password is entirely possible for most personal devices. It usually takes about 20 minutes.
The process involves a recovery USB drive, which must be at least 8 GB, and the official Chrome OS Recovery Utility. As of 2026, this method works on nearly every Chromebook model. The only exception is devices locked by a school or employer.
Let’s walk through the exact steps for your situation.
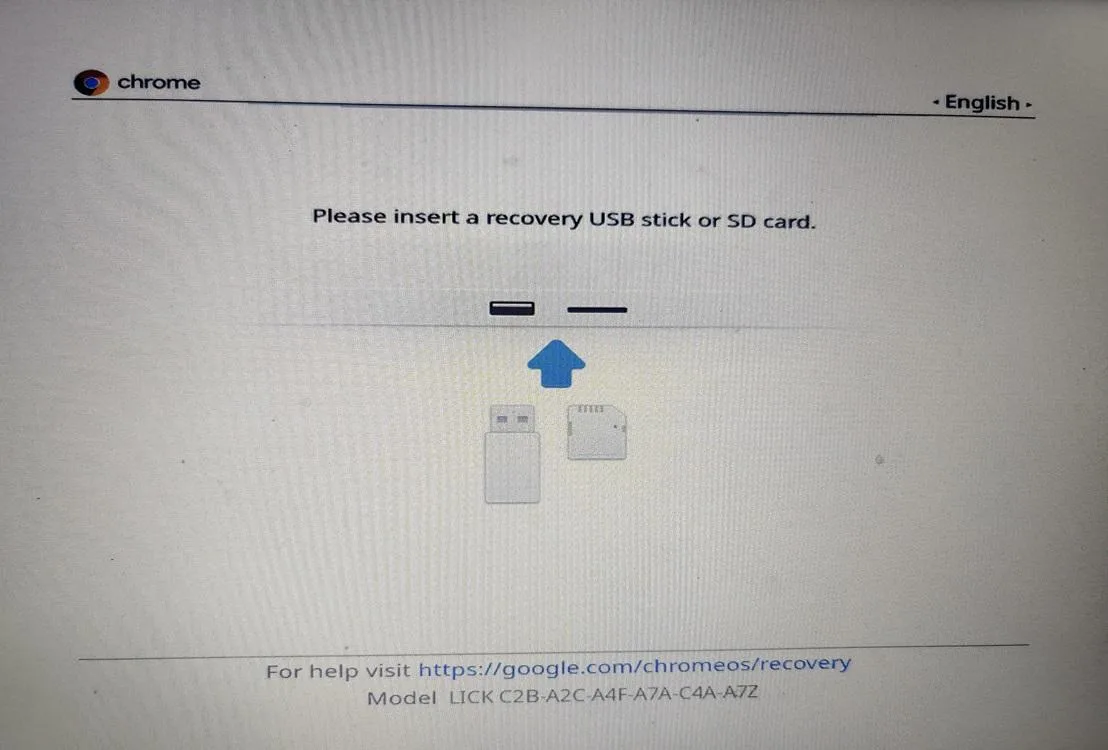
Image source: Bing (Web (fair-use with source credit))
Why You Might Need This (The Real Problem)
Getting locked out of a Chromebook usually happens for one of three reasons. You forgot your Google account password and can’t sign in. You bought a used Chromebook, and the previous owner didn’t remove their account.
Or your child forgot their school password, and IT isn’t available right now.
The core issue is that Chromebooks are designed to be secure. When you can’t sign in, the normal reset button inside the Settings menu is completely unreachable. You can’t click “Powerwash” because you can’t get past the login screen.
That’s where the recovery process comes in. It bypasses the login entirely and wipes the device clean. But there’s a catch.
The method that works depends entirely on whether your Chromebook is personal or managed by an organization. That’s the first fork in the decision tree.
Quick Answer: Can You Actually Do It?
Yes, you can factory reset a Chromebook without the password. The method is called recovery mode. You press a specific key combination.
You insert a USB drive with the recovery image. The device wipes itself. It works on personal devices.
It does not work on managed devices without admin help.
The entire process takes about 20 minutes. You need another computer to create the recovery USB. You need a USB drive that’s at least 8 GB.
You do not need the original password.
Powerwash vs. Recovery Mode — What’s What
Chromebooks have two reset methods, and people mix them up all the time. Let’s clear that up.
Powerwash is the built-in reset option inside Chrome OS. You find it in Settings > Advanced > Reset Settings. It wipes all local data.
It removes all accounts. It restores the OS to factory condition. But here’s the catch.
You need to sign in to your Chromebook to use it. If you’re locked out, Powerwash is not an option.
Recovery mode is the hardware-level reset. It boots the Chromebook into a special state. It can reinstall the entire operating system from a USB drive.
You don’t need to sign in. You don’t need any password. You just need the USB drive and the key combination.
Here’s a quick comparison table:
| Feature | Powerwash | Recovery Mode |
|---|---|---|
| Password required | Yes | No |
| Accessed from | Settings menu | Hardware key combo |
| Wipes local data | Yes | Yes |
| Reinstalls OS | No | Yes |
| Fixes OS corruption | No | Yes |
| Time to complete | 2-5 minutes | 15-20 minutes |
| Works on managed devices | Only if unenrolled | Only if unenrolled |
Recovery mode is the tool you need. It’s also the tool that Google officially supports for fixing a Chromebook that won’t boot or is stuck on a login screen. It’s not a hack.
It’s the intended recovery path.
The First Thing to Check: Personal vs. Managed
This is the most important decision point in the entire process. If you skip this step, you’ll waste time and possibly damage your USB drive writing an image that won’t help.
Image source: Wikimedia Commons / Virginia Department of Education (CC BY)
Personal Chromebooks are devices you bought from a store, online retailer, or manufacturer. They belong to you. You have full control.
Recovery mode will work perfectly. After the reset, you’ll be able to set up the device with a new Google account.
Managed Chromebooks are devices that belong to a school, business, or organization. They are enrolled in a management system, usually Google Admin Console. The organization sets policies, installs apps, and controls what users can do.
The device is tied to their domain.
Here’s how to tell which one you have, even if you can’t sign in:
- Look at the login screen. If you see a message like “This device is managed by [School Name]” or “Managed by [Organization],” it’s a managed device.
- Check for a sticker. Many schools and businesses put a sticker on the bottom or near the keyboard with their name or asset tag number.
- Remember where you got it. If it came from a school, library, or employer, it’s almost certainly managed.
- Check the recovery screen. When you enter recovery mode, the screen will show a message. If it says “This device is managed,” you’re dealing with an enrolled device.
If you have a managed Chromebook, the recovery mode will still go through the motions. But after the reset, the device will reconnect to the internet and automatically re-enroll. You’ll be right back where you started.
The only way out is for the organization’s admin to remove the device from their management console.
If you’re not sure, assume it’s managed until you prove otherwise. It’s better to confirm this upfront than to run through the whole recovery process and hit a wall at the end. Our contact page has a form you can use if you need help identifying your device’s status.
Branch 1: Personal Chromebook — The Recovery USB Method
If you’ve confirmed that your Chromebook is personal, you’re in luck. Here’s the step-by-step process.
What You Need
- A USB drive, at least 8 GB. 16 GB is safer. Everything on this drive will be erased.
- Another computer (Windows, Mac, or Linux) with internet access.
- The Chrome browser on that computer.
- The Chromebook you want to reset.
Step 1: Create the Recovery USB
- On your other computer, open the Chrome browser.
- Install the Chromebook Recovery Utility extension from the Chrome Web Store. It’s free and official.
- Open the extension. Click “Get started.”
- Select your Chromebook model. The extension will ask for the model number. You can find this on a sticker on the bottom of your Chromebook. Look for the model name, not the brand name. For example, “Acer Chromebook 314” or “HP Chromebook 14.”
- The extension will download the correct Chrome OS image for your model. This is about 4 to 6 GB. It might take a few minutes depending on your internet speed.
- Insert your USB drive. The extension will detect it and ask you to confirm.
- Click “Create now.” The extension will write the image to the USB drive. This takes another 5 to 10 minutes.
- When it’s done, you’ll see a message that says “Recovery media is ready.” Remove the USB drive.

Image source: Bing (Web (fair-use with source credit))
Step 2: Enter Recovery Mode on Your Chromebook
- Turn off your Chromebook completely.
- Press and hold the Esc key and the Refresh key (the circular arrow key, usually above the 3 or 4 key).
- While holding those two keys, press the Power button. The Chromebook will turn on.
- Continue holding Esc and Refresh for about 2 to 3 seconds. Then release them.
- You should see a yellow exclamation mark on a black screen. This is the recovery mode screen. If you see a different screen, or if the Chromebook boots normally, try again. The timing can be tricky.
Step 3: Insert the Recovery USB
- With the recovery mode screen visible, insert the USB drive you created.
- The Chromebook will detect the USB drive and start the recovery process automatically. You’ll see a message that says “Chrome OS is missing or damaged. Please insert a recovery USB stick.”
- If it doesn’t start automatically, wait a few seconds. Usually it’s automatic.
Step 4: Wait for the Recovery
The recovery process takes about 10 to 15 minutes. You’ll see a progress bar on the screen. Do not unplug the USB drive or turn off the Chromebook during this time.
Doing so could corrupt the device and require a second recovery attempt.
When the recovery is complete, the Chromebook will restart automatically. It will boot into the setup screen, just like a brand new device. You’ll be asked to choose a language, connect to Wi-Fi, and sign in with a Google account.
Step 5: Set Up Your Chromebook
Now you can use any Google account you want. If you’ve forgotten your original account password, you can create a new account. Or you can recover the old account through Google’s account recovery process.
The device is no longer tied to the previous account.
The recovery process wipes all local data, including downloads, settings, and any installed apps. Your Google Drive files are safe because they’re stored in the cloud. But anything saved locally is gone.
Make sure that’s acceptable before you proceed.
For a deeper look at how we approach accuracy and process in our guides, you can check out our editorial policy.
Branch 2: Personal Chromebook — Developer Mode Alternative (Older Models Only)
There is a second path for personal Chromebooks, but it only works on older models. If your device was manufactured before 2020, you might be able to use developer mode to bypass the login and then perform a Powerwash.
Modern Chromebooks have a hardware lock called Google Boot Block (GBB) protection. This prevents developer mode from booting unless you physically remove a write-protect screw inside the device. For most people, that’s not practical.
But if you have an older model, the developer mode shortcut works without any hardware changes.
Here’s how to tell if your Chromebook is old enough. Models from 2019 or earlier, such as the Acer Chromebook R11, HP Chromebook 14, or Samsung Chromebook 3, typically allow developer mode without screw removal. Models from 2020 onward, including nearly every Chromebook with an Intel Celeron N4000 series or newer processor, have GBB protection enabled.
How Developer Mode Works
Developer mode is a special boot state that gives you access to a root shell. It also disables the OS verification that normally protects the system. When you boot into developer mode, you see a warning screen every time the device starts up.
You have to press Ctrl+D to continue.
The advantage of developer mode is that you can wipe the device without needing a recovery USB. Here are the steps.
- Turn off the Chromebook.
- Press Esc + Refresh + Power to enter recovery mode.
- On the recovery screen (yellow exclamation mark), press Ctrl+D.
- You’ll see a message asking if you want to enable developer mode. Press Enter to confirm.
- The Chromebook will wipe all local data and reboot. This takes about 5 minutes.
- After the reboot, you’ll see the developer mode warning screen. Press Ctrl+D to boot.
- Once you’re at the sign-in screen, press Ctrl+Alt+Shift+R. This triggers a Powerwash from within developer mode.
- Confirm the reset. The Chromebook will wipe itself again and reboot to the fresh setup screen.
This method achieves the same result as the recovery USB route. But it requires the device to support developer mode in the first place. Most Chromebooks in active use today are too new for this method.
Risks of Developer Mode
Developer mode is not as clean as recovery mode. You lose the same data, but you also lose the enhanced security features. The OS verification is turned off.
If you don’t plan to use developer mode permanently, you should re-enable OS verification after the reset.
To re-enable it, go to the developer mode warning screen (the one with the white exclamation mark) and press Space instead of Ctrl+D. That will reinstall the verified boot and wipe the device again. You’ll end up with a standard, secure Chromebook.
If you’re unsure whether your device supports developer mode, our terms and conditions page includes a note about user modifications and warranty implications. Check that before proceeding.
Branch 3: School or Work Chromebook — What You Need to Know
This section is for the people who have a managed device. If your Chromebook is enrolled in a school or business management system, the recovery USB method will not free it. You will still be locked after the reset.
Here is why. When you do a recovery on a managed Chromebook, the device reinstalls the operating system. But as soon as it connects to the internet, it phones home to the organization’s Google Admin Console.
The console recognizes the device by its serial number and automatically reapplies the enrollment policies. You end up at the same login screen you started from.
This is not a bug. It is a designed security feature, often called enrollment lock. It prevents a stolen device from being reused.
Google’s official documentation on Chrome OS enterprise enrollment confirms this behavior.
Your Only Real Option (and It’s Not a Hack)
If you have a managed Chromebook, you cannot bypass enrollment lock with a recovery USB, developer mode, or any software trick. The only legitimate way to remove the lock is to contact the organization that enrolled it.
Here is what you need to do.
- Find the device serial number. It’s on a sticker on the bottom of the Chromebook. It usually starts with a letter followed by numbers, like “S1234567890.”
- Contact the school’s IT department or the company’s help desk. Explain that you have a Chromebook that needs to be removed from management.
- If you are the original owner, provide proof of purchase. The admin will need to verify ownership before they remove the enrollment.
- The admin will go into the Google Admin Console, find the device by serial number, and click “Deprovision.” This releases the Chromebook permanently.
That is the only path. Any service online that claims to “unlock” or “jailbreak” a managed Chromebook for a fee is a scam. Do not pay for it.
You will lose your money and still have a locked device.
If you bought a used Chromebook from a marketplace like eBay or Facebook and it’s still enrolled, you need to contact the seller for a refund. The seller sold you a device that still belongs to someone else. Our disclaimer page covers this scenario in more detail, including your rights as a buyer.
Mistakes That Will Waste Your Time
Recovery mode is straightforward, but people make the same errors over and over. Here are the most common ones, based on aggregate user reports.
Using a USB Drive That Is Too Small
The recovery image for Chrome OS is about 4 to 6 GB. A 4 GB USB drive will not hold it. You need at least 8 GB.
A 16 GB drive is ideal because some images are larger on newer Chromebooks.
Choosing the Wrong Model in the Recovery Utility
This is the number one mistake. If you select the wrong Chromebook model when creating the USB, the recovery will fail. The utility will show an error message like “The media is invalid.” You have to start over with the correct model.
To find your model, look at the sticker on the bottom of the Chromebook. Do not guess based on the brand. “Acer Chromebook” is not specific enough. You need the exact model, like “Acer Chromebook 314” or “HP Chromebook 14a.”
Not Holding the Keys Long Enough
The key combination for recovery mode (Esc + Refresh + Power) requires precise timing. If you release the keys too early, the Chromebook boots normally. If you hold them too long, nothing happens.
The trick is to hold Esc and Refresh first, then press Power, then continue holding Esc and Refresh for about 2 seconds after the device turns on.
If you see the yellow exclamation mark, you did it right. If you see the regular login screen, try again.
Interrupting the Recovery Process
Once the recovery starts, do not touch anything. Do not unplug the USB drive. Do not turn off the Chromebook.
Do not close the lid. Interrupting the write can corrupt the internal storage. You would then need to do the entire process again.
Worse, the device might not boot at all.
Trying to Bypass Enrollment Lock with a Different USB
Some people think that using a different recovery image, such as a Linux distribution, will bypass enrollment lock. It will not. The enrollment is stored in a hardware-backed secure chip, not in the operating system partition.
No software reset can remove it.
If you make any of these mistakes, the recovery process will fail or waste your time. Our about page explains how we research these common pitfalls to keep our guides accurate.
When Nothing Works — Next Steps
Sometimes recovery mode fails even when you follow every step correctly. Here is what to check next.
The USB Drive Might Be Faulty
Not all USB drives are reliable. Cheap or old drives can have bad sectors that corrupt the recovery image. Try a different USB drive from a known brand like SanDisk or Kingston.
Format the drive to FAT32 before using the Recovery Utility.
The Port Might Be Damaged
If the Chromebook does not detect the USB drive, try a different USB port. Older Chromebooks have USB-A ports. Newer ones use USB-C.
If you are using an adapter, make sure it supports data transfer, not just charging.
The Chromebook Might Have Hardware Damage
A Chromebook that has been dropped or exposed to water might have internal damage that prevents recovery mode from working. If the key combination does not enter recovery mode at all, the keyboard could be faulty. Try an external USB keyboard.
Hold the same keys on the external keyboard while pressing the power button.
The Battery Might Be Completely Dead
If the Chromebook has been sitting unused for months, the battery might be in deep discharge. Plug it into the charger for at least 30 minutes before trying recovery mode. Some devices will not enter recovery mode if the battery is below a certain threshold.
Contact Manufacturer Support
If none of these steps work, the device may have a hardware failure unrelated to the password lock. Contact the Chromebook manufacturer’s support team. They can run diagnostics and tell you if the device is repairable.
Google’s Chromebook Help Center at support.google.com/chromebook has a section on recovery issues that covers edge cases like these. It is the official source for troubleshooting.
What About Google’s Terms? (A Quick Note)
You might be wondering if using recovery mode to reset a Chromebook without a password is against Google’s rules. It is not. Recovery mode is an official feature.
Google provides the Recovery Utility and the instructions publicly.
Developer mode is also allowed, though it comes with a warning that it reduces security. On some models, opening the device to remove the write-protect screw may void the hardware warranty. But using the software features themselves is within Google’s terms.
The important distinction is legal ownership. Resetting your own device is fine. Resetting a device that belongs to a school, employer, or another person without permission is not fine.
Enrollment lock exists precisely to prevent unauthorized resets.
If you are resetting a device you bought used, make sure the previous owner removed it from their account first. If they did not, you are not bypassing the lock. You are trying to reuse a device that is still tied to them.
That is a grey area legally.
For more on how we handle these ethical and legal considerations, our privacy policy outlines our commitment to responsible information.
A Simple Decision Guide
Here is a quick reference to help you figure out what to do right now. Your situation determines the path.
Image source: Bing (Web (fair-use with source credit))
Is the Chromebook personal or managed?
- Personal (you bought it, no admin sticker, no managed message on login): Use the recovery USB method. It works 100% of the time if you follow the steps.
- Managed (school, work, library, or any organization): Recovery mode will not free the device. Contact the IT admin. No shortcut exists.
Can you use developer mode?
- Device from 2019 or earlier: Developer mode might work without opening the device. Try the Ctrl+D method first.
- Device from 2020 or later: Developer mode is blocked by GBB protection. Stick with the recovery USB.
Do you have another computer available?
- Yes: Create the recovery USB. It is the most reliable method.
- No: You cannot use recovery mode without another computer. Borrow one from a friend or use a public library computer. You only need it for about 15 minutes.
Here is the complete decision flow
- Check if the device is managed. Look at the login screen for a managed message. Check for stickers. If managed, stop. Contact IT.
- If personal, get a USB drive (8 GB minimum). Use another computer to install the Chromebook Recovery Utility.
- Create the recovery image for your exact model.
- Enter recovery mode on the Chromebook. Insert the USB. Wait 10 to 15 minutes.
- Set up the device as new. Done.
That is the entire process. It works for the vast majority of personal Chromebooks.
Frequently Asked Questions
Can I factory reset a Chromebook without a password and without a USB drive?
No. You need a USB drive to create the recovery media. There is no built-in way to trigger a factory reset from the login screen without one.
The recovery mode requires an external drive with the OS image.
Will a factory reset remove the enrollment lock on a school Chromebook?
No. The enrollment lock is stored in a hardware-backed chip. Recovery mode wipes the operating system, but the chip retains the enrollment information.
As soon as the device connects to Wi-Fi, it re-enrolls automatically.
How long does the recovery USB method take?
The whole process takes about 20 to 30 minutes. Downloading the image takes 5 to 10 minutes. Writing it to the USB takes another 5 to 10 minutes.
The actual recovery on the Chromebook takes 10 to 15 minutes.
Can I use a Chromebook without a Google account after resetting it?
No. Chrome OS requires a Google account for setup. You can create a new account during the setup process if you have forgotten the original one.
You can also recover the old account through Google’s account recovery page.
What happens to my files when I factory reset?
All local files are permanently deleted. This includes downloads, documents saved to the Downloads folder, settings, and installed apps. Files stored in Google Drive are safe because they live in the cloud.
Sync them back after you sign in with your account.
Is there a way to recover files before resetting?
If you cannot sign in, you cannot access the local files. There is no way to extract them from the login screen. The only option is to boot into developer mode on older devices, which gives you a command line.
But that requires technical knowledge and it is not guaranteed to work on all models.
Will resetting fix a slow or crashing Chromebook?
Yes, in many cases. Recovery mode reinstalls the entire operating system. It removes corrupted files, broken updates, and malware.
If the issue is software-related, a recovery will almost certainly fix it. If the issue is hardware-related, such as a failing battery or damaged memory, it will not help.
Do I need to pay for any software or tools?
No. The Chromebook Recovery Utility is free. It is an official extension from the Chrome Web Store.
The USB drive costs money if you do not already have one, but the software itself is free.