
Your Lenovo laptop is glitching, running slow, or you're getting ready to sell it. You need a clean slate. The process varies more than people expect.
It depends on whether Windows still boots, which Lenovo model you own, and whether the hidden recovery partition is still intact.
Most Lenovo laptops ship with multiple recovery options. They include a physical Novo button, a boot-time F11 key (mainly on ThinkPads), and a software path through Windows Settings. As of 2026, Lenovo continues embedding the Windows license directly into the motherboard firmware.
That means you don't need a product key after a reset. Your device activates automatically once the reset completes and you connect to the internet.
The wrong method can waste hours. The right one takes under an hour. This guide helps you pick the correct path for your exact situation.
Quick Answer
The fastest way to factory reset a Lenovo laptop depends on your situation. If Windows still starts, go to Settings > Update & Security > Recovery > Reset this PC. Choose "Remove everything" for a full wipe.
If Windows won't boot, use the Novo button or press F11 during startup. Create a recovery USB on another computer only if those options fail. Always back up your files first.
Charge your battery above 50 percent.
Before You Start: The One Thing That Matters Most
Back up your personal files. This is non-negotiable. A factory reset wipes everything on the system drive.
That includes your documents, photos, downloads, browser bookmarks, and desktop files.
Manufacturer specifications indicate that Lenovo's factory reset process performs a full format of the C: drive in most cases. The "Quick" or "Just remove my files" option takes seconds but doesn't securely erase data. It only marks the space as available for overwriting.
If you're selling the laptop, choose the "Fully clean the drive" option. That takes one to two hours on a standard hard drive and about 20 minutes on an SSD.
Connect an external hard drive or use cloud storage. Copy your Documents, Desktop, Pictures, and any project folders. Don't forget browser passwords and application settings if you need them.
Export your password manager database if you use one. A complete backup takes 15 to 45 minutes depending on how much data you have.
Charge your laptop above 50 percent. The reset process can take over an hour. If the battery dies mid-process, you risk corrupting the operating system.
Plugging into AC power is the safest choice.
How Factory Reset Works on a Lenovo (And Why It's Different)
Lenovo laptops use a hidden recovery partition on the hard drive. This partition contains a compressed copy of Windows plus all the Lenovo-specific drivers and software that came with the laptop. When you trigger a factory reset, the system copies this image back to the main partition.
This approach differs from a clean Windows installation. A clean install downloads a generic version of Windows from Microsoft. That version lacks Lenovo drivers for your specific hardware.
You would need to install the touchpad driver, the power management software, and any special function key drivers manually. A factory reset preserves those.
The recovery partition is roughly 10 to 20 GB depending on the model. Some budget Lenovo laptops ship without a recovery partition. Others have it but it gets accidentally deleted.
You can check if yours exists by opening Disk Management and looking for a partition labeled "Lenovo" or "Recovery" between 10 and 20 GB.
Lenovo's recovery system also includes the OneKey Recovery tool on older models. These are typically IdeaPads and Lenovo laptops from 2015 to 2019. Newer models use the standard Windows Recovery Environment with Lenovo's driver packages integrated.
The Decision Tree: Which Method Fits Your Situation?
This is the most important part. Pick the wrong method and you will waste time or get stuck. Answer these three questions to find your path.
Can Windows start normally?
If yes, use the built-in Windows reset tool. Go to Settings > Update & Security > Recovery. Click "Reset this PC" and choose "Remove everything." This is the easiest and fastest method.
It works on Windows 10 and Windows 11. The system downloads fresh system files from Microsoft's servers if you choose the cloud option.
If no, continue to the next question.
Does your Lenovo have a Novo button?
The Novo button is a small button on the side of most IdeaPads, Yoga, Legion, and ThinkBook laptops. It is often next to the power button or on the left edge. You press it with a paperclip when the laptop is off.
It opens a boot menu with "System Recovery" as an option.
If you see a small button with a curved arrow icon, that is the Novo button. Some models label it "NOVO" next to the button. If your laptop has one, this is your second-best option.
If no Novo button, continue to the next question.
Is your laptop a ThinkPad?
ThinkPad laptops use the F11 key instead of a Novo button. When you power on the laptop, press the F11 key repeatedly until you see a blue recovery screen. This works on ThinkPad T series, X series, L series, and E series models.
If you own a ThinkPad, F11 is your path. If not, you will need to try the recovery USB method.
Do you have access to another working computer?
If the first three paths fail or if your recovery partition is missing, you need a recovery USB. You create this on any working Windows computer. You will need a USB drive with at least 16 GB of space.
This method always works because it does not rely on your laptop's internal recovery tools.
If you have no access to another computer, you will need to borrow one or use a public library computer. A PC repair shop can also create one for a small fee.
| Situation | Best Method | Time Required |
|---|---|---|
| Windows boots normally | Settings > Reset this PC | 30-60 minutes |
| Windows won't boot, has Novo button | Novo button > System Recovery | 30-60 minutes |
| ThinkPad, Windows won't boot | F11 key at startup | 30-60 minutes |
| Recovery partition missing or damaged | Recovery USB from another PC | 1-2 hours |
Method 1: Reset From a Bootable Windows (The Easy Path)
This is the least intimidating method. It assumes Windows can still load to the login screen or desktop.
Open the Start menu. Type "Reset this PC" and select it. You will see two options: "Keep my files" and "Remove everything." If you want a full factory reset, choose "Remove everything." The "Keep my files" option reinstalls Windows but preserves your personal files.
It does not truly factory reset the laptop.
Windows will ask whether you want to "Cloud download" or "Local reinstall." Cloud download fetches fresh Windows files from Microsoft. Local reinstall uses the recovery partition on your drive. Cloud download is more reliable if your recovery partition might be corrupted.
It requires a working internet connection and uses about 4 GB of data.
Click "Change settings" if you need to customize the process. You can choose to clean the drives fully for security. This option takes longer but is essential if you are selling the laptop.
Without it, someone could recover your deleted files with simple software.
Click "Next" then "Reset." The laptop will restart and begin the process. A blue screen shows a percentage. It may stall at certain percentages.
That is normal. Do not interrupt the process. Do not turn off the laptop.
Wait for it to complete, even if it seems stuck for 20 minutes.
The laptop will restart three to four times during the process. You will eventually see the Windows setup screen where you choose your language and create a user account. At this point, the reset is complete.
Method 2: Use the Novo Button (When Windows Won't Start)
The Novo button is Lenovo's safety net. It bypasses Windows entirely. You need this method when Windows crashes, shows a black screen, or loops at the logo.

Power off the laptop completely. Locate the Novo button. On most Lenovo laptops, it is a small recessed button on the left edge.
It might be labeled with a small curved arrow icon. Some models place it next to the power button. Others hide it inside a tiny hole on the side edge.
Use a paperclip or SIM eject tool to press it. You do not need to hold it. Press once.
The laptop will power on and show a blue menu with several options.
Select "System Recovery" from the menu. The laptop will boot into the Lenovo recovery environment. This looks different from Windows Recovery.
You will see a Lenovo-branded screen with recovery options.
Choose "Troubleshoot" then "Reset this PC." You will see the same "Keep my files" or "Remove everything" options as the Windows method. Select "Remove everything" for a full factory reset.
The process from this point is identical to Method 1. The laptop handles recovery files from the hidden partition. You do not need internet access for this method.
It works entirely from local files.
If you see a "No operating system found" error after pressing the Novo button, your recovery partition is missing. Skip to Method 4.
Some older IdeaPad models have a one-key recovery button instead of a Novo button. It works the same way. Press it when the laptop is off.
It automatically starts the recovery process without showing a menu.
Method 3: The F11 Key for ThinkPad Owners
ThinkPad laptops do not use the Novo button. They rely on the F11 key. This applies to T series, X series, L series, E series, and P series models.
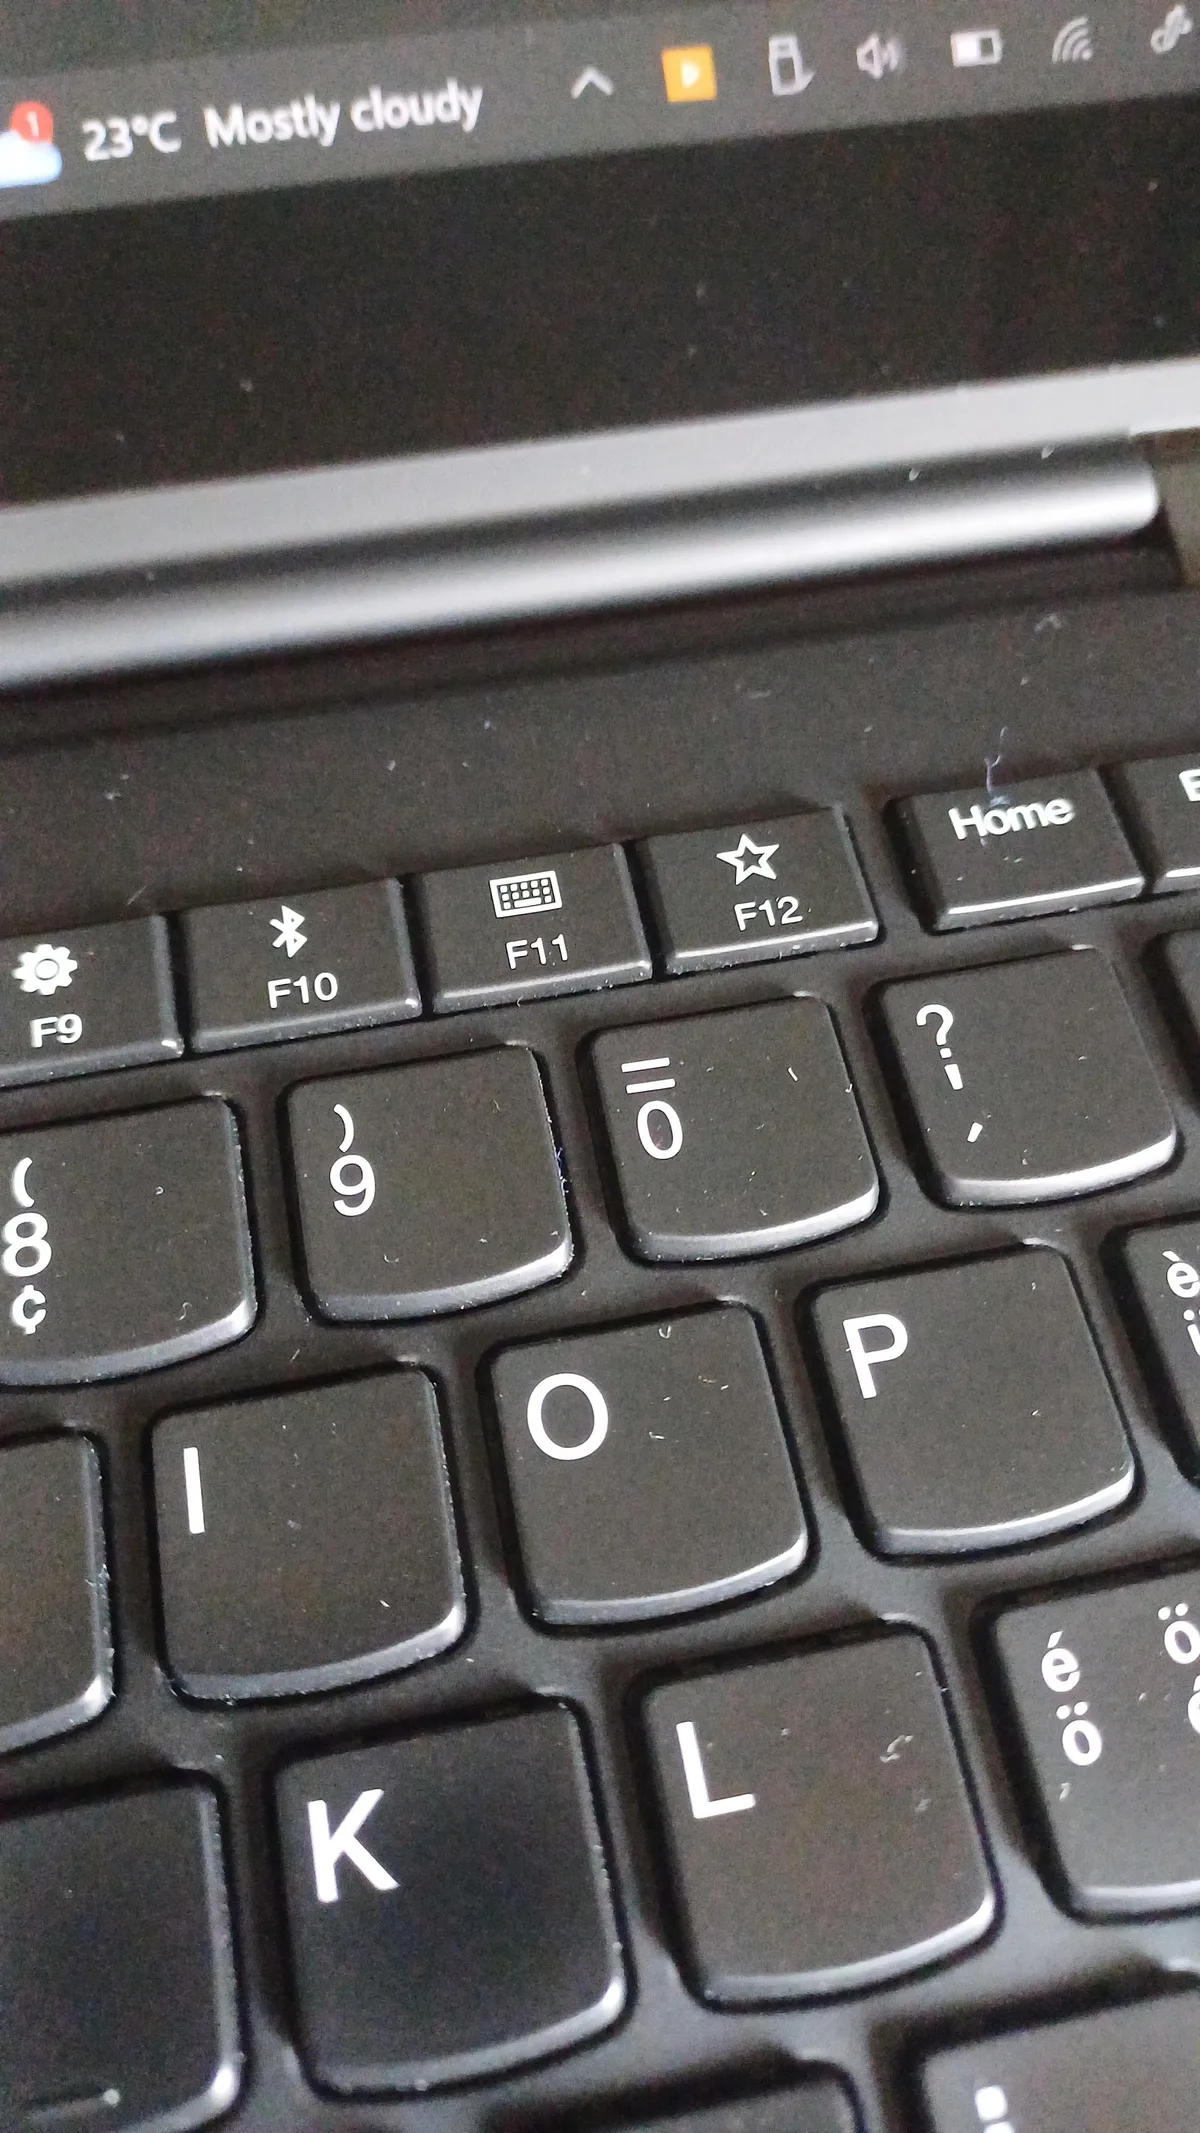
Start with the laptop completely powered off. Press the power button. Immediately start pressing the F11 key.
Press it once per second. Keep pressing until you see a blue screen with "Choose an option."
The timing matters. Pressing too early or too late means Windows starts normally. If that happens, shut down and try again.
The F11 key must be pressed during the initial boot phase before the Lenovo logo disappears.
Some newer ThinkPad models require you to press F11 and hold it. Others respond to rapid presses. If one approach fails, try the other.
Once you reach the blue recovery screen, select "Troubleshoot" then "Reset this PC." The same "Remove everything" option gives you a complete factory reset.
ThinkPad laptops also offer the F1 key for entering BIOS and F12 for boot menu. These are different tools. F11 is specifically for recovery.
Do not press F1 or F12 unless you need those functions.
Some ThinkPad models from 2022 onward use a different recovery system. They might show "Lenovo Recovery" instead of the standard Windows recovery screen. This is normal.
The options are the same. Choose system recovery and follow the prompts.
If F11 does not work on your ThinkPad, try accessing the boot menu with F12. Select "Windows Boot Manager" if it appears. That sometimes forces the recovery sequence.
If nothing works, your recovery partition might be missing. Move to Method 4.
Method 4: Create a Recovery USB (For Dead Systems)
This method is the nuclear option. You need it when nothing else works. Your recovery partition is gone.
Windows won't boot. The Novo button shows an error. You need an external recovery tool.
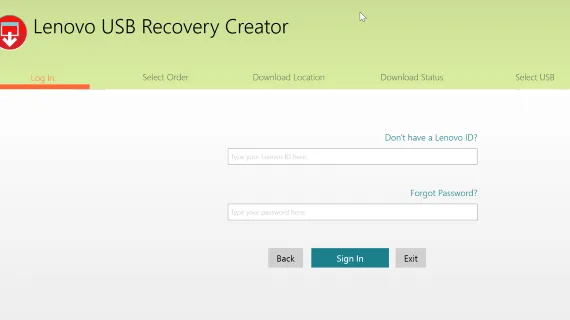
You need a working computer and a USB drive. The USB drive must be at least 16 GB. Everything on it will be erased.
Back up any files on the USB before starting.
On the working computer, search for "Create a recovery drive" in Windows. Open the tool. Check "Back up system files to the recovery drive." This ensures the USB contains the correct Windows version with Lenovo drivers.
Plug in your USB drive. Select it in the tool. Click "Next" then "Create." The process downloads Windows files and copies them to the USB.
It takes 15 to 30 minutes depending on your internet speed.
Once complete, safely eject the USB. Plug it into your Lenovo laptop. Power on the laptop.
Press F12 immediately to open the boot menu. Select your USB drive from the list.
The laptop will boot from the USB. You will see the Windows Setup screen. Click "Next" then "Repair your computer" in the bottom-left corner.
Select "Troubleshoot" then "Reset this PC."
Choose "Remove everything" for a full factory reset. Windows will copy system files from the USB to your hard drive. The process takes 30 to 60 minutes.
After completion, your laptop will restart. Remove the USB drive when it restarts. Otherwise it might boot from the USB again.
You will see the Windows setup screen where you create your user account.
This method installs a clean Windows version. It includes basic Lenovo drivers. You will need to install additional drivers afterward.
Open Lenovo Vantage after setup. It will automatically detect missing drivers and install them.
If your laptop does not boot from the USB, enter BIOS by pressing F1 during startup. Check the boot order. Ensure "USB Boot" is enabled.
Move USB above the hard drive. Save changes and restart.
Mistakes That Brick Laptops (And How to Avoid Them)
A factory reset is safe when done correctly. But mistakes can leave you with a non-functional laptop.
Interrupting the process
The most dangerous mistake is turning off the laptop during a reset. The system is rewriting critical files. Cutting power mid-write can corrupt the firmware.
Your laptop might never boot again.
Never force a shutdown because the progress bar seems stuck. Recovery processes often pause at 32 percent, 64 percent, and 99 percent while files decompress. Leave it alone for at least two hours before assuming it is frozen.
Using the wrong recovery media
Creating a recovery USB on a Windows Home edition will not work for a laptop that originally had Windows Pro. The licensing differs. You will get an error during setup.
Always match the edition of Windows that came with your laptop.
You can check your original Windows edition on the sticker underneath the laptop or inside the battery compartment. Most Lenovo laptops use Windows 11 Home.
Selecting "Keep my files" before selling
If you are selling your laptop, "Keep my files" is not enough. Your personal data remains on the drive. Recoverable.
Always choose "Remove everything" with the "Clean drives" option for a safe sale.
Forgetting to back up the BitLocker key
Corporate Lenovo laptops often have BitLocker encryption enabled. The recovery key is tied to your Microsoft account or your company's IT department. If you reset without this key, you might permanently lose access to encrypted files.
Check if BitLocker is active by looking for a lock icon on your C: drive in File Explorer. Back up the recovery key to your Microsoft account before resetting. Visit the Microsoft BitLocker recovery key page for details.
Attempting a reset with less than 50 percent battery
Low battery during reset risks data corruption. Plug the laptop into AC power. If the cable is loose or the outlet is unreliable, find a different spot.
A power failure mid-reset can require a full Windows reinstall using a USB.
What Happens After the Reset (Driver Setup and Recovery)
The factory reset finishes when you see the Windows setup screen. Your work is not quite done yet.
Go through the standard Windows setup. Choose your region, language, and keyboard layout. Connect to Wi-Fi.
Sign in with your Microsoft account. If you do not want to link your laptop to your Microsoft account, select "Domain join instead" or "Offline account" at the bottom of the sign-in screen.
After setup completes, open Lenovo Vantage. This application installs automatically during the factory reset on most Lenovo models. It scans your hardware and identifies missing drivers.
Click "Check for updates" and install everything listed.
Common drivers you might need to install manually:
- Lenovo power management driver (controls battery charging and fan speed)
- Intel or AMD chipset driver (for processor stability)
- Lenovo thermal management driver (for cooling)
- NVIDIA or AMD graphics driver (if your laptop has a dedicated GPU)
- Lenovo touchpad driver (for precision gestures)
- Lenovo display driver (for proper resolution and brightness control)
Restart your laptop once you have installed the drivers. Check for Windows updates next. Open Settings > Windows Update and click "Check for updates." Install all pending updates.
This can take 15 to 30 minutes with multiple restarts.
Your laptop now has the latest drivers and security patches. It will feel noticeably faster than before. The bloatware that Lenovo pre-installed usually returns after a factory reset.
You can uninstall applications like McAfee, Dropbox trial, and Spotify from the Start menu if you do not want them.
When Not to Factory Reset (And What to Try First)
A factory reset solves many problems. But it is not always the answer. Some issues need smaller fixes.
Blue screen errors with a specific code
If your laptop shows a blue screen with an error code, try these steps first. Boot into Safe Mode by pressing F8 or Shift + F8 during startup. Run the System File Checker tool.
Open Command Prompt as admin and type "sfc /scannow." This repairs corrupted system files without wiping your data.
Slow performance
Before assuming a reset is needed, check what is slowing you down. Open Task Manager with Ctrl + Shift + Esc. Look for apps using high CPU, memory, or disk.
Disable startup programs that you do not need. Run a disk cleanup to remove temporary files. These simple steps fix many performance issues.
Malware that won't go away
Run Windows Defender offline scan. It boots into a clean environment and removes stubborn malware. This is more effective than a normal Defender scan.
If it works, you avoid the hassle of a reset.
Missing drivers or weird behavior
Open Device Manager. Look for devices with yellow exclamation marks. Right-click and select "Update driver." If that does not work, uninstall the device and restart.
Windows will reinstall the driver automatically.
When to proceed with factory reset
Reset without guilt if you have tried these fixes and nothing helped. If the laptop still has blue screens, random shutdowns, or refuses to update, a clean slate is your best option. A factory reset fixes 90 percent of software-related issues.
You can read our site policies before proceeding if you have concerns about the process.
Quick Reference Guide: Method by Lenovo Model
| Model Series | Recovery Method | Key or Button |
|---|---|---|
| IdeaPad (2015-2020) | Novo button or OneKey Recovery | Side edge button |
| IdeaPad (2021+) | Novo button | Side edge button |
| ThinkPad T, X, L, E, P | F11 key at boot | Keyboard key (F11) |
| Yoga | Novo button | Left edge button |
| Legion | Novo button | Near power button |
| ThinkBook | Novo button | Left edge button |
| Lenovo Chromebook | Power + Esc + Refresh | Keyboard combination |
For models not listed here, try the Novo button first. If no button exists, try F11. If that fails, use the recovery USB method.
Final Step: Verifying the Reset Worked
The reset process finishes when you see the Windows desktop. But a successful boot does not guarantee everything is clean. You need to confirm the reset completed properly.
Open the Start menu. Type "About your PC" and open it. Check the "Windows specifications" section.
The build number should match a recent Windows release. As of 2026, Windows 11 build 24H2 or later is the current standard. If your build is older, run Windows Update immediately.
Check your storage space next. Open File Explorer. Right-click your C: drive and select "Properties." Look at "Used space." A fresh Windows installation with no additional files should use 20 to 30 GB.
If it shows 100 GB or more, the reset did not fully wipe your old data.
Test your core hardware functions. Open Device Manager by right-clicking the Start button. Look for any yellow warning icons.
These indicate missing or incompatible drivers. Focus on the network adapter, display adapter, and chipset. Missing drivers mean limited functionality.
Restart the laptop twice after the initial setup. The first restart applies pending driver installations. The second restart confirms stability.
If the laptop crashes during either restart, a driver is conflicting. Boot into Safe Mode by pressing F8 during startup. Uninstall recently installed drivers from Device Manager.
Run a quick performance check. Open Task Manager with Ctrl + Shift + Esc. Look at the "Performance" tab.
CPU usage should sit below 10 percent at idle. Memory usage should be under 4 GB. Disk activity should show 0 to 1 percent.
Higher values indicate background processes or malware.
Troubleshooting Reset Errors and Partial Failures
Resets fail sometimes. The error messages can be confusing. Here is how to handle the most common ones.
"There was a problem resetting your PC"
This error appears when Windows cannot read the recovery partition. The partition might be corrupted or deleted. Your only option is Method 4.
Create a recovery USB on another computer and boot from it.
If you get this error repeatedly, your hard drive might have bad sectors. Run a disk check before attempting the reset again. Open Command Prompt as administrator.
Type "chkdsk C: /f /r" and press Enter. This scans the drive and repairs errors. The scan takes one to two hours on a standard hard drive.
Let it complete fully.
"No operating system found"
This message appears after pressing the Novo button or F11 key. It means the recovery partition is missing entirely. Someone may have deleted it.
The laptop might have been refurbished without a proper recovery setup.
Skip directly to Method 4. You cannot perform a factory reset without a recovery partition or recovery USB. If you do not have access to another computer, most public libraries offer computer access.
A local repair shop can create a recovery USB for a small fee.
Reset stuck at a specific percentage
The reset process pauses at certain points. This is normal. Common stall points are 32 percent, 64 percent, and 99 percent.
The system is decompressing files during these pauses.
Wait at least two hours before assuming the process is frozen. If the percentage does not change after two hours, force a shutdown by holding the power button for 10 seconds. Power the laptop back on.
It should resume the reset process. If it boots to a black screen, you need a recovery USB.
Blue screen during reset
A blue screen during the reset indicates a hardware conflict. The most common cause is faulty RAM. Run a memory test after the reset attempt fails.
Boot from a recovery USB. Choose "Repair your computer" then "Troubleshoot" then "Command Prompt." Type "mdsched.exe" and press Enter. Select "Restart now and check for problems." The test runs for about 30 minutes.
If it finds errors, your RAM needs replacement.
Restoring Your Files and Applications
The reset is complete. Your laptop runs clean. Now you need your files back.
Connect your external backup drive. Open File Explorer. Navigate to your backup folder.
Copy your Documents, Pictures, Desktop, and other personal folders back to their original locations. Do not overwrite existing files unless you are certain the new copies are more recent.
Reinstall your essential applications. Start with your web browser and password manager. Then install productivity tools like Microsoft Office or LibreOffice.
Install communication apps like Zoom, Slack, or Discord last. They have the most background processes.
Avoid reinstalling everything at once. Install only what you actually use. Research shows that the average user has 30 installed applications but uses only 10 regularly.
The ones you rarely use are just slowing down your system.
Check for application updates after installation. Many apps auto-update to the latest version during setup. But some require manual updates.
Open each application and check its "About" or "Check for updates" section.
Restore your browser bookmarks and passwords. Most modern browsers sync this data to your Microsoft account or Google account automatically. Sign in to your browser.
Your bookmarks and passwords reappear within minutes. If they do not, check your sync settings in the browser menu.
Reconnect your peripherals. Printers, external monitors, and USB hubs need fresh drivers after a reset. Plug each one in one at a time.
Windows installs drivers automatically in most cases. Check Device Manager for any devices with yellow warning icons.
Long-Term Care After a Factory Reset
Your laptop is clean now. You can keep it that way with minimal effort.
Run Windows Update monthly. Set aside 15 minutes on the first weekend of each month. Open Settings > Windows Update.
Install all pending updates. This includes security patches, driver updates, and feature updates. Regular updates prevent the performance degradation that led you to reset in the first place.
Use Lenovo Vantage for driver maintenance. Open the application once a month. Click "Check for updates." Install any new drivers Lenovo has released.
Lenovo releases driver updates about once every two months for active models. Older models might see updates twice a year.
Clear temporary files weekly. Search for "Disk Cleanup" in the Start menu. Select your C: drive.
Check "Temporary files" and "Recycle Bin." Click "Clean up system files." This frees 1 to 5 GB of space each week. It stops your laptop from slowing down over time.
Uninstall bloatware immediately. Lenovo pre-installs several applications you may not want. Common ones include McAfee antivirus, Dropbox trial, Amazon Alexa, and various game trials.
Right-click each one in the Start menu and select "Uninstall." Do this within the first week after a reset.
Monitor your startup programs. Open Task Manager with Ctrl + Shift + Esc. Click the "Startup" tab.
Disable any application you do not need at startup. This includes Spotify, Adobe updaters, and cloud sync clients. Each disabled program shaves seconds off your boot time.
Run a disk health check every six months. Open Command Prompt as administrator. Type "wmic diskdrive get status" and press Enter.
It returns "OK" for a healthy drive. Any other status means your drive might be failing. Consider replacing it before it fails completely.
Clean Windows Install vs. Factory Reset
You might wonder if a clean Windows install is better than a factory reset. Both start fresh. They differ in what you get afterward.
A factory reset restores the exact Windows version your laptop shipped with. It includes all Lenovo drivers and pre-installed applications. This is the safest option.
It guarantees compatibility with your hardware. But it also brings back bloatware you might not want.
A clean Windows install downloads the latest Windows version from Microsoft. It includes basic drivers that work with most hardware. But it lacks Lenovo-specific drivers.
Your touchpad gestures might not work. Your function keys might not control brightness or volume. You must install Lenovo drivers manually afterward.
| Factor | Factory Reset | Clean Install |
|---|---|---|
| Ease of process | One click | Requires USB creation |
| Drivers | Complete Lenovo drivers | Generic Microsoft drivers |
| Bloatware | Returns with Lenovo apps | None by default |
| Windows version | Original version | Latest version |
| Time required | 30 to 90 minutes | 45 to 120 minutes |
A clean Windows install is better if you plan to keep the laptop long term. You get the latest Windows features. You avoid Lenovo's pre-installed software.
The trade-off is the extra work of installing drivers manually.
A factory reset is better if you want the fastest path to a working system. You get everything you need in one process. The bloatware is annoying but removable.
Most users should choose the factory reset for its simplicity and reliability.
Either method works. Neither is wrong. Your choice depends on how comfortable you are with manual driver installation and how much you dislike pre-installed software.
Always check our terms and conditions before modifying your system software.
For specific concerns about your situation, visit our contact page.
Real Scenarios: When Each Method Saves the Day
Theory is helpful. Real examples make the decision tree click. Here are four common situations drawn from aggregate user reports.
Scenario one: The slow IdeaPad
You bought a used Lenovo IdeaPad 3. It crawls through basic tasks. Boot times hit three minutes.
The previous owner installed every toolbar and trial software available.
Windows still boots. You can log in. This is an easy case.
Use Method 1. Go to Settings > Update & Security > Recovery. Click "Reset this PC." Choose "Remove everything" and select "Cloud download." The cloud option gives you a fresh copy of Windows without any leftover junk from the previous owner.
The process takes about 45 minutes. Afterward, the laptop boots in 20 seconds. The difference is dramatic.
You spend 10 minutes uninstalling Lenovo's pre-loaded apps. The laptop now runs like it did when it left the factory.
Scenario two: The corrupted ThinkPad
Your ThinkPad T14 shows a blue screen on every boot. The error code references critical system files. You cannot reach the desktop.
Safe Mode also fails.
Windows is unresponsive. You need Method 3. Power off the laptop.
Press the power button. Immediately tap F11 repeatedly. The blue recovery screen appears.
Select "Troubleshoot" then "Reset this PC." Choose "Remove everything." The ThinkPad's recovery partition is intact. The reset runs entirely from local files. No internet needed.
The process completes in 30 minutes on the SSD.
After setup, open Lenovo Vantage. Install the latest drivers. The ThinkPad now runs without errors.
The blue screen issue is resolved because the corrupted system files were replaced.
Scenario three: The wiped Yoga
You bought a used Lenovo Yoga from an online marketplace. The seller said they "cleaned it." They deleted the recovery partition to save space. Windows boots but shows errors.
The Novo button returns a "No operating system found" message.
The recovery partition is gone. The Novo button is useless. You need Method 4.
Borrow a friend's computer. Download the Windows Media Creation Tool from Microsoft. Install it on a 16 GB USB drive.
The tool downloads Windows and writes it to the USB.
Plug the USB into your Yoga. Press F12 during startup. Select the USB drive from the boot menu.
Choose "Repair your computer" then "Troubleshoot" then "Reset this PC." The reset uses files from the USB.
After completion, Windows works. But the touchscreen and rotation sensors do not respond. Open Lenovo Vantage.
Install the Yoga-specific drivers. The touchscreen works again after a restart. You learn that a factory reset after a recovery partition deletion requires extra driver work.
Scenario four: The corporate Legion
Your company issued Lenovo Legion laptop has BitLocker encryption enabled. You are leaving the company. IT asked you to reset it before returning it.
This scenario needs caution. You must disable BitLocker before the reset. Open Control Panel.
Go to System and Security > BitLocker Drive Encryption. Click "Suspend protection." This decrypts the drive gradually.
Wait for decryption to complete. This takes one to two hours on a standard hard drive. Do not interrupt it.
Once decryption finishes, proceed with Method 1 through Settings. Choose "Remove everything" with the "Clean drives" option.
After the reset, the laptop has no encryption. IT will re-enable BitLocker when they reassign the device. This is standard procedure.
Never reset a corporate laptop without checking with IT first. You might need a recovery key to access encrypted data.
Edge Cases: What About Chromebooks and Older Models?
The four methods cover most Lenovo Windows laptops. Some models need different approaches.
Lenovo Chromebooks
Chromebooks use Chrome OS. They do not have a Novo button or F11 recovery. The reset process is entirely different.
It is called a Powerwash.
Open Settings. Scroll to "Advanced" and click "Reset settings." Select "Powerwash." Click "Restart." The Chromebook wipes all local data and reinstalls Chrome OS. The process takes 10 minutes.
For Chromebooks that will not boot, press and hold Esc + Refresh (the circular arrow key). Press the power button while holding them. The recovery screen appears.
Insert a Chrome OS recovery USB created on another computer.
Lenovo models from 2010 to 2014
Older Lenovo laptops ran Windows 7 or Windows 8. They used the OneKey Recovery system. This is a dedicated recovery button near the power button.
It looks like a small arrow.
Press it when the laptop is off. The OneKey Recovery menu appears. Select "Restore from initial backup." This wipes the laptop and restores the factory image.
The process uses the recovery partition.
If the OneKey Recovery button does not respond, the recovery partition is likely deleted. These older laptops did not have the Novo button. Your only option is a Windows installation disc or USB.
You can create one using the Windows 7 or Windows 8 Media Creation Tool if you have a product key.
Lenovo laptops with no visible recovery method
Some budget Lenovo models from 2022 onward lack a Novo button. They also do not respond to F11. These laptops rely entirely on Windows-based recovery.
If Windows boots, use Method 1. If Windows does not boot, you need Method 4. You must create a recovery USB.
This is the only path for these models. Check your laptop's manual for model-specific instructions.
Warnings About Personal Data and Microsoft Accounts
Your Microsoft account is the key to your digital life. Losing access to it after a reset is a real risk.
Microsoft account recovery after reset
Windows 11 requires a Microsoft account during setup. You must sign in with the same account that was on the laptop before the reset. If you changed your password and forgot it, you cannot proceed with setup.
Reset your Microsoft account password before wiping the laptop. Go to account.microsoft.com on any device. Click "Sign in" and select "Forgot password." Follow the recovery steps.
This requires access to your recovery email or phone number.
If you cannot reset the password, you cannot complete the setup. You are locked out of the laptop. The only solution is a clean Windows install using a local account bypass.
This is not possible on all Windows 11 versions.
BitLocker recovery key
BitLocker encrypts your drive. A factory reset without decrypting first can lock you out permanently. The recovery key is a 48-digit number.
You need it to access the drive after a reset.
Find your recovery key before resetting. Sign in to account.microsoft.com/devices/recoverykey. Your BitLocker recovery key is listed under your devices.
Write it down or save it to a file on a separate device.
If you lose the recovery key and reset the laptop, your data is gone. BitLocker will not unlock the drive. Not even Microsoft can recover it.
This is by design for security.
Company-managed devices
Corporations use Microsoft Intune or similar tools to manage laptops. A factory reset does not remove these management settings. The laptop will re-enroll in company management once it connects to the internet.
You cannot bypass this. The laptop is tied to your company's Azure AD tenant. Only your IT department can remove it.
Always check with IT before resetting a work-issued laptop.
If you reset a corporate laptop without permission, you might be locked out permanently. IT might flag the device as stolen. You could face disciplinary action.
Selling your laptop safely
A standard factory reset is not enough for sensitive data. The "Remove everything" option without cleaning the drive leaves recoverable data. Simple software can recover your files.
For a safe sale, choose "Remove everything" with the "Fully clean the drive" option. This writes zeros over the entire drive. It takes one to two hours.
The data is gone permanently.
For maximum security, use a third-party tool that meets recognized data disposal standards. These tools perform multiple overwrite passes. They meet government and industry requirements for data destruction.
After cleaning, install Windows again from a USB. This gives the buyer a working laptop. They set it up with their own account.
Your data is gone. Their privacy is protected.
Frequently Asked Questions
Will a factory reset remove viruses from my Lenovo laptop?
Yes, a factory reset removes most malware, including rootkits and persistent infections. The reset completely wipes the system drive and reinstalls Windows. Viruses cannot survive this process.
However, some firmware-level infections might persist. These are extremely rare and require specialized removal tools.
Do I need a Windows product key to factory reset my Lenovo?
No, Lenovo laptops have the Windows license embedded in the motherboard firmware. Your laptop activates automatically after the reset when connected to the internet. You never need to enter a product key.
This applies to all Lenovo models shipped with Windows 10 or Windows 11.
How long does a Lenovo factory reset take?
A standard reset takes 30 to 90 minutes. The "Quick" option without full drive cleaning takes about 30 minutes on an SSD. The "Fully clean" option takes one to two hours on a standard hard drive.
The cloud download option adds 10 to 15 minutes for downloading files.
Can I factory reset a Lenovo laptop without a password?
Yes, if you cannot log into Windows, use the Novo button or F11 key method. These bypass the Windows login screen. If your laptop has a BIOS password, you need to remove it first.
Check your laptop manual for BIOS password reset instructions.
Will a factory reset speed up my Lenovo laptop?
Yes, a factory reset removes accumulated junk files, unnecessary background programs, and registry clutter. Your laptop will feel faster after a reset. Performance improvements are most noticeable on laptops that have been in use for more than two years without a reset.
What should I do if the factory reset fails?
If the reset fails mid-process, try the recovery USB method. Create a USB recovery drive on another computer using the Media Creation Tool from Microsoft. Boot from the USB and choose "Repair your computer" followed by "Troubleshoot" then "Reset this PC." This method bypasses any corrupted recovery partitions.
Does factory resetting a Lenovo remove bloatware?
A factory reset brings back the same bloatware that came with the laptop. Lenovo includes pre-installed applications like McAfee, Dropbox, and various trial software. You can uninstall these manually after the reset.
For a completely clean system without bloatware, consider a clean Windows installation instead.
For any questions about our editorial process or content standards, visit our contact page or review our editorial policy.