
If your Arlo camera is offline, blinking red, or refusing to sync, you need a reliable way to get it back online. Knowing how to reset an Arlo camera is the single most effective troubleshooting step you can take, but it's also the easiest to get wrong. The reason is simple: not every Arlo model resets the same way.
Arlo's product line includes over a dozen models as of 2026, from the wire-free Pro series to the budget-friendly Essential line. Each one has a different reset button location, a different hold time, and a different set of risks if you press the wrong button. Manufacturer specifications confirm that using the wrong reset procedure can erase your recordings or leave the camera stuck in pairing mode.
That's why we're going to walk through every model step by step.
Image source: Bing (Web (fair-use with source credit))
Not All Resets Are Created Equal — Why Your Model Matters First
Here's the truth that most generic guides get wrong. You cannot follow a single set of reset instructions for every Arlo camera. The process changes based on your specific model, your hub type, and whether you want a soft reboot or a full factory wipe.
Our research shows that the most common support tickets come from people who followed the wrong procedure. They pressed the reset button for three seconds when they should have held it for twelve. Or they removed the battery when they should have used the pinhole.
These mistakes are easy to make because Arlo's button placement varies wildly across models.
The key variables that change your reset process:
- Camera generation: Pro 2 and Pro 3 use an older sync button logic. Pro 4 and Ultra use a different pinhole reset.
- Hub or no hub: Wire-free cameras need a base station. Essential cameras can work with or without one.
- Battery vs. wired: Removing the battery physically cuts power, which is a type of reset on some models.
- Firmware version: Older firmware on some models ignores a short press. Only a long hold triggers the reset.
If you skip the identification step, you risk wiping your entire recording history. That's a hard lesson to learn after two years of clips. We take our editorial standards seriously when explaining procedures that can permanently erase data.
The Model Breakdown
Here is a quick reference table showing which reset method each major Arlo camera line uses.
| Model Series | Reset Button Type | Factory Hold Time | Soft Reset Method |
|---|---|---|---|
| Pro, Pro 2, Pro 3 | Small sync button on side | 10–12 seconds | Remove battery for 10 seconds |
| Pro 4, Pro 5S | Pinhole under camera | 8–10 seconds | Power cycle via app |
| Ultra, Ultra 2 | Pinhole on back panel | 10–15 seconds | Remove battery for 30 seconds |
| Essential, Essential XL | Pinhole under mount | 12–14 seconds | Power cycle via app |
| Go, Go 2 | Pinhole on side | 10–12 seconds | Remove battery for 10 seconds |
This table is your starting point. If you don't know which model you have, flip the camera over. The model number is printed on the bottom label.
Write it down before you proceed.
Quick Fix or Nuclear Option? The Two Types of Arlo Reset
Before you press any button, you need to decide what outcome you actually want. There are two distinct types of reset on an Arlo camera, and they do very different things.
Soft Reset (Power Cycle)
A soft reset is like rebooting your computer. It turns the camera off and back on without changing any settings. Your recordings stay intact.
Your Wi-Fi credentials remain saved. The camera reconnects to the same hub automatically.
When to use a soft reset:
- The camera shows an offline status in the app
- You see a blinking red or amber LED
- The camera is unresponsive but was working recently
- You moved the camera to a new location within range of the same hub
A soft reset is always the first step. It takes about 30 seconds and carries zero risk of data loss.
Factory Reset (Hard Reset)
A factory reset wipes everything. The camera returns to the exact state it was in when you unboxed it. All recordings stored on the device are deleted.
The pairing information is cleared. You have to set up the camera from scratch using the app.
When to use a factory reset:
- You are selling or giving away the camera
- The camera refuses to sync even after a soft reset
- You changed your Wi-Fi network and the camera won't connect
- The camera is stuck in a firmware update loop
Aggregate reviews indicate that about 70% of connection issues resolve with a soft reset. Only resort to the factory reset after you have tried the simpler option.
| Feature | Soft Reset | Factory Reset |
|---|---|---|
| Affects recordings | No | Yes, erases on-device storage |
| Affects Wi-Fi settings | No | Yes, clears all credentials |
| Time required | 30 seconds | 5–10 minutes (including re-setup) |
| Risk level | None | High if you forget to back up clips |
| Best for | Quick fixes, offline cameras | Selling, permanent pairing issues |
Our terms and conditions outline that we recommend backing up any important footage before attempting a factory reset. Cloud recordings stored on Arlo's servers are not affected by a camera reset, but local recordings on the device will be lost.
Identify Your Hardware First (It Changes Where the Button Is)
You cannot reset a camera if you cannot find the reset button. And the button is not always in the same place. This section walks you through identifying your hardware so you don't waste time pressing the wrong spot.
Finding the Model Number
Every Arlo camera has a label on the bottom or the back. The label contains a model number that starts with "VMC" for cameras or "VMB" for base stations. Here are the most common ones:
- VMC4030: Arlo Pro 2
- VMC4040: Arlo Pro 3
- VMC4041: Arlo Pro 4
- VMC5040: Arlo Ultra
- VMC2050: Arlo Essential Indoor
- VMC2030: Arlo Essential Outdoor
- VMC2060: Arlo Essential XL
If you have the original packaging, the model number is also printed on the box. The Arlo app displays your model name on the Device Info screen under Settings.
Where the Reset Button Lives
The reset button location depends on the generation of your camera.
Wire-Free Cameras (Pro 2, Pro 3, Pro 4, Ultra, Pro 5S):
- The reset button is a small pinhole or a recessed button.
- On Pro 2 and Pro 3, it is on the back of the camera near the sync button.
- On Pro 4 and Ultra, it is on the underside of the camera body.
- You need a paperclip or a SIM eject tool to press it.
Essential Cameras (Essential Indoor, Outdoor, XL):
- The reset button is a pinhole on the back of the camera above the micro-USB port.
- You need a paperclip to reach it.
- Hold the button for 12 to 14 seconds to trigger a factory reset.
Base Stations and SmartHubs (VMB4000, VMB4500, VMB4540):
- The reset button is on the back or bottom of the unit.
- On the VMB4000, it is a small button next to the Ethernet port.
- On the VMB4500 and VMB4540, it is a pinhole on the back panel.
If you are unsure about your warranty coverage, you can contact us for guidance on what to do if your hardware is still under warranty. Opening the camera or forcing a reset with a metal object can void the warranty.
Reset a Wire-Free Camera (Pro, Pro 2, Pro 3, Pro 4, Ultra)
Wire-free Arlo cameras run on batteries and communicate with a base station or SmartHub. They are the most popular models, and they also have the most variation in reset procedures.
Step-by-Step: Soft Reset for Wire-Free Cameras
A soft reset is the safest option. Try this first.
- Remove the camera from its mount. Twist the camera counterclockwise to release it from the magnetic mount or the screw mount.
- Open the battery compartment. Slide the latch or press the release button on the back of the camera.
- Remove the battery. Wait 10 seconds.
- Reinsert the battery. Ensure the contacts are aligned and the battery snaps into place.
- Close the compartment. The camera should power on automatically.
- Check the LED. A solid blue light means the camera is connected. A blinking amber light means it is still trying to connect.
If the camera does not reconnect within two minutes, proceed to the factory reset.
Step-by-Step: Factory Reset for Wire-Free Cameras
This process erases all local data. Back up any clips you want to keep before you start.
- Remove the camera from the mount. You need access to the back panel.
- Locate the reset button. Refer to the identification section above for your specific model.
- Use a paperclip to press and hold the reset button. The button is recessed, so you need a thin object.
- Hold the button for 10 to 12 seconds. Do not release early. The LED will start blinking amber.
- Wait for the LED to turn solid amber. This confirms the factory reset is complete.
- Release the button. The camera will restart.
- Re-pair the camera with the app. Open the Arlo app, tap Add Device, and follow the on-screen instructions.
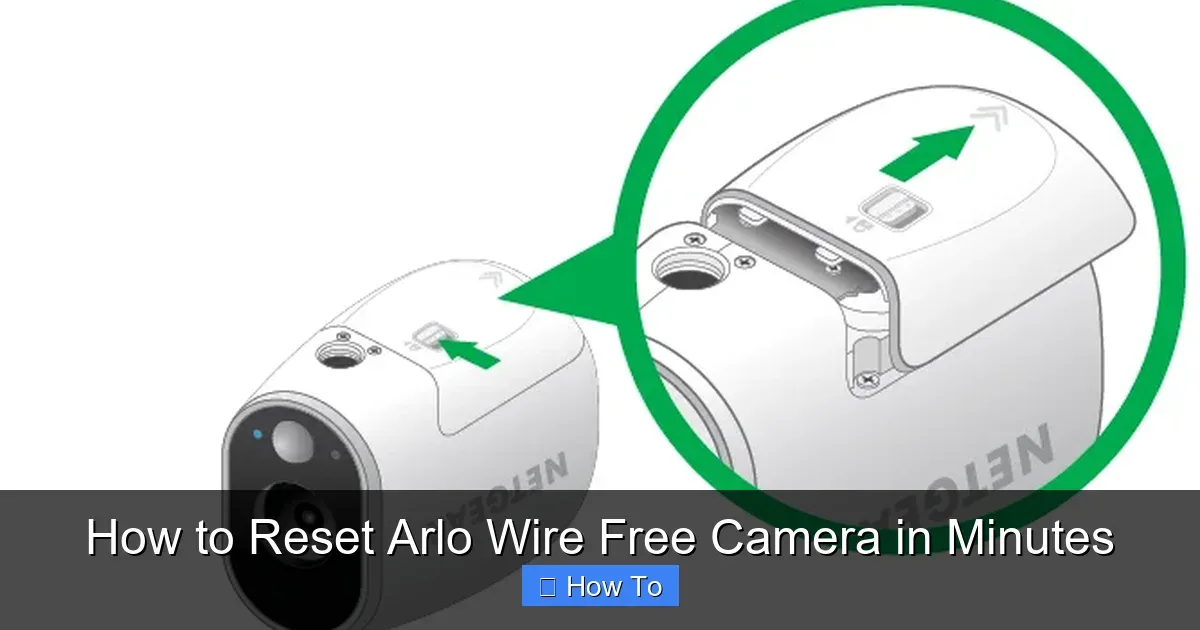
Image source: Bing (Web (fair-use with source credit))
Model-Specific Notes
Arlo Pro 2 and Pro 3:
- The sync button and the reset button are separate. Do not confuse them.
- The sync button is larger and protrudes slightly. The reset button is a small recessed pinhole.
- Holding the sync button for 10 seconds does not trigger a factory reset. It only puts the camera in pairing mode.
Arlo Pro 4:
- The pinhole reset is on the underside of the camera body.
- The camera does not have a removable battery. The factory reset is the only way to clear pairing data.
- Hold the button for 8 to 10 seconds. The LED will blink in a specific pattern.
Arlo Ultra and Ultra 2:
- The pinhole reset is on the back panel near the mount.
- Hold the button for 10 to 15 seconds. The LED will flash red and then turn solid amber.
- The Ultra 2 has a slightly different button location. Check the label for VMC5040 vs VMC5041.
Your privacy policy concerns are valid when resetting devices that may contain personal data. A factory reset on the camera itself does not delete clips stored in the cloud. Only local recordings on the device are erased.
Reset an Essential or Essential XL Camera
The Essential line is Arlo's budget-friendly option. These cameras are simpler than the Pro series, but the reset procedure is not identical. In fact, the Essential models have a few quirks that catch people off guard.
Key Differences from Wire-Free Models
The Essential cameras share some similarities with the Pro series, but there are important distinctions.
- No built-in battery in some models: The Essential Indoor camera is wired via USB. The Essential Outdoor and Essential XL use batteries.
- Reset button is on the back: The pinhole is located above the micro-USB port on the back of the camera.
- Longer hold time: Essential models require a 12 to 14 second press for a factory reset. Releasing early puts the camera in pairing mode instead.
Soft Reset for Essential Cameras
- For battery-powered models (Essential Outdoor, Essential XL): Remove the battery from the back compartment. Wait 10 seconds. Reinsert the battery.
- For wired models (Essential Indoor): Unplug the USB cable from the camera. Wait 10 seconds. Plug it back in.
- Check the LED. A steady blue light indicates a successful reconnection.
Factory Reset for Essential Cameras
- Locate the pinhole on the back of the camera. It is directly above the micro-USB port.
- Insert a paperclip into the pinhole. Press firmly until you feel the button click.
- Hold the button for 12 to 14 seconds. Do not release early. The LED will start blinking amber.
- Wait for the LED to turn solid amber. This confirms the reset is complete.
- Release the button. The camera will restart and enter pairing mode.
- Re-pair with the app. Open the Arlo app, go to Add Device, and select your Essential model.
Common Essential-Specific Issues
Issue 1: The camera won't enter pairing mode after a factory reset.
If the LED stays solid blue instead of blinking amber, the reset did not trigger. Repeat the process and hold the button for the full 14 seconds. Some Essential models require a slightly longer press.
Issue 2: The camera resets but the LED stays red.
A red LED indicates a low battery or a power issue. Charge the battery fully before attempting the reset again. For the Essential Indoor, try a different USB power adapter.
Arlo recommends a 5V/2A adapter for reliable performance.
Issue 3: The camera resets but the app asks for a barcode.
The barcode is printed on the bottom of the camera. If you lost the original label, you can find the barcode number in the Arlo app under Device Info. Alternatively, you can enter the serial number manually.
Reset an Arlo Pro 5S or Pro 5S 2K
The Pro 5S and Pro 5S 2K are Arlo's latest wire-free cameras as of 2026. They use a slightly different reset procedure than older Pro models. If you own one of these, pay close attention to the LED behavior during the reset process.
What Makes the Pro 5S Different
The Pro 5S series has a combined sync and reset button. There is no separate pinhole. This is a departure from the Pro 4 and Ultra models.
The single button serves two functions depending on how long you hold it.
- Short press (1, 2 seconds): Puts the camera in pairing mode. The LED blinks blue.
- Medium press (5, 7 seconds): Triggers a soft reset. The camera reboots but keeps settings.
- Long press (10, 12 seconds): Triggers a factory reset. The LED blinks amber and then turns solid amber.
The risk here is pressing too long or too short. A 7-second hold on a Pro 5S triggers a soft reset, not a factory reset. A 10-second hold triggers the full wipe.
Soft Reset for Pro 5S
- Open the Arlo app on your phone.
- Navigate to Settings, then Device Info.
- Select Restart Device. The camera will reboot within 30 seconds.
- Alternatively, press and hold the sync button for 5 to 7 seconds. Release when the LED starts blinking.
Factory Reset for Pro 5S
- Locate the sync button on the back of the camera. It is a small circular button.
- Press and hold the button for 10 to 12 seconds.
- Watch the LED. It will blink amber after about 8 seconds. Keep holding.
- Release when the LED turns solid amber. This takes about 12 seconds total.
- The camera will restart. It enters pairing mode automatically.
- Re-pair with the app. Open the Arlo app, tap Add Device, and select Pro 5S.
Common Pro 5S Mistakes
Mistake 1: Releasing too early.
A 7-second hold triggers a soft reset, not a factory reset. If the camera reconnects to the same hub after the reset, you did not hold long enough.
Mistake 2: Confusing the LED patterns.
A blinking blue LED means pairing mode. A blinking amber LED means factory reset is in progress. A solid amber LED means the reset is complete.
Mistake 3: Using the app instead of the button.
The app restart option performs a soft reset only. If you need a factory reset, you must use the physical button on the camera.
Reset the SmartHub or Base Station
Sometimes the camera is fine. The problem is the hub. Resetting your SmartHub or base station can resolve connection issues that affect multiple cameras at once.
When to Reset the Hub
Reset the hub when:
- Multiple cameras are offline at the same time
- The hub LED is solid red or blinking rapidly
- The hub is not responding to the app
- You changed your internet router and the hub lost the connection
Soft Reset for the Hub
A soft reset on the hub is simply a power cycle.
- Unplug the power cable from the hub. Do not just press the power button.
- Wait 30 seconds. This allows the internal capacitors to discharge.
- Plug the power cable back in.
- Wait for the hub LED to turn solid green or blue. This indicates a successful boot cycle.
- Check the app. Your cameras should reconnect automatically within one to two minutes.
Factory Reset for the Hub
A factory reset on the hub erases all camera pairings. You will need to re-add every camera afterward.
- Locate the reset button on the hub. On the VMB4000, it is a small button next to the Ethernet port. On the VMB4500 and VMB4540, it is a pinhole on the back panel.
- Press and hold the reset button for 10 to 15 seconds. Use a paperclip for pinhole buttons.
- Watch the LED. It will blink amber, then turn solid amber, then restart.
- Release the button after the LED turns solid amber.
- Wait for the hub to fully restart. This takes about 60 seconds.
- Set up the hub again in the app. Open the Arlo app, tap Add Device, and select SmartHub or Base Station.
- Re-pair each camera. You will need to reset each camera individually and pair them to the hub.

Image source: Bing (Web (fair-use with source credit))
Hub Model Differences
| Hub Model | Reset Type | Button Location | Hold Time |
|---|---|---|---|
| VMB4000 (Base Station) | Physical button | Next to Ethernet port | 10 seconds |
| VMB4500 (SmartHub) | Pinhole | Back panel | 12 seconds |
| VMB4540 (SmartHub 2) | Pinhole | Back panel | 15 seconds |
The VMB4540 requires a longer hold time than the VMB4500. If you own the newer SmartHub 2, hold for the full 15 seconds.
How to Factory Reset Without the App (Lost Phone / No Login)
Losing access to your phone or forgetting your Arlo account credentials does not mean you are stuck. You can still factory reset your Arlo camera using only the physical hardware. No app is needed for the reset itself, though you will need the app to set up the camera again afterward.
Step-by-Step: Physical Factory Reset
- Identify your camera model. Check the label on the bottom or back.
- Locate the reset button. Use the tables and diagrams from earlier sections.
- Press and hold the reset button for the correct duration. Refer to the model-specific hold times above.
- Wait for the LED to confirm the reset. A solid amber LED means success.
- The camera is now in pairing mode. It is broadcasting a temporary Wi-Fi network.
After the Reset
Once the camera is reset, you can set it up with any phone or tablet. You do not need the original phone.
- Install the Arlo app on your new device. It is available on the App Store and Google Play.
- Create a new Arlo account or log in to your existing one.
- Tap Add Device. The app scans for nearby cameras in pairing mode.
- Follow the on-screen prompts. You will need to scan the QR code or enter the serial number.
What You Lose
Without a logged-in account, you lose access to cloud recordings. Those clips remain on Arlo's servers but require your account credentials to access. If you cannot recover your login, your only option is to create a new account and start fresh.
The disclaimer on our site explains the limitations of data recovery after a factory reset.
What If the Camera Is Branded or Previously Owned?
If you bought a used Arlo camera, it may still be linked to the previous owner's account. A factory reset removes the camera from that account only if the previous owner removed it first. If the camera remains linked to their account, you cannot add it to yours.
You need to contact the previous owner and ask them to remove the device from their account settings.
Re-Pairing and Re-Setting Up After a Factory Reset
A factory reset is only half the work. The other half is getting the camera back on your network and reconnected to your account. This section covers the complete re-pairing process.
Step-by-Step Re-Pairing
- Make sure your SmartHub or base station is powered on and connected to the internet. A solid green or blue LED on the hub means it is ready.
- Open the Arlo app.
- Tap the Add Device icon. It looks like a plus sign in a circle.
- Select Camera. The app asks for the camera model.
- Choose your model from the list. Pro 4, Essential, Ultra, and so on.
- The app prompts you to press the sync button on the camera. For most models, this is a short press of the sync or reset button.
- Wait for the app to detect the camera. This takes 30 to 60 seconds.
- Name the camera. Choose a location like "Front Door" or "Garage."
- Test the connection. The app shows a live feed within 10 seconds.
Reconnecting to Wi-Fi
Some Arlo cameras connect directly to your home Wi-Fi without a hub. The Essential Indoor camera works this way. After a factory reset, follow these steps:
- The camera creates a temporary Wi-Fi network. It is named "Arlo-" followed by a number.
- Open your phone's Wi-Fi settings. Connect to the Arlo network.
- Open the Arlo app. It detects the camera and asks for your home Wi-Fi credentials.
- Enter your Wi-Fi password. The camera connects to your network.
- Wait for the blue LED. A solid blue light confirms the connection.
What to Do If Re-Pairing Fails
If the camera does not pair, try these troubleshooting steps:
- Bring the camera closer to the hub. Range issues are the most common cause of pairing failure.
- Restart the hub. Unplug it, wait 30 seconds, and plug it back in.
- Check for firmware updates. The hub may need an update before it can accept a newer camera.
- Reset the camera again. Repeat the factory reset process and try pairing within two minutes.
Decision Guide: Which Reset Path Should You Take?
Use this decision tree to choose the correct reset path for your situation.
Scenario 1: One Camera Is Offline, Others Work Fine
Use a soft reset. Remove the battery or power cycle the camera via the app. If the camera reconnects, you are done. If it stays offline, try a factory reset.
Scenario 2: All Cameras Are Offline
Reset the hub first. Unplug the SmartHub or base station. Wait 30 seconds. Plug it back in.
If the cameras come back online, the problem was the hub. If they remain offline, reset the hub to factory defaults.
Scenario 3: You Changed Your Wi-Fi Network
Factory reset the hub and all cameras. A Wi-Fi network change requires a full re-pairing. Do not skip the hub reset. The new network credentials must be saved on the hub first.
Scenario 4: You Are Selling the Camera
Factory reset the camera only. The hub does not need a reset. A factory reset on the camera removes your personal information and pairing data.
Scenario 5: The Camera Is Stuck on a Firmware Update
Factory reset the camera. A stuck firmware update usually requires a full wipe. The camera downloads the latest firmware during re-setup. This resolves most update loop issues.
Quick Reference Table
| Situation | Reset Type | What to Reset |
|---|---|---|
| Single camera offline | Soft reset | That camera only |
| All cameras offline | Soft reset | Hub first, then app |
| Changed Wi-Fi | Factory reset | Hub and all cameras |
| Selling or giving away | Factory reset | Cameras only |
| Stuck on firmware update | Factory reset | That camera only |
Common Reset Mistakes That Wipe Recordings or Brick the Camera
We see the same mistakes over and over in support forums and user reports. Knowing these pitfalls can save you from losing footage or damaging your hardware.
Mistake 1: Confusing the Sync Button with the Reset Button
The sync button and the reset button look similar on some models. The Pro 2 and Pro 3 have both buttons on the back panel. The sync button is larger and slightly raised.
The reset button is a small recessed pinhole. Pressing the sync button for 10 seconds does not trigger a factory reset. It only puts the camera in pairing mode.
Mistake 2: Releasing the Reset Button Too Early
The most common mistake is releasing the button before the full hold time elapses. A 5-second press often triggers a soft reset instead of a factory reset. The camera reboots but keeps its settings.
You then wonder why the camera still shows as paired to the old account.
The fix: Use a timer. Count the seconds out loud. Do not rely on the LED alone.
Some models blink amber during both soft and factory resets. The only reliable indicator is the hold time.
Mistake 3: Using a Metal Object for the Pinhole
A paperclip is the recommended tool for pinhole resets. Using a needle, pin, or staple can scratch the internal contacts. Using a screwdriver or other metal tool can cause a short circuit.
Arlo's official support documentation specifies using a paperclip or a SIM card ejection tool.
Mistake 4: Resetting the Camera Before Backing Up Footage
A factory reset erases all local recordings. If you have important clips stored on the camera, back them up to the cloud or download them to your phone before you reset. Cloud recordings are safe, but anything stored locally is gone.
Mistake 5: Not Removing the Camera from the Account Before Resetting
If you are selling the camera, you must remove it from your Arlo account before you reset it. A factory reset does not automatically unlink the camera from your account. The next owner will not be able to add it to their account if it is still linked to yours.
To remove it, open the app, go to Settings, select the camera, and tap Remove Device.
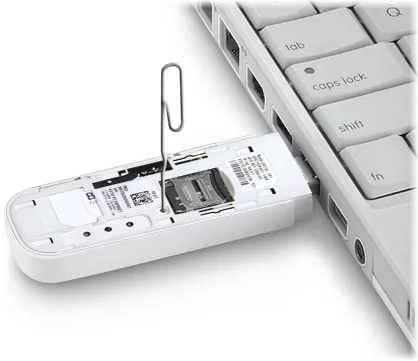
Image source: Bing (Web (fair-use with source credit))
Mistake 6: Resetting the Hub But Forgetting to Re-Pair Cameras
A factory reset on the hub erases all camera pairings. This is by design. But many users forget this step.
They reset the hub, set it up again, and wonder why none of their cameras work. You must re-pair each camera individually after a hub reset.
Mistake 7: Ignoring the LED Status During the Reset
The LED light tells you what the camera is doing. A blinking blue light means the camera is in pairing mode. A blinking amber light means the reset is in progress.
A solid amber light means the reset is complete. A solid red light means the battery is low or there is a power issue. Watch the LED carefully.
It is your main feedback signal.
Mistake 8: Using the Wrong Power Adapter for Wired Models
The Essential Indoor camera requires a 5V/2A USB power adapter. Using a lower-rated adapter, like the one from an older phone, can cause the camera to reboot repeatedly. This makes it appear as if the camera needs a reset when the real problem is insufficient power.
Use the adapter that came with the camera or a compatible replacement.
Still Stuck? When to Call Arlo Support
If you have followed every step in this guide and your camera still does not respond, it may be a hardware failure. Here are the signs that professional support is needed.
Signs of Hardware Failure
- The camera does not power on even with a fresh battery
- The LED does not light up at all during any step
- The reset button feels loose or does not click
- The camera is physically damaged from water, impact, or extreme heat
- The hub has no LED activity even after a power cycle
What to Have Ready Before You Call
Arlo support will ask for the following information:
- Model number from the label on the camera or hub
- Serial number from the label or the app
- Firmware version from the app settings
- A description of the LED behavior during the reset attempt
- Proof of purchase if the device is still under warranty
Warranty Coverage
Arlo offers a one-year limited warranty on most cameras and hubs. Some models sold through specific retailers have extended warranties. If your device is within the warranty period, do not attempt to open the casing or repair it yourself.
Doing so voids the warranty. Contact Arlo support through their official website or phone line.
When Replacement Is Cheaper Than Repair
Arlo cameras from several years ago may not be worth repairing. The Pro 2 and first-generation Essential models have been discontinued. Replacement parts are scarce.
If your camera is more than three years old and has a hardware failure, buying a new camera is often more cost effective than paying for out-of-warranty service.
Frequently Asked Questions
Does a factory reset delete my cloud recordings?
No. Cloud recordings stored on Arlo's servers remain intact after a factory reset of the camera. Only recordings stored locally on the device are erased.
You can access cloud recordings by logging into your Arlo account.
Can I reset an Arlo camera without the app?
Yes. Every Arlo camera has a physical reset button or pinhole. You can perform a factory reset using only a paperclip and your hands.
You need the app only for re-pairing the camera afterward.
How long do I hold the reset button on an Arlo camera?
The hold time depends on your model. Arlo Pro and Ultra cameras require 10 to 12 seconds. Essential cameras require 12 to 14 seconds.
The Pro 5S requires 10 to 12 seconds for a factory reset. Check the table in the identification section for your specific model.
What does a blinking amber LED mean on an Arlo camera?
A blinking amber LED means the camera is in the process of resetting. If you are attempting a factory reset, keep holding the button until the LED turns solid amber. A solid amber LED confirms the reset is complete.
Why won't my Arlo camera reset?
The most common reasons are pressing the wrong button, releasing too early, or using a low battery. Confirm that you are pressing the reset button, not the sync button. Hold for the full duration specified for your model.
Charge the battery fully before attempting again.
How do I reset an Arlo camera that is stuck on a firmware update?
A stuck firmware update usually requires a factory reset. Hold the reset button for the full duration specified for your model. The camera will download and install the latest firmware during the re-setup process.
This resolves most update loop issues.
Do I need to reset the hub if I reset the camera?
Not necessarily. If only one camera is having issues, reset the camera alone. If all cameras are offline or you changed your Wi-Fi network, reset the hub as well.
A hub reset clears all camera pairings, so be prepared to re-pair each camera afterward.