
Your Wi‑Fi drops out every time you walk into the bedroom. The extender was supposed to fix dead zones, but now it won’t even show up on your network list. Before you toss it in the drawer of forgotten gadgets, there’s a good chance you just need to learn how to reset TP‑Link extender and start fresh.
A proper reset clears old connections, forgotten passwords, and configuration glitches in about sixty seconds.
A factory reset restores the extender to its default state. Per TP‑Link’s official documentation, the standard hold time across RE series models is 10‑15 seconds, with a boot‑up window of 30‑60 seconds afterward. That short wait is usually enough to get a bricked or unresponsive extender back online.
Let’s walk through exactly when you need a reset, which type to use, and how to do it without making things worse.
Problem: When You Actually Need to Reset Your TP‑Link Extender
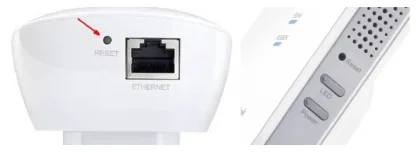
Image source: Bing (Web (fair-use with source credit))
Not every extender issue calls for a full reset. In fact, resetting too often can point to a deeper problem with your router placement or signal strength. But there are specific situations where a reset is the right move.
- You forgot the admin password. The default credentials are admin/admin. If you changed them and can’t remember what you set, there’s no password recovery option. A factory reset is the only way back in.
- The extender won’t connect to your router anymore. Even after retyping the Wi‑Fi password, the extender keeps failing. Old credentials might be corrupted or stuck in memory.
- You’re moving the extender to a new home or network. The extender carries the previous network’s SSID and password. A clean slate prevents authentication conflicts.
- The extender is stuck in a boot loop. The power LED blinks, the extender tries to start, then restarts again. A factory reset can break that cycle.
- You’re selling or giving away the extender. Nobody wants your old network password stored in their extender. Reset it to factory defaults before handing it off.
If your extender simply needs a refresh because it’s acting sluggish, try a power cycle first. Unplug it, wait 30 seconds, and plug it back in. Reserve the full factory reset for the situations above.
Quick Answer
A factory reset erases all your custom settings and returns the extender to out‑of‑box condition. Press and hold the recessed reset button with a paperclip for 10 to 15 seconds. Wait for the extender to reboot.
Connect to its default Wi‑Fi. Log in at tplinkrepeater.net with admin/admin. Run the setup wizard again.
Core Explanation: Soft Reboot vs. Factory Reset – Know the Difference
This is the most common point of confusion. People mash the reset button for two seconds, think it worked, and wonder why their extender still has the old password. You need to know which type of reset you’re doing.
Soft Reboot (Power Cycle)
What it does: Restarts the extender without clearing any settings.
How to do it: Unplug the extender from the wall, wait 30 seconds, plug it back in. Or press the reset button for less than 5 seconds.
When to use: The extender is working but feels slow, won’t connect temporarily, or you just want to refresh its connection.
Result: All your custom SSID, passwords, and DHCP settings remain intact.
Factory Reset (Hard Reset)
What it does: Wipes everything. Returns the extender to the exact state it was in when you pulled it out of the box.
How to do it: Press and hold the reset button for 10 to 15 seconds until the power LED starts blinking or changes color.
When to use: You’re locked out, moving networks, selling the device, or fixing a serious glitch.
Result: Default SSID (TP‑Link_XXXX), default IP (192.168.0.254), default login (admin/admin). All custom settings gone.
Reset via Web Interface or App (Soft Management Reset)
What it does: A factory reset initiated through the admin panel or the Tether app.
How to do it: Log into tplinkrepeater.net or open the Tether app. Navigate to System Tools > Factory Defaults and confirm.
When to use: You still have access to the extender. This is the safest method because you can see what you’re doing.
Result: Same as a hard factory reset. But without needing to press a tiny button.
Key takeaway: If you pressed the reset button for 2‑3 seconds and the extender flashed, you triggered a soft reboot. Your settings are still there. To truly wipe it, you need the full 10‑15 second hold.
Decision Tree: Which Reset Path Fits Your Situation?
Image source: Bing (Web (fair-use with source credit))
Not all reset methods work for every scenario. Follow these branches to find your exact path.
Branch A – You Can Still Log Into the Web Interface or App
Situation: You know your admin password. You can reach tplinkrepeater.net or open the Tether app.
Best action: Use the built‑in factory reset in the web interface or app.
- Open a browser and go to tplinkrepeater.net. Log in.
- Navigate to System Tools and select Factory Defaults.
- Click Restore. The extender will reboot and reset itself.
- This method is safest because you confirm the action on a screen. No risk of a partial press.
Branch B – You’re Locked Out (Forgot Password or Can’t Connect)
Situation: You don’t remember the admin password. Or the extender isn’t handing out IP addresses properly.
Best action: Physical factory reset with the recessed button.
- Locate the reset button on the extender’s side, bottom, or back panel.
- Use a paperclip or SIM eject tool. A pen tip is often too thick and may damage the switch.
- With the extender powered on, press and hold the button for 10‑15 seconds.
- Wait for the LED to blink or change color. Then release.
- The extender will reboot. Wait 60 seconds before trying to connect.
Branch C – The Extender Is Frozen or Bricked (No LED, No Web Access)
Situation: The extender shows no lights. Or the lights are on but you can’t reach it on any network.
Best action: Hard reset while plugging in the extender.
- Unplug the extender from power.
- Press and hold the reset button with a paperclip.
- While holding, plug the extender back into the wall outlet.
- Continue holding the button for 15 seconds.
- Release. The extender should power on in factory default mode.
- If still no response, try a 30‑30‑30 reset. Hold reset for 30 seconds. Keep holding while unplugging for 30 seconds. Then keep holding while plugging back in for 30 seconds. This trick occasionally revives bricked hardware.
Branch Comparison Table
| Scenario | Best Method | Time Needed | Settings Preserved? |
|---|---|---|---|
| Can log into web interface | Software reset via admin panel | 1‑2 minutes | No (full wipe) |
| Forgot admin password | Physical button reset (10‑15 sec) | 2 minutes | No (full wipe) |
| Extender unresponsive, no LED | Hard reset while plugging in | 2‑3 minutes | No (full wipe) |
| Extender acting slow/laggy | Soft reboot (power cycle) | 1 minute | Yes |
| Moving to a new network | Physical or software factory reset | 2 minutes | No (full wipe) |
Step‑by‑Step: Factory Reset via the Physical Button
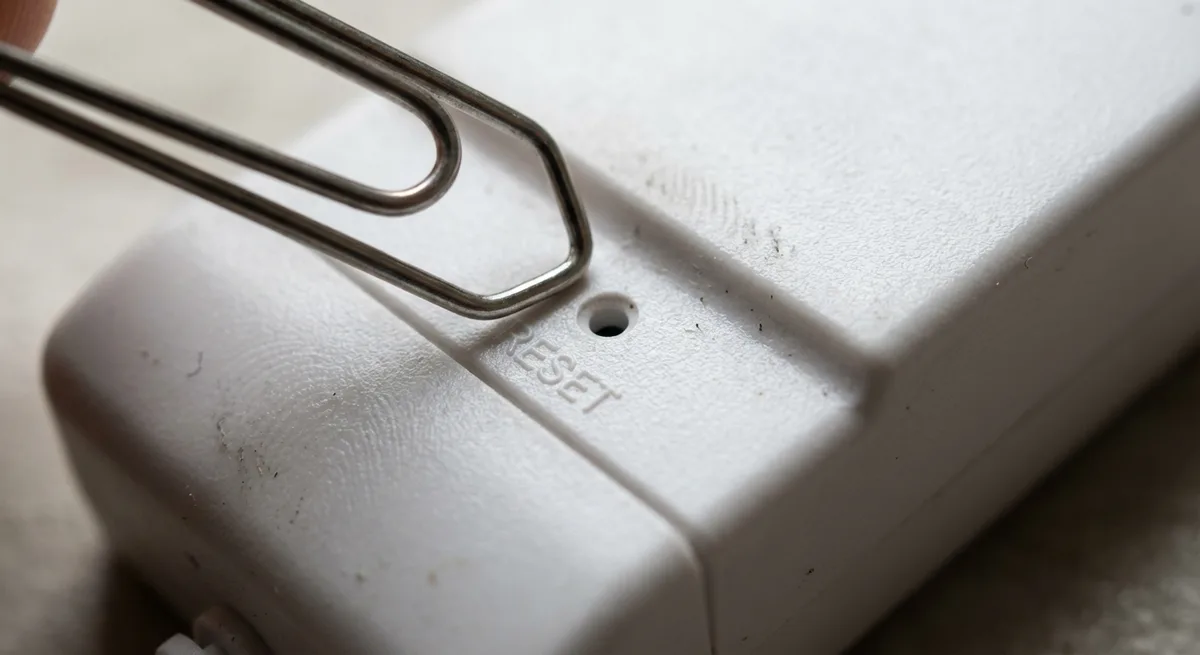
Image source: Bing (Web (fair-use with source credit))
This is the most universal method. It works on nearly every TP‑Link extender model from the RE100 series to the latest RE705X.
Step 1: Power on the extender.
Plug it into a wall outlet near your router. Wait for the power LED to light up solid. If the extender is already on, skip this step.
Step 2: Locate the reset button.
It’s a small, recessed hole on the side, bottom, or back of the unit. It’s usually labeled Reset or has a small icon of a circle with an arrow. On some models (older RE200 and RE210), the WPS button doubles as the reset button when held for 10+ seconds.
Step 3: Prepare your tool.
Use a paperclip or a SIM card eject tool. Do not use a pen, pencil, or toothpick. Those can snap off inside the hole and permanently jam the switch.
Step 4: Press and hold.
Insert the tool straight into the hole. You’ll feel a slight click when you depress the button. Hold it down firmly.
Do not release early.
Step 5: Watch for the LED signal.
Keep holding. After about 5 seconds, the LED may blink once. That’s just a soft reboot.
Keep holding. At the 10‑15 second mark, you should see one of these signals:
- The power LED starts blinking rapidly.
- The power LED turns solid amber or red.
- All LEDs flash once and then the extender restarts.
Step 6: Release and wait.
When you see the reset signal, let go. The extender will reboot. This takes 30‑60 seconds.
Do not unplug it or press any buttons during this time.
Step 7: Verify the reset.
After the reboot, try to connect to the extender’s Wi‑Fi. The default SSID will be TP‑Link_XXXX. The last four characters are unique to your device.
If you see that, the reset worked.
Troubleshooting the physical reset:
- If the extender restarts but keeps its old SSID, you didn’t hold the button long enough. Repeat with a full 15‑second hold.
- If pressing the button does nothing, the switch may be jammed or broken. Try the software reset method if you can still access the web interface. Or contact TP‑Link support for a possible replacement.
Step‑by‑Step: Soft Reset Through the Web Interface
If you can still log into your extender’s admin panel, this is the cleanest reset method. No paperclip. No guessing on hold times.
You see exactly what you’re doing.
Step 1: Connect to the extender’s network.
Use a laptop or phone. Join the Wi‑Fi network your extender broadcasts. If you’ve set a custom SSID, use that.
If you don’t remember it, check the sticker on the side of the extender.
Step 2: Open a browser and go to tplinkrepeater.net.
Type that exactly into the address bar. Do not use a search engine. If the page doesn’t load, try the extender’s IP address directly (192.168.0.254).
On some networks, you may need to use HTTP instead of HTTPS.
Step 3: Log in with your admin credentials.
The default is username admin, password admin. If you changed the password and can’t remember it, skip to the physical reset method. There is no password recovery option.
Step 4: Find the factory reset option.
The exact menu location varies by firmware version. It’s usually under System Tools or Administration. Look for a tab labeled Factory Defaults, Restore, or Reset.
On newer models (RE300 series and up) you might find it under Advanced Settings > System Tools > Backup & Restore.
Step 5: Click Restore and confirm.
The interface will ask you to confirm. Click OK or Restore. The extender will immediately reboot.
This takes 30‑60 seconds. Do not interrupt the power during this time.
Step 6: Reconnect after reboot.
Once the LEDs settle, search for Wi‑Fi networks. You’ll see the default SSID (TP‑Link_XXXX). Connect to it.
Open your browser again and go to tplinkrepeater.net. Log in with admin/admin and run the Quick Setup wizard.
When this method is best: You still have access and want zero guesswork. It’s also useful if the physical reset button is broken or hard to reach.
Step‑by‑Step: Reset Using the TP‑Link Tether App
The Tether app is TP‑Link’s mobile management tool. It works on iOS and Android. If you have the app installed and can still communicate with the extender, this is another clean reset option.
Step 1: Open the Tether app.
Make sure your phone is connected to the extender’s Wi‑Fi, not your main router’s. If you’re connected to the router, the app may show the router instead of the extender.
Step 2: Select your extender from the device list.
The app scans the local network and displays all connected TP‑Link devices. Tap on your extender’s model name.
Step 3: Tap the Settings gear icon.
It’s usually located in the top right corner. Scroll down until you see System or Device Management.
Step 4: Select Factory Reset.
The exact wording may be Restore Factory Defaults or Reset. Tap it. A confirmation pop‑up appears.
Confirm the action.
Step 5: Wait for the extender to reboot.
The app will lose connection as the extender restarts. After a minute, the extender will broadcast its default SSID. You can then reconnect and set it up from scratch using the app or the web interface.
What the Tether reset does differently: It performs the same full factory wipe as the web interface or physical button. The only advantage is that you can do it from your phone without needing a laptop. The disadvantage is that you must already be logged into the app.
That requires the same admin password you might have forgotten.
What Happens After the Reset – Default Login, IP, and SSID
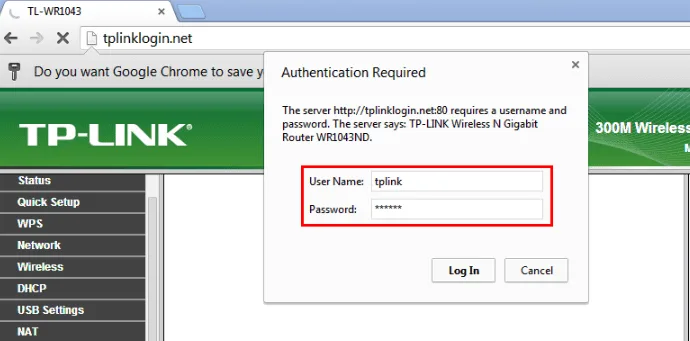
Image source: Bing (Web (fair-use with source credit))
Once the extender finishes its post‑reset reboot, it’s in the same state as when you first unboxed it. Here are the exact default values you’ll need to know.
| Setting | Default Value |
|---|---|
| SSID (Wi‑Fi name) | TP‑Link_XXXX (XXXX = last 4 characters of the device’s MAC address) |
| Admin username | admin |
| Admin password | admin |
| Management IP | 192.168.0.254 |
| Web access URL | http://tplinkrepeater.net |
| DHCP server | Enabled (hands out IPs in the 192.168.0.x range) |
What the extender looks like after reset: The power LED should be solid green or amber. The Wi‑Fi LED may blink slowly. No client devices are connected yet.
The extender is broadcasting its default SSID with no security. That’s open network. That’s normal for the initial setup.
Why you might not see the default SSID right away: On some models, after a factory reset, the extender briefly enters “AP mode.” It doesn’t broadcast an SSID until you connect via Ethernet. That’s rare. But if you don’t see TP‑Link_XXXX in your Wi‑Fi list after two minutes, plug a laptop directly into the extender’s Ethernet port (if it has one) and access the web interface that way.
The first thing you should do after reset: Connect to the default SSID. Open a browser. Run the Quick Setup wizard.
Don’t skip this and try to manually configure settings. The wizard guides you through re‑connecting the extender to your main router’s Wi‑Fi and setting a new password.
Mistakes to Avoid – Wrong Hold Time, Using a Pen, Resetting During a Firmware Update
We’ve seen simple mistakes turn a straightforward reset into a dead extender. Here are the most common errors and how to avoid them.
Mistake 1: Holding the button for only 2‑3 seconds.
That triggers a soft reboot, not a factory reset. Your settings survive. You think the reset failed, so you try again, get frustrated, and end up buying a new extender.
Hold for at least 10 seconds, preferably 15, until you see the LED signal.
Mistake 2: Using a pen, pencil, or toothpick to press the reset button.
These tools are too wide for the recessed hole. The tip of a standard ballpoint pen can snap off inside the hole and permanently jam the switch. Always use a paperclip or a SIM card eject tool.
If the button feels stuck and won’t click, inspect it with a flashlight. A broken tip may already be lodged inside.
Mistake 3: Resetting during a firmware update.
If you press the reset button while the extender is flashing new firmware, you can corrupt the operating system. The extender may never boot again. Only reset when the extender is idle with a steady power LED.
Never reset if you see the LED blinking rapidly in a pattern that suggests an update.
Mistake 4: Powering off the extender during the reset process.
After you release the button, the extender takes 30‑60 seconds to reboot. Unplugging it during that window can cause a partial erase. That leaves the extender in a half‑configured state.
Wait until the LEDs stabilize.
Mistake 5: Forgetting to reconnect to the extender after the reset.
After the reset, your computer or phone will still be trying to connect to your main router or the old extender SSID. You must go into Wi‑Fi settings, find the default TP‑Link_XXXX network, and connect to that. If you skip this step, you can’t access the setup page.
Mistake 6: Assuming a reset solves every problem.
If your extender constantly loses signal or drops connections, a reset might temporarily mask the real issue. The problem could be router placement, interference, or an outdated router. A reset doesn’t fix hardware failures either.
If the extender still acts up after a fresh setup, consider replacing it.
Expert Tips – When a Hard Reset Still Doesn’t Work (Boot Loop, Stuck LED)
Sometimes you follow the steps precisely and the extender still won’t cooperate. Here’s what to try next.
Tip 1: Try the 30‑30‑30 reset.
This is an old networking trick that works on many TP‑Link extenders and routers.
- Press and hold the reset button for 30 seconds (with power on).
- While still holding the button, unplug the extender from power.
- Continue holding for another 30 seconds while it’s unplugged.
- While still holding, plug it back in and hold for 30 more seconds.
- Release. The total hold time is 90 seconds. This deeper reset often revives devices stuck in a boot loop.
Tip 2: Reset while holding the WPS button.
On certain older models (RE200, RE210, RE220), the reset function is shared with the WPS button. Pressing the WPS button alone for 5 seconds triggers WPS. But holding the WPS button for 15 seconds performs a factory reset.
Check your model’s manual if the dedicated reset button isn’t working.
Tip 3: Use the emergency firmware restore method.
If the extender is completely bricked (no LEDs, no response to any button), TP‑Link provides a recovery mode for some models.
- Power off the extender.
- Press and hold the reset button.
- Power on the extender while holding the button.
- Keep holding until the power LED starts flashing slowly (usually after 10‑15 seconds).
- Release. The extender enters a special recovery mode. You can upload a new firmware file via a wired Ethernet connection. This is advanced and model‑specific. Check TP‑Link’s official support page for your exact model.
Tip 4: Try a different power source.
A weak or failing power adapter can cause the extender to behave erratically. Try plugging it into a different outlet. If it has a removable power cable, test with another compatible adapter.
Some extenders require 5V 1A or 9V 0.6A. Using the wrong adapter can cause boot loops.
Tip 5: Wait longer after the reset.
We’ve seen extenders that take up to three minutes to fully boot after a factory reset. This is especially true if they need to scan for firmware recovery. Don’t assume it failed after 60 seconds.
Wait up to five minutes before giving up.
Tip 6: Contact TP‑Link support with your model number.
If none of these steps work, the extender may have a hardware fault. TP‑Link’s support team can help determine if it’s still under warranty. Have your model number and serial number ready.
They’re usually on a sticker on the bottom or side.
FAQs – Extender Won’t Reset, No Reset Button, or tplinkrepeater.net Not Loading
Why won’t my extender reset even after I hold the button for 15 seconds?
You might be doing a soft reboot instead of a factory reset. Make sure you hold the button for a full 15 seconds until the power LED starts blinking rapidly or changes color. If you still see your old SSID broadcast after the reboot, the reset didn’t take.
Try again with a fresh paperclip and count the seconds out loud. If the button feels loose or doesn’t click, the switch may be physically broken. Use the web interface reset method if you can still log in.
My TP‑Link extender doesn’t have a visible reset button. Where is it?
On some models, the reset button is hidden under a sticker or behind a panel. The RE200, RE210, and RE220 use the WPS button for dual duty. Holding the WPS button for 10‑15 seconds triggers a factory reset on those models.
Check the side and bottom edges of the extender. If you still can’t find it, look up your model on the official TP‑Link support site. The user manual shows the reset button location.
tplinkrepeater.net won’t load after a reset. What do I do?
First, make sure your device is connected to the extender’s default Wi‑Fi network (TP‑Link_XXXX). If you’re still connected to your main router, the page won’t load. Second, try using the IP address 192.168.0.254 directly in your browser.
If that also fails, clear your browser cache or try a different browser. Some extenders require you to type http:// and not https://. If nothing works, the extender may have failed to reset properly.
Unplug it, wait 30 seconds, and repeat the factory reset process.
I pressed the reset button, but the extender keeps its old SSID. Did the reset fail?
Yes. You triggered a soft reboot, not a factory reset. The button needs to be held for 10‑15 seconds, not 2‑3 seconds.
After you release, wait for the power LED to blink or change color. Then look for the default SSID. If the old SSID appears, repeat the process with a longer hold.
If the extender still keeps old settings after a 20‑second hold, the button may be faulty. Try the web interface reset or app reset as alternatives.
Can I reset my extender without a paperclip or tool?
Yes, if you can still access the web interface or the Tether app. Log in at tplinkrepeater.net and navigate to System Tools > Factory Defaults. Or use the Tether app on your phone.
Both methods perform a full factory reset without needing any physical tool. If you’re locked out of the web interface and the app, and the physical button is broken, the extender may need professional repair or replacement.
Does resetting the extender affect my main router’s settings?
No. The reset only affects the extender itself. Your main router’s SSID, password, and configuration stay exactly as they were.
After the reset, the extender will need to be paired with the router again via the Quick Setup wizard. If you’ve forgotten your router’s Wi‑Fi password, you’ll need that handy to complete the setup.
How do I know if the reset actually worked?
After the reboot, look for these signs:
- The default SSID (TP‑Link_XXXX) appears in your phone’s Wi‑Fi list.
- Connecting to that SSID opens tplinkrepeater.net without asking for a password. The default network is open.
- Logging in with admin/admin works.
- The extender no longer shows any custom name or settings you had previously configured.
If you still see your old network name or can’t log in with admin/admin, the reset did not complete. Start over from the physical button method.
Is there a way to reset without losing all my settings?
No. A factory reset wipes everything. If you want to keep your settings but fix a connection issue, try a power cycle first.
Unplug the extender for 30 seconds and plug it back in. That refreshes the connection without clearing your configuration. If that doesn’t help, try updating the firmware through the web interface.
That may fix bugs without a full reset.
For more advanced troubleshooting, TP‑Link’s official support database provides model‑specific recovery procedures.
Final Decision Guide – Quick Flowchart for Your Exact Situation
Here’s a simple way to pick the right reset method based on what state your extender is in. Follow the branches from top to bottom.
| Your Situation | Start Here | Next Step | Outcome |
|---|---|---|---|
| Extender is working but slow | Power cycle (unplug 30 sec) | No improvement? Try factory reset via web | Extender refreshes, settings kept |
| Forgot admin password | Physical button reset (10‑15 sec) | Wait for reboot, connect to default SSID | Full wipe, set up like new |
| Can’t reach tplinkrepeater.net | Hard reset with paperclip | If still fails, try 30‑30‑30 reset | Default access restored |
| Extender stuck in boot loop | Hard reset while holding button during power‑on | If loop persists, try emergency firmware restore | Device revived or confirmed dead |
| No LEDs at all | Check power adapter and outlet | Try a different known‑good adapter | Either power issue or hardware failure |
| Selling or giving away extender | Web interface reset or physical reset | Connect and verify default SSID appears | No personal data remains |
When to use each method in real life:
- Power cycle: Use this first for any glitch. It takes 60 seconds and doesn’t erase anything. Most connection drops clear up with a simple reboot.
- Physical button reset: Your go‑to when you’re locked out. It works even if the web interface is broken. Keep a paperclip near your networking gear.
- Web interface reset: Safest and most precise. Use it when you’re already logged in. No risk of a partial press.
- Tether app reset: Best when you’re away from a laptop. Handy for quick resets from your phone.
- 30‑30‑30 reset: Last resort for bricked devices. Don’t use this if the extender is working. It’s a deeper wipe that can sometimes revive dead hardware.
- Emergency firmware restore: Only for completely unresponsive extenders. Requires a wired Ethernet connection and a firmware file from TP‑Link. Follow the official instructions precisely.
One final reminder: A reset is a troubleshooting tool, not a maintenance routine. If you find yourself resetting the extender every few weeks, the real problem is probably signal interference, range, or an outdated router. Consider moving the extender closer to the router.
Reduce the distance or number of walls between them. Sometimes a newer extender with dual‑band or Wi‑Fi 6 support solves issues that resets can only mask.
We hope this guide helps you get your TP‑Link extender back online quickly. Our research standards and editorial integrity are detailed in our editorial policy. If you run into a model‑specific issue we haven’t covered, refer to the manufacturer’s support documentation or reach out through our contact form.
We’ve done our homework to ensure accuracy as of 2026.