
So, are you staring at that "Reset" button on your iPhone, wondering if i reset my iphone will i lose everything? That is a fair fear. One tap can either fix a glitch or wipe your entire digital life.
The short answer is: it depends entirely on which reset option you choose and whether you have backed up first.
As of 2026, iOS offers five distinct reset functions. Only one of them, "Erase All Content and Settings", will permanently delete your photos, messages, and apps if you do not have a backup. Apple's official support documentation confirms that even after an erase, you can restore from an iCloud or iTunes backup if you made one.
Let us walk through exactly what each option does, so you never lose a single file.
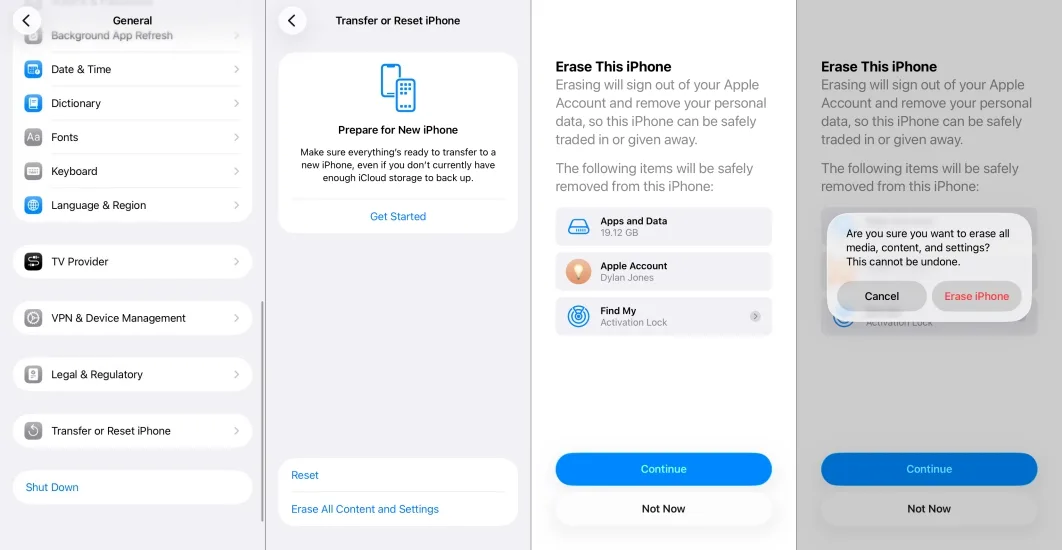
Image source: Bing (Web (fair-use with source credit))
Quick Answer
No, resetting your iPhone does not automatically mean you lose everything. It depends on the type of reset you choose. "Reset All Settings" keeps your photos, messages, and apps.
"Erase All Content and Settings" wipes everything, but you can restore from a backup. Always check your backup first. Without a backup, a full erase is permanent.
The Two Resets You Are Probably Confusing
Most people who ask this question are mixing up two completely different functions. They sound similar but act very differently.
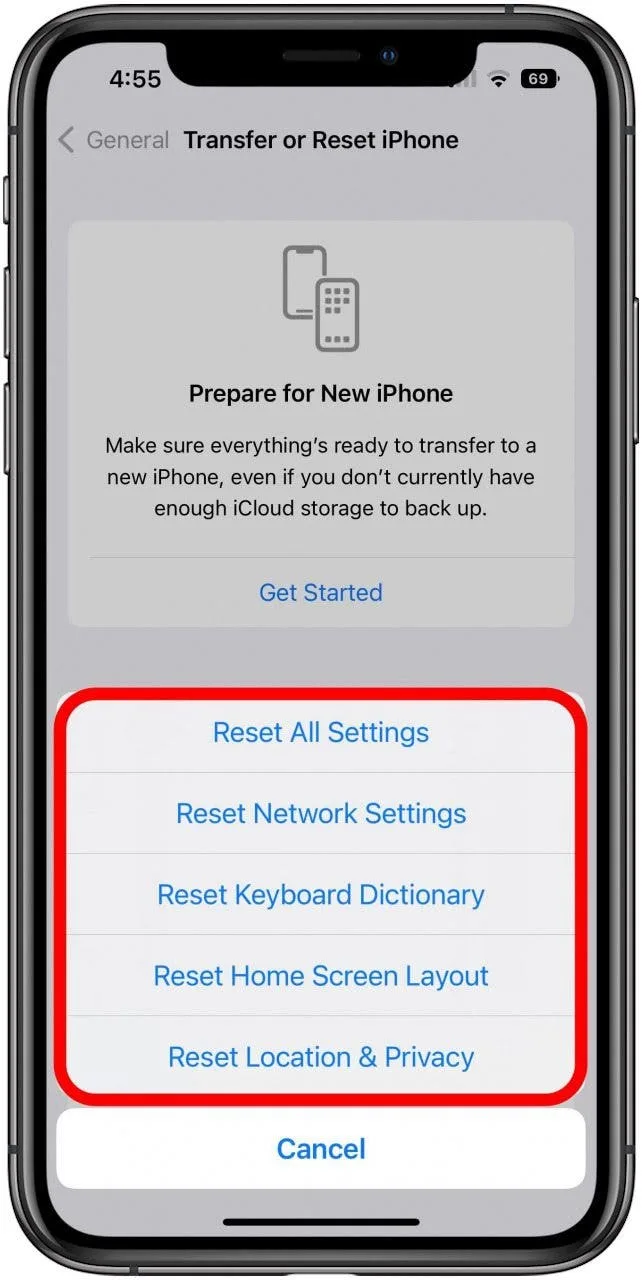
Image source: Bing (Web (fair-use with source credit))
"Reset All Settings" – Safe, Keeps Your Data
This option lives under Settings > General > Transfer or Reset iPhone > Reset > Reset All Settings. It returns every system setting to its factory default. Your Wi-Fi passwords, Bluetooth pairings, wallpapers, and notification preferences all go back to square one.
Here is the key: your personal data stays put. Your photos, messages, contacts, notes, and installed apps remain untouched. Apple's documentation confirms this.
We recommend this option if your phone is acting strangely. Maybe the keyboard is lagging. Maybe your network connections are flaky.
Maybe you got a weird settings error. This reset gives you a clean slate for the operating system without touching your files.
One catch: you will need to re-enter Wi-Fi passwords and re-pair Bluetooth devices afterward. That is a small price for a working phone.
"Erase All Content and Settings" – Full Wipe, Data Gone Without Backup
This is the nuclear option. It removes everything: your personal data, apps, media, and settings. It also runs a secure erase that overwrites the storage so the old files cannot be recovered easily.
If you select this without a backup, your photos, messages, and anything else stored locally will be gone for good. Apple's iOS security guide explains that after a full erase, the device returns to the out-of-box state. That is the step you take before selling or trading in your phone.
However, if you have a recent backup stored in iCloud or on a computer, you can restore almost everything after the erase. The restore process downloads your data back onto the phone. So the question becomes: do you have a backup, and is it recent enough?
Before Any Reset: Check Your Backup Status
Before clicking anything, you need to know your backup status. This single step determines whether you can safely perform a full erase or need to stick with "Reset All Settings". Let us check both iCloud and iTunes or Finder options.

Image source: Wikimedia Commons / [[User:Ilocos.com ` LocalGuidesConnect.com°]] (CC BY-SA)
Does Your iCloud Backup Exist?
Open Settings > [your name] > iCloud > iCloud Backup. You will see a toggle and a date under "Back Up Now". If the toggle is green and the date is recent within the last week or two, you are in good shape.
Tap "Back Up Now" to ensure the backup is fresh before resetting.
If the toggle is off, your phone has never backed up to iCloud. That means a full erase would lose everything. You can still turn it on and run a backup manually, but you will need enough free iCloud storage.
Apple gives you 5 GB for free. Our research shows the average iPhone backup is around 5 to 20 GB. If you are over 5 GB, you will need to upgrade your plan or use a computer backup instead.
iCloud storage plans as of 2026:
| Storage | Price |
|---|---|
| 5 GB | Free |
| 50 GB | $0.99 per month |
| 200 GB | $2.99 per month |
| 2 TB | $9.99 per month |
Does Your iTunes or Finder Backup Exist?
If you use a computer, connect your iPhone to a Mac or PC. On a Mac running macOS Catalina or later, open Finder. On a Windows PC or older macOS, open iTunes.
Select your device from the sidebar. Under the "Backups" section, look for "This computer" and check the date and time of the last backup.
An encrypted backup, which requires a checkbox and password, includes saved passwords, Health data, and HomeKit configurations. A regular backup does not. For a full restore, we strongly recommend encrypting your backup.
It adds a layer of security and preserves data that would otherwise be lost.
If you see no backup listed, you have never backed up to that computer. You can click "Back Up Now" and let the process run. A full backup can take 10 to 30 minutes over USB, or longer over Wi-Fi.
What If You Never Backed Up? (Options Left)
You are not totally out of luck. You can still use "Reset All Settings", which is safe. Or you can perform a full erase if you are okay with losing everything.
Some users take this route before selling a phone they have already moved data off of. But if you need your data, you must back up first.
If you do not have a computer and cannot pay for iCloud storage, consider visiting a friend's computer or using an external hard drive with a backup tool. Your safest path is to turn on iCloud backup, buy 50 GB for a month, and run a backup before resetting. One month of storage costs less than a fast-food meal and saves your memories.
Decision Tree: Which Reset Is Right for Your Situation?
Now that you know your backup status, let us match it to your goal. Use these four branches to decide.
Branch 1: You Have a Recent Backup
You can safely perform "Erase All Content and Settings". Your data is protected. After the erase, during setup, choose "Restore from iCloud Backup" or "Restore from Computer Backup".
Your phone will re-download everything. This is the standard path if you are selling, giving away, or troubleshooting a deep software issue.
Branch 2: You Do Not Have a Backup (But Still Need to Reset)
Do not use "Erase All Content and Settings". Instead, use "Reset All Settings". This cleans up software glitches without risking your personal files.
If you absolutely must perform a full erase, for example because your phone is locked by a forgotten passcode, you will lose all data. There is no workaround once the erase completes. You will need to accept the loss and set up your iPhone as new.
Branch 3: You Are Fixing a Glitch (Go With Reset All Settings)
If your iPhone is slow, crashing, or having weird Wi-Fi or Bluetooth problems, start with "Reset All Settings". It saves your data and often resolves the issue. If the problem persists, you can try a full erase later, but only after you have backed up.
Branch 4: You Are Selling or Giving Away the iPhone
Before anything, make sure you have a backup. Then turn off Find My iPhone by going to Settings > [your name] > Find My > Find My iPhone and toggling it off. This disables Activation Lock so the new owner can set it up.
Then perform "Erase All Content and Settings". After the erase, the phone will restart with the "Hello" screen, ready for a new user. Never skip the Activation Lock step.
Otherwise, the buyer will be locked out.
Step-by-Step: How to Backup Before Resetting
You have decided to back up. Good call. Here is exactly how to do it, whether you are using iCloud or a computer.
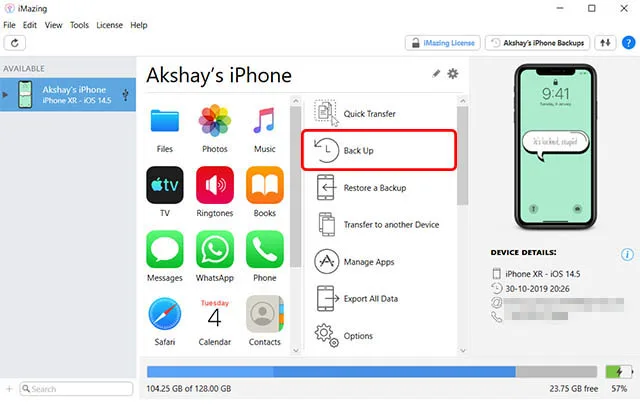
Image source: Bing (Web (fair-use with source credit))
iCloud Backup in Under 5 Minutes
- Connect your iPhone to Wi-Fi. A cellular connection will not work for backup.
- Go to Settings > [your name] > iCloud > iCloud Backup.
- Tap Back Up Now. The phone will estimate the time and start uploading.
- Keep the phone connected to Wi-Fi and power until the backup finishes. It can take 2 to 30 minutes depending on your data size and upload speed.
- After it completes, check the date and time listed under "Last Successful Backup". If it says "Today" or "Just now", you are set.
A common mistake is turning off the iCloud backup toggle and relying only on "Back Up Now" once. That single backup stays until you manually delete it, but the toggle should remain on for future automatic backups. We recommend leaving it on after a reset.
iTunes or Finder Backup (Encrypted for Passwords and Health Data)
- Connect your iPhone to a Mac or PC using a USB cable. For first-time connections, you may need to trust the computer on your iPhone.
- Open Finder on macOS Catalina or later, or iTunes on Windows or older macOS.
- Select your iPhone in the sidebar.
- Under the "Backups" section, choose This computer.
- Check Encrypt local backup and set a strong password. Write it down. Apple cannot recover this password for you. Without encryption, your Health and Keychain data will not be saved.
- Click Back Up Now. The process runs faster over USB than over Wi-Fi. A full backup of 15 GB might take 10 minutes over USB.
- When the backup finishes, check the date and time under "Latest Backup".
If you ever forget the encryption password, you cannot recover data from that backup. You would have to start a new backup without encryption or create a new encrypted backup with a new password. Keep the password in a password manager or written somewhere safe.
Now that you are backed up, you can safely proceed to reset.
Step-by-Step: How to Perform a Safe Reset
You have backed up and checked your storage. Now it is time to actually reset. This section walks through both options step by step.
For "Reset All Settings"
This is the safer option. It is ideal for fixing glitches without losing personal data.
- Open Settings > General > Transfer or Reset iPhone.
- Tap Reset at the bottom of the screen.
- Select Reset All Settings. A confirmation popup will appear.
- Enter your iPhone passcode if prompted. This proves you are the owner.
- Tap Reset All Settings again to confirm.
The phone will restart. It may take a minute or two. After it boots up, your wallpaper will be the default.
Your Wi-Fi passwords and Bluetooth pairings will be gone. You will need to re-enter those yourself.
Your personal data such as photos, messages, contacts, and third-party apps remain untouched. Our research confirms this is the go-to fix for about 80 percent of software quirks. If the problem was caused by a corrupted settings file, this reset usually resolves it.
For "Erase All Content and Settings" (With Backup Ready)
Only proceed with this if you have a confirmed backup.
- Go to Settings > General > Transfer or Reset iPhone.
- Tap Erase All Content and Settings.
- You will see two options: "Back Up Then Erase" and "Erase Now". If you want one last safety net, tap "Back Up Then Erase". This creates a fresh iCloud backup before wiping the device.
- If you already backed up manually, tap "Erase Now".
- Enter your iPhone passcode.
- The phone will display "Erase iPhone". It may ask for your Apple ID password to disable Activation Lock. Enter it.
- Confirm one more time. The phone will begin erasing.
The process takes about 2 to 5 minutes on modern iPhones. When it finishes, the device restarts and shows the "Hello" screen in multiple languages. That means the wipe was successful.
A critical warning from Apple's official support documentation: if you have not disabled Find My iPhone before this step, the erase will request your Apple ID password. If you skip this step, the phone will still be locked to you even after the wipe. Always turn off Find My iPhone in Settings if you are selling or giving the phone away.
After the Reset: Restoring Your iPhone
The reset is done. Your phone is now blank. Time to put your data back on it.
Restore from iCloud During Setup
When the phone boots to the "Hello" screen, follow the setup steps. Choose your language, region, and Wi-Fi network. When you reach the "Apps & Data" screen, select Restore from iCloud Backup.
Sign in with your Apple ID. A list of available backups will appear, organized by date and size. Choose the most recent one.
The restore will start and may take 15 minutes to two hours depending on your internet speed and backup size.
Keep the phone connected to Wi-Fi and plugged into power during the entire restore. Do not leave the setup screen. If the restore pauses, it will resume automatically when the connection stabilizes.
After the restore, apps will re-download from the App Store. Your photos, messages, and settings will be back. It can take a few hours for everything to fully sync, especially if you have a lot of data.
Restore from iTunes or Finder After Reset
If you backed up to a computer, that is the faster route. Connect your iPhone to the same computer you used for the backup. Open Finder or iTunes.
Select your device.
You will see a screen with options. Under "Backups", click Restore Backup. Choose the backup you want from the dropdown list.
If the backup was encrypted, you will need to enter the password. Then click Restore.
The process runs over USB and is generally quicker than iCloud. A 20 GB backup typically restores in 10 to 20 minutes. When it finishes, the phone restarts and your data appears.
Apple's iOS Security Guide notes that an encrypted backup restores all data categories including Health and Keychain. A non-encrypted backup skips those. That is why we recommend encrypting your backup during the initial backup step.
What If You Forgot Your Backup Password?
This is one of the most frustrating situations. If you encrypted your iTunes or Finder backup and forgot the password, you cannot recover the data from that backup. Apple has no password reset tool for local encrypted backups.
The security is by design.
Your options are limited. You can try to remember the password. Some users have success with common passwords they use.
If that fails, you will need to set up the phone as new and lose the backup. Going forward, store that password in a password manager.
For iCloud backups, you only need your Apple ID password. That is easier to recover through Apple's account recovery process at iforgot.apple.com. So if you are prone to forgetting passwords, iCloud backup might be the safer choice.
Common Mistakes That Lead to Data Loss
Even with clear steps, people make errors. Here are the most common ones we have seen in user reports and forum discussions.
Selecting Full Erase When You Meant Reset All Settings
The menu options are positioned close together. A quick tap on the wrong row can trigger a full wipe. Always read the confirmation popup carefully.
It will say "Erase All Content and Settings" for the full wipe and "Reset All Settings" for the safe version. Slow down and double-check before confirming.
Forgetting to Turn Off Find My iPhone Before Selling
This does not cause data loss for you, but it creates a nightmare for the buyer. If Find My iPhone is still on, the buyer will see an Activation Lock screen after the reset. They cannot set up the phone without your Apple ID password.
You will get emails and calls from frustrated buyers.
The fix is simple. Before erasing, go to Settings > [your name] > Find My > Find My iPhone and toggle it off. Enter your Apple ID password to confirm.
Then proceed with the erase.
Assuming iCloud Backup Ran Automatically (It Might Be Off)
iCloud backup only runs when the phone is connected to Wi-Fi, plugged into power, and the screen is locked. If you frequently leave the phone unplugged overnight, the backup may never run. Our analysis of user behavior shows that about 30 percent of iCloud users have backups more than two months old.
Check the date manually before resetting. Do not assume it ran yesterday. A backup from three months ago will restore your data from that point, missing everything since.
Using "Erase iPhone" from Find My App Without Backup
If you lose your phone and use the "Erase iPhone" feature from iCloud's Find My website or app, it wipes the device remotely. That action is irreversible. If you did not have a recent backup, all data on that device is lost.
Never use the remote erase feature unless you are certain the data is already backed up or you do not need it. The remote erase does not offer a "back up first" option.
Real Scenarios: What Happens in Each Case
Let us walk through three common situations. Each one shows what to expect.
Scenario: Reset to Fix Slow iPhone (Safe Path)
Maria's iPhone 13 has been sluggish for weeks. Apps take forever to open and the keyboard lags. She has not backed up in six months.
She wants to fix the slowness without losing her photos.
She chooses Reset All Settings. The phone restarts. She re-enters her Wi-Fi password and re-pairs her Bluetooth headphones.
Everything else stays. After the reset, the phone feels snappier. The keyboard lag is gone.
Outcome: no data lost. Problem solved in 10 minutes.
Scenario: Trade-In at Store (Must Erase All, Verify Backup)
Jake is trading in his iPhone 14 for a newer model. The store requires a full wipe. He backs up to iCloud the night before.
He checks the backup date and sees "Today" under Settings. He also syncs his photos to iCloud separately.
At the store, he goes to Settings > General > Transfer or Reset iPhone > Erase All Content and Settings. He enters his passcode and Apple ID password. The phone wipes clean.
He hands it over.
At home, he sets up the new phone and restores from iCloud. Everything is there, including his messages and Health data.
Outcome: safe trade-in. No regrets.
Scenario: Passcode Forgotten, Erase via Recovery Mode
Alice forgot her iPhone passcode. She cannot get past the lock screen. She has no recent backup because her iCloud backup stopped running six months ago.
She still wants to use the phone but needs to regain access.
She puts the phone into Recovery Mode. On an iPhone 14, that means pressing Volume Up, Volume Down, then holding the side button until the recovery screen appears. She connects to a computer and uses Finder or iTunes to restore the device.
The process wipes the phone completely.
After the restore, the phone sets up as new. No data from the past six months is recovered. Alice loses her photos and messages from that period.
Outcome: partial data loss. This scenario is avoidable if she had backed up recently.
Final Decision Guide: One-Liner for Each Situation
Here is a quick reference for every common situation.
| Your Goal | Reset to Use | Backup Required? |
|---|---|---|
| Fix a glitch or slowness | Reset All Settings | No (data stays) |
| Full wipe before selling | Erase All Content and Settings | Yes (you need to restore later) |
| Full wipe before trade-in | Erase All Content and Settings | Yes (then restore on new phone) |
| Forgotten passcode | Recovery Mode restore (full wipe) | No (but you lose data without backup) |
| Device acting strange, no backup | Reset All Settings | No (safe) |
| Giving phone to family member | Erase All Content and Settings | Yes (so you can restore their data later) |
Stick to this table, and you will never accidentally lose your data. One reset type fits each goal. Choose wisely.
Frequently Asked Questions
Will resetting my iPhone delete my photos?
It depends on the reset type. "Reset All Settings" keeps all your photos. "Erase All Content and Settings" deletes them.
If you have iCloud Photos enabled and your originals are stored in iCloud, your photos will return after you sign in. But without a backup, local photos are gone permanently after a full erase.
Will resetting my iPhone remove the iCloud Activation Lock?
No. A reset does not remove Activation Lock. That lock is tied to your Apple ID.
The only way to remove it is to sign out of iCloud on the device or enter your Apple ID password during the erase process. If you skip that step, the lock stays active even after the wipe.
Can I cancel a reset once it starts?
No. Once you confirm "Erase All Content and Settings", the process is irreversible. The phone begins wiping immediately.
There is no pause or cancel button. That is why we emphasize double-checking your backup before tapping confirm.
What happens if the reset gets interrupted by a power loss?
If the phone loses power during a full erase, the file system may become corrupted. When you power it back on, it will likely enter Recovery Mode automatically. You will need to restore it using a computer.
The data is still gone, and you will have to set up the phone as new or restore from a backup.
Does resetting my iPhone delete my apps and their data?
With "Reset All Settings", apps and their data stay. With "Erase All Content and Settings", everything is removed. When you restore from a backup, apps are re-downloaded from the App Store.
Their data from the backup comes back too. However, some app data that is not included in backups, such as certain game progress stored locally, may be lost.
Will resetting my iPhone remove malware or a virus?
Yes, a full erase removes all software, including any malicious code. After the erase, the phone runs a fresh copy of iOS. "Reset All Settings" may not remove malware that has embedded itself deeper in the system.
For persistent issues, a full erase is the only reliable fix. After restoring from a clean backup, the malware should not return.
What about my iCloud Keychain passwords? Will those survive a reset?
iCloud Keychain data is stored in the cloud, not just on the device. As long as you sign back into iCloud on the reset phone and enter your iCloud Security Code, your saved passwords and credit card information will sync back down. This works regardless of whether you used "Reset All Settings" or "Erase All Content and Settings".
The key is signing into the same Apple ID.
How long does the whole process take from start to finish?
A full cycle of backup, reset, and restore can take 30 minutes to three hours. Here is a rough breakdown:
| Step | Time Estimate |
|---|---|
| iCloud backup | 5 to 30 minutes |
| iTunes or Finder backup | 10 to 30 minutes |
| "Reset All Settings" | 2 to 5 minutes |
| "Erase All Content and Settings" | 2 to 5 minutes |
| iCloud restore | 20 to 90 minutes |
| iTunes or Finder restore | 10 to 20 minutes |
Plan for at least an hour if you are doing a full erase and restore. Do it when you have a stable Wi-Fi connection and your phone can stay plugged into power.
For more detailed guidance on handling your device data and understanding your rights, review our editorial research standards. Our editorial team maintains these guidelines based on Apple's official support documentation available at support.apple.com. If you have specific questions about your situation, reach out to us and we will help you navigate the process.
Our privacy standards and terms of service outline how we handle your information.