
You're staring at two buttons that sound nearly identical: "Reset" and "Erase All Content and Settings." The phrase reset vs erase all content and settings is confusing because both options live in the same menu, and both seem to "reset" your device. But one of them wipes everything you own, while the other only tweaks the settings.
Apple's official support documentation confirms that "Reset All Settings" leaves your photos, messages, and apps untouched. According to the iOS Security Guide, the "Erase All" process cryptographically sanitizes the device, making data recovery extremely difficult. That difference matters, a lot.
Let's walk through exactly what each button does so you never hit the wrong one.

Image source: Openverse / cogdogblog
Quick Answer
Reset keeps your data. Erase removes everything.
Reset All Settings affects only system preferences like Wi‑Fi passwords and wallpaper.
Erase All Content and Settings deletes all files, accounts, and apps.
Use Reset to fix glitches. Use Erase before selling or giving away your device.
Why You're Probably Confused About These Two Buttons
Apple buried both options under the same parent menu. You go to Settings > General > Transfer or Reset iPhone. Right there, "Reset" is the top entry, and "Erase All Content and Settings" sits one line below.
They share the same visual weight and the same kind of confirmation prompt.
But the outcomes couldn't be more different. Tapping "Reset" opens a sub‑menu with five distinct choices. Tapping "Erase All" immediately asks for your passcode and Apple ID password, then starts a process that permanently deletes everything.
The confusion also comes from language. Other operating systems call a factory reset something like "Reset this PC" and that actually wipes the drive. On an iPhone, "Reset" by itself doesn't mean wipe.
It means "restore defaults for a specific category." That mismatch trips up even experienced users.
What Each Option Actually Does (No Fluff)
Reset (the umbrella menu)
When you tap Reset, you see five sub‑options:
| Option | What it affects | Data preserved? |
|---|---|---|
| Reset All Settings | Wi‑Fi networks, Bluetooth pairings, wallpaper, privacy permissions, keyboard dictionary, accessibility settings | Yes — all photos, apps, messages, music, documents |
| Reset Network Settings | Only Wi‑Fi networks, Bluetooth devices, cellular settings, VPN/APN configurations | Yes — everything else stays |
| Reset Keyboard Dictionary | Custom words you've taught the keyboard | Yes — all other data |
| Reset Home Screen Layout | App icon positions and folders | Yes — all apps remain installed |
| Reset Location & Privacy | App permissions for location, camera, microphone, and more | Yes — all other data |
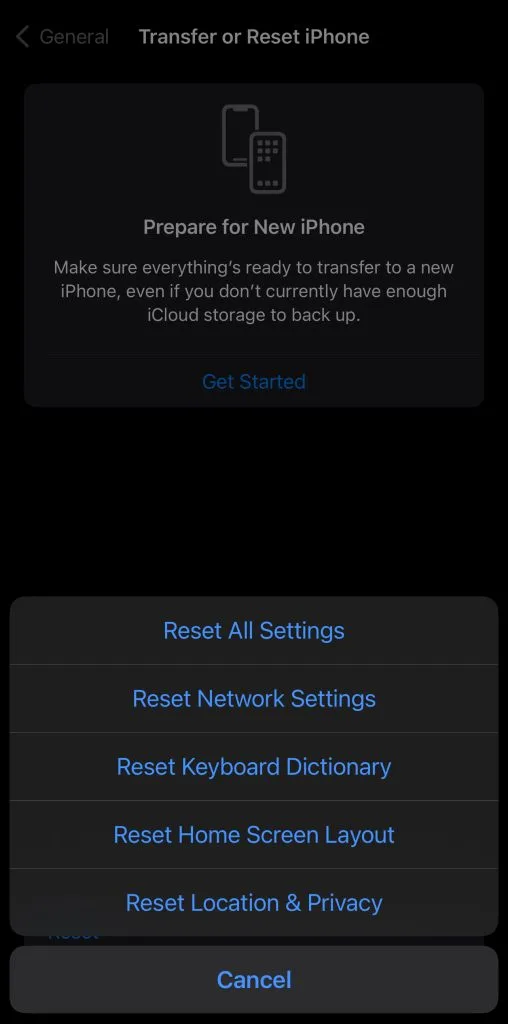
Image source: Bing (Web (fair-use with source credit))
Reset All Settings is the most commonly used sub‑option. It's like giving your phone's preferences a factory reset without touching your personal files. After it runs, your phone restarts.
You'll need to reconnect to Wi‑Fi and re‑pair Bluetooth devices. Everything else, photos, apps, iMessages, notes, remains exactly where you left it.
Reset Network Settings is a lifesaver when you can't connect to Wi‑Fi, cellular data drops frequently, or Bluetooth won't pair. It clears saved networks and devices, forcing fresh scans. Your photos, apps, and other data stay completely untouched.
Reset Keyboard Dictionary solves autocorrect problems. If your phone keeps "correcting" words you type regularly, this clears the learned vocabulary. It's a quick fix that requires no backup.
Reset Home Screen Layout moves all your apps back to the default grid. Folders you created vanish; icons appear in their original order. No data is lost.
Reset Location & Privacy is useful when you want to start permissions fresh. Every app will ask again for access to your location, camera, or microphone.
Erase All Content and Settings
This is the full device wipe. When you confirm, the iPhone:
- Signs out of your Apple ID (if you're online)
- Turns off Find My iPhone
- Removes all encryption keys
- Deletes every file, photo, message, app, and account
- Restarts and shows the "Hello" setup screen, just like a new phone
There is no recovery. No "undo" button. The device is cryptographically erased per Apple's secure‑deletion standards.
Only a previous backup can restore your data.
The Decision Tree – Pick Your Path
Your situation determines the right choice. Follow these branches.
Branch 1: Are you fixing a glitch?
If your phone is acting weird, apps crash, Wi‑Fi won't connect, Bluetooth drops, settings hang, start with Reset All Settings. This fixes most software corruption without risking your data. If the problem persists, try Reset Network Settings (for connectivity issues) or Reset Location & Privacy (for permission bugs).
Only move to Erase All if nothing else works and you've backed up everything.
Branch 2: Are you selling or giving away the device?
You must use Erase All Content and Settings. A simple reset leaves your data intact. The next owner could access your photos, accounts, and passwords.
Erase All removes everything and disables Activation Lock, letting the new user set it up fresh.
Branch 3: Do you want a fresh start without losing data?
You actually want Reset All Settings, not Erase All. It clears all your customizations, wallpapers, notification sounds, privacy settings, and gives you a blank settings slate while keeping your photos, apps, and messages. You'll have to reconfigure Wi‑Fi and permissions, but your life's data stays.
Branch 4: Is it a network, keyboard, or layout problem only?
Don't reset everything. Use the specific sub‑option:
- Network problem → Reset Network Settings
- Autocorrect annoyance → Reset Keyboard Dictionary
- Messy home screen → Reset Home Screen Layout
- Permission confusion → Reset Location & Privacy
These targeted resets take seconds and leave your other settings alone.
Step‑by‑Step: How to Safely Reset (Without Losing Anything)
Here's the exact process for a safe Reset All Settings, the one that keeps your photos and apps.
- Open Settings. Tap the gray gear icon on your home screen.
- Go to General. Scroll down about halfway.
- Tap Transfer or Reset iPhone. Near the bottom of the General menu.
- Tap Reset. The button at the bottom of the list that says "Reset."
- Choose Reset All Settings. It's the first option in the sub‑menu.
- Enter your passcode. This confirms it's really you.
- Confirm when prompted. A warning appears listing what will be reset. Tap "Reset All Settings."
- Wait for the restart. The phone will reboot. The whole process takes about 30 seconds.
After the restart, you'll need to:
- Reconnect to Wi‑Fi (enter passwords again)
- Re‑pair Bluetooth devices (headphones, car, watch)
- Re‑grant app permissions (location, camera, etc.)
- Re‑set any custom wallpapers or ringtones
Your photos, messages, notes, contacts, and installed apps are all still there. No backup required.
If you're resetting only network settings, follow steps 1, 4, then choose Reset Network Settings in step 5. That's it.
Step‑by‑Step: How to Properly Erase All Content and Settings (Before Sale or Trade‑In)
This process is straightforward but requires preparation. Skipping even one step can lock your device or leave personal data exposed.
Step 1: Back up everything you want to keep
Before you wipe anything, create a fresh backup.
- iCloud backup: Go to Settings > [your name] > iCloud > iCloud Backup > Back Up Now. Stay connected to Wi‑Fi until it finishes.
- Computer backup: Connect your iPhone to a Mac or PC. Open Finder (macOS Catalina or later) or iTunes (Windows or older macOS). Select your device, then click Back Up Now.
A full iCloud backup typically takes 5 to 30 minutes depending on storage size and internet speed. Computer backups run faster since they use a wired connection.
Do not proceed until the backup is complete. Verify by checking the date and time under Settings > [your name] > iCloud > iCloud Backup > Last Successful Backup.
Step 2: Sign out of iCloud (optional but recommended)
When you tap Erase All, the device signs out of your Apple ID automatically if it's online. But doing it manually beforehand gives you one extra safety net.
Why sign out manually: If the device loses internet connection during the erase process, Activation Lock can stay enabled. The next owner won't be able to activate the phone without your Apple ID password.
To sign out manually:
- Go to Settings > [your name].
- Scroll to the bottom and tap Sign Out.
- Enter your Apple ID password to turn off Find My iPhone.
- Choose what data to keep on the device (none, since you're erasing anyway).
- Tap Sign Out.
Step 3: Navigate to the erase option
Go to Settings > General > Transfer or Reset iPhone. Tap Erase All Content and Settings.
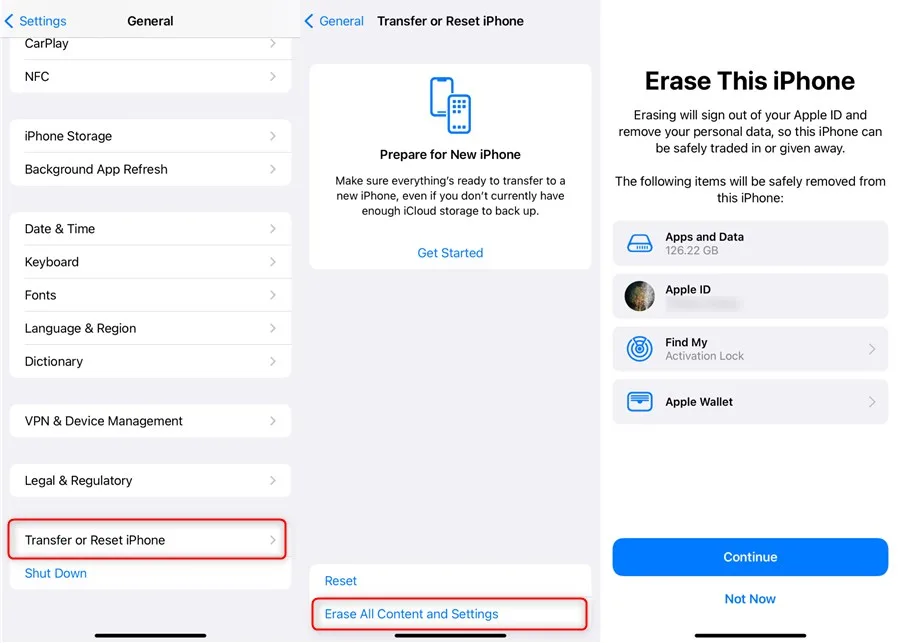
Image source: Bing (Web (fair-use with source credit))
Step 4: Confirm the erase
The phone will display a warning screen listing everything that will be removed. It also reminds you that your Apple ID will be signed out.
Tap Erase iPhone. You'll be prompted for your passcode and your Apple ID password. Enter both.
Step 5: Wait for the process to complete
The erase takes between 5 and 15 minutes. During this time:
- The screen goes black with an Apple logo and progress bar.
- The device restarts once or twice.
- Your iPhone downloads a small activation profile from Apple's servers.
When it finishes, the phone shows the "Hello" screen in multiple languages. This confirms the erase was successful.
Step 6: Set up or hand off
If you're keeping the device, you can set it up as new or restore from your backup. If you're selling or trading it in, leave it on the "Hello" screen. The new owner will complete setup with their own Apple ID.
Common Mistakes People Make (And How to Avoid Each)
Even careful users slip up. These are the most frequent errors reported across Apple support forums.
Mistake 1: Confusing "Erase All" with a simple reset
This is the most dangerous mix-up. Users tap "Erase All Content and Settings" thinking it will just clear their home screen layout or fix a Wi‑Fi issue.
How to avoid it: Read the warning screen carefully. If the message says "This will erase your media and data," that's Erase All. If it says "This will reset settings without affecting your data," that's Reset.
Pause and confirm before tapping.
Mistake 2: Forgetting to back up before erasing
Erase All is permanent without a backup. Many users realize this only after the phone restarts and they see the "Hello" screen.
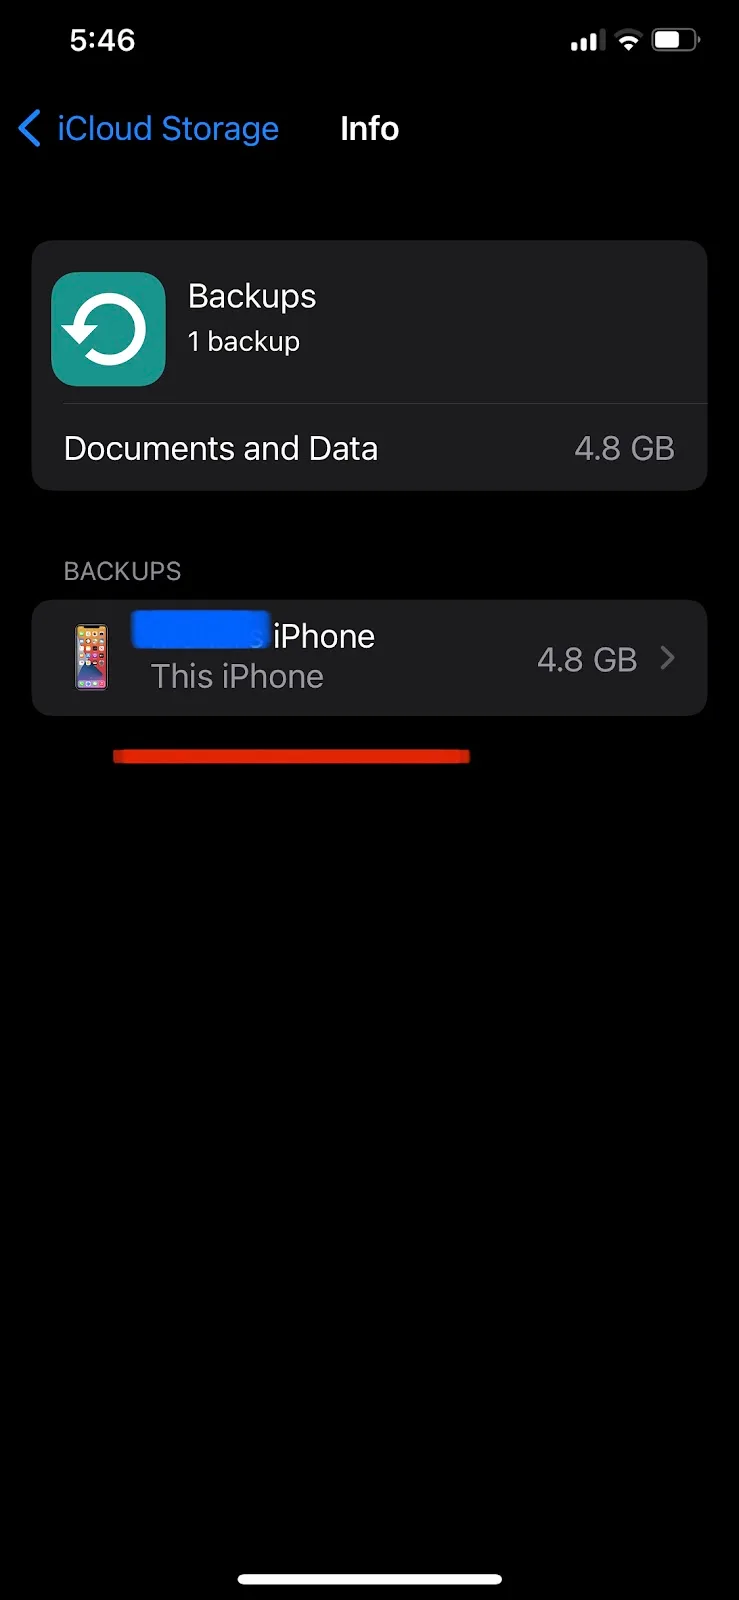
Image source: Bing (Web (fair-use with source credit))
How to avoid it: Make backing up a non-negotiable first step. Set a rule: "No backup, no erase." Check your backup date and time in Settings before proceeding.
Mistake 3: Skipping the iCloud sign‑out
This locks the device to your Apple ID. The next owner can't activate it. You'll have to use Apple's account recovery process, which can take days.
How to avoid it: Sign out of iCloud manually before erasing. If you forget, make sure the device stays connected to Wi‑Fi during the entire erase process. Apple's servers will remove Activation Lock automatically as long as it can reach them.
Mistake 4: Picking the wrong sub‑reset and making things worse
Users sometimes tap "Reset All Settings" when they only meant to reset network settings. This loses all their Wi‑Fi passwords, wallpaper, and accessibility preferences unnecessarily.
How to avoid it: Identify the exact problem first. If your Wi‑Fi dropped, choose Reset Network Settings, not Reset All Settings. If your keyboard is acting weird, pick Reset Keyboard Dictionary.
Use the table in the earlier section to match symptoms to the right option.
Mistake 5: Not removing a SIM card before erasing
If you're selling your phone, remove the SIM card. The new owner might need their own. Some carriers also lock the device to the original SIM during activation, which can cause issues.
How to avoid it: Eject the SIM tray with a paper clip. Remove the SIM. Store it safely or transfer it to your new device.
Mistake 6: Erasing a stolen or locked device
If you buy a used iPhone and it asks for someone else's Apple ID password after erasing, you have an Activation Locked device. This is a known issue in the secondhand market.
How to avoid it: Before erasing a device that isn't yours, confirm the seller has removed it from their Apple ID. Ask them to sign out of iCloud in front of you. If they can't, don't buy it.
Use Cases – When to Choose Reset vs. Erase
Different situations call for different approaches.
Troubleshooters
You're here because something isn't working. Your apps crash. Your phone won't connect to your car.
Your keyboard autocorrects every third word.
Best choice: Start with the specific sub‑reset. Reset Network Settings for connectivity. Reset Keyboard Dictionary for typing issues.
Reset Location & Privacy for permission bugs. Only escalate to Reset All Settings if none of those work.
When to erase: If you've tried all sub‑resets and the problem persists, and you've exhausted other troubleshooting steps like restarting and updating iOS, then consider Erase All. But only after backing up.
Sellers and trade‑in users
You're passing your device to someone else. Your privacy matters. Their convenience matters.
Best choice: Erase All Content and Settings. Always. No exceptions.
Why not reset: A simple reset leaves your photos, messages, and accounts on the device. Anyone with basic technical knowledge can recover them. Apple's trade‑in program also requires Erase All as part of their terms.
Parents handing down a device
Your old iPhone is going to your child. They need a clean slate with their own Apple ID.
Best choice: Erase All Content and Settings. Then set up the phone as new with your child's Apple ID. This prevents them from accessing your messages or accidentally making purchases under your account.
Beta testers cleaning up
You installed a beta version of iOS and now you want to return to the stable release.
Best choice: Erase All Content and Settings, then restore from a backup made before the beta, or set up as new and install the public release.
Why reset won't work: Beta profiles often modify system files that a settings reset doesn't touch. A full erase ensures no beta remnants remain.
Users switching phones
You just bought a new iPhone and need to trade in the old one.
Best choice: Use Quick Start during new phone setup to transfer data. Then follow the erase steps above on the old device.
What You Lose and What You Keep (Quick Reference Table)
This table summarizes the outcome of each option at a glance.
| Option | Photos & Videos | Messages & Contacts | Apps & Documents | Wi‑Fi Passwords | Wallpaper | Bluetooth Pairings | App Permissions |
|---|---|---|---|---|---|---|---|
| Reset All Settings | Keep | Keep | Keep | Lost | Lost | Lost | Lost |
| Reset Network Settings | Keep | Keep | Keep | Lost | Keep | Lost | Keep |
| Reset Keyboard Dictionary | Keep | Keep | Keep | Keep | Keep | Keep | Keep |
| Reset Home Screen Layout | Keep | Keep | Keep (apps rearranged) | Keep | Keep | Keep | Keep |
| Reset Location & Privacy | Keep | Keep | Keep | Keep | Keep | Keep | Reset to defaults |
| Erase All Content and Settings | Deleted | Deleted | Deleted | Deleted | Deleted | Deleted | Deleted |
The pattern is clear. Reset options keep your personal files. Erase All removes everything.
Use this table as a quick check before you tap anything.
What about iCloud data?
Your iCloud data (photos, contacts, notes, calendars) exists on Apple's servers, not just on your device. Erasing your iPhone does not delete your iCloud data. When you sign into a new device with your Apple ID, that data syncs back down.
This is an important distinction. Even after Erase All, your photos in iCloud are safe. But any data stored locally only on the device (like unreleased voicemails or notes stored "On My iPhone") is gone.
FAQs – The Questions People Actually Ask
Will "Reset All Settings" delete my photos?
No. Reset All Settings only touches system preferences. Your photos, videos, messages, contacts, notes, and apps remain exactly where they are.
The phone simply forgets your Wi‑Fi passwords, wallpaper, and permissions.
Can I undo "Erase All Content and Settings"?
Not without a backup. There is no undo button. Once the process completes, the device is cryptographically wiped per Apple's secure deletion standards.
The only way to get your data back is to restore from an iCloud or computer backup created before the erase.
Do I need a backup before a network reset?
No. Resetting network settings only clears saved Wi‑Fi networks, Bluetooth pairings, and cellular configurations. Your personal data remains untouched.
You do not need a backup for any of the five sub‑resets under the Reset menu.
What if my phone is stuck and I can't reach Settings?
Use a computer. Connect your iPhone to a Mac or PC. Put the device into Recovery Mode (press and hold the side button while connecting to the computer).
In Finder or iTunes, you'll see options to Update or Restore. Restore performs a full erase and installs the latest iOS. This is equivalent to Erase All Content and Settings but works when the touchscreen is unresponsive.
Does erasing my iPhone delete my iCloud photos?
No. iCloud Photos are stored on Apple's servers, not just on your device. When you erase your iPhone and later sign into a new device with your Apple ID, your iCloud photos sync back down. Local-only data like voicemails or "On My iPhone" notes is gone permanently.
How long does a full erase take?
Between 5 and 15 minutes on most modern iPhones. Older models may take longer. The phone restarts once or twice.
You'll know it's done when you see the "Hello" screen. Network speed can affect the final activation step, but the local wipe itself is quick.
Will a reset fix a frozen or unresponsive phone?
Sometimes. If the phone is completely frozen and won't respond to touch, you cannot navigate to Settings. Try a force restart first (press volume up, volume down, then hold the side button until the Apple logo appears).
If that fails, use Recovery Mode as described above.
Can I erase a stolen iPhone?
If you have Find My iPhone enabled and the device is online, you can erase it remotely from iCloud.com. This removes your data and locks the device with Activation Lock. The thief cannot use or sell the phone without your Apple ID password.
Final Decision Guide – One Flowchart in Words
Here is your quick reference. Think of it as a mental flowchart you can run through before touching any button.
Start here: What are you trying to do?
- Fix a problem → Go to question A.
- Sell, trade, or give away → Go to question B.
- Fresh start but keep data → Go to question C.
- Network/keyboard/layout issue only → Go to question D.
Question A: What kind of problem?
- General glitch, weird behavior, app crashes → Use Reset All Settings.
- Wi‑Fi or Bluetooth not connecting → Use Reset Network Settings.
- Keyboard autocorrect issues → Use Reset Keyboard Dictionary.
- Permission or location bugs → Use Reset Location & Privacy.
- Problem persists after all resets → Back up, then Erase All Content and Settings.
Question B: Are you selling or trading in?
- Yes → Back up, sign out of iCloud, then Erase All Content and Settings.
- No, just passing the phone to a family member → Same process. Always erase.
Question C: Do you want a clean settings slate without losing data?
- Yes → Use Reset All Settings. Your photos, messages, and apps stay.
- No, you want to start completely empty → Back up, then Erase All Content and Settings.
Question D: Is it a single‑category issue?
- Network only → Reset Network Settings.
- Keyboard only → Reset Keyboard Dictionary.
- Home screen only → Reset Home Screen Layout.
- Permissions only → Reset Location & Privacy.
Final rule of thumb: If your goal is to keep your data, use Reset. If your goal is to remove your data, use Erase All. When in doubt, back up first.
You can never undo an erase, but you can always undo a reset by re-entering your settings.
That's the complete picture. You now have everything you need to choose the right option with confidence. No more guesswork, no more accidental wipes.
Just a clear decision path based on what you actually need.