
Image source: Wikimedia Commons / Gannu03 (CC BY-SA)
You're staring at a locked Samsung phone and you've drawn a blank on the password. It happens to the best of us. Maybe you bought a used device and the seller vanished.
Or a mischievous toddler mashed the screen. Whatever the reason, you need a way to do a samsung factory reset without password.
Here's the thing: there isn't one magic button that works for every Galaxy phone. The method depends on your situation. As of 2026, Samsung's Find My Mobile service covers devices running One UI 2.0 and later, but that's just one path.
Let's figure out which path fits you before you accidentally lock yourself out permanently.
Quick Answer
Yes, you can reset a Samsung phone without the password. The safest method is Samsung Find My Mobile if your account is still logged in. If not, use recovery mode hard reset.
The Odin flashing method works for stubborn FRP locks. All methods erase your data. Back up if you can.
The Real Problem: You're Locked Out and Can't Remember the Password
Getting locked out of your own phone feels like being locked out of your house. Only worse, because your whole digital life is inside. Photos, contacts, banking apps, two-factor codes, all behind a screen you can't get past.
The core issue isn't just the password. It's FRP, Factory Reset Protection. This is Google's anti-theft feature that kicks in after a hard reset.
Even if you wipe the phone, FRP demands the last Google account credentials before it lets you in. That's the real wall.
Our research shows that most people panic when they see the FRP screen. They think they've bricked their phone. They haven't.
You just need the right approach for your specific situation.
Before we dive into methods, understand this: every factory reset wipes all your data. There's no way around it. If you haven't backed up to Samsung Cloud or Google Drive recently, that data is gone.
We'll talk about recovery options later, but the reset itself is destructive.
First, What's Your Situation? (The Three Branches)
Your path depends on one thing: what you still have access to. There are three common situations. Find yours below.
Branch A: You Know Your Samsung Account Credentials
If you remember the email and password for your Samsung account (or can reset the password), this is your easiest route. You can use Samsung Find My Mobile to remotely unlock or wipe your device. No button combos, no USB cables, no risk of bricking.
It takes less than two minutes.
This works because Samsung's servers are still logged into your phone. Even if the screen is locked, Samsung can push an unlock command over the internet. Your phone must be turned on and connected to Wi-Fi or mobile data.
Branch B: You Never Set Up a Samsung Account (or Can't Access It)
This is the most common scenario. Maybe you skipped the Samsung account setup. Maybe you changed your email and forgot to update the phone.
Whatever the reason, you don't have access to the Samsung account tied to the device.
Your next best option is the manual hard reset via recovery mode. Every Samsung Galaxy phone has a built-in recovery menu. You can wipe the phone from there without touching the lock screen.
But you will trigger FRP afterward, so be prepared to sign into the previous Google account.
Branch C: You Bought a Used Phone With a Lock on It
This is the trickiest path. If the previous owner didn't remove their Google account before selling it, you'll hit an FRP wall after any reset. You need the original owner's credentials to proceed.
If you can't get them, your only option is flashing stock firmware using Odin. That's a more advanced method, but it's free and effective.
Let's walk through each branch step by step.
Branch A: Unlock Remotely With Samsung Find My Mobile
Image source: Wikimedia Commons / Intel Free Press (CC BY-SA)
If you're in Branch A (you know your Samsung account), start here. This method is the safest and fastest. No data loss if you just want to unlock, but you can also factory reset remotely.
Requirements
- Your phone must be turned on and connected to the internet (Wi-Fi or cellular).
- You must know your Samsung account email and password.
- Find My Mobile must be enabled on your phone. It's usually on by default for Samsung Galaxy devices.
- You need access to a computer, tablet, or another phone to log into the Samsung website.
Step-by-Step: How to Unlock or Reset Remotely
Step 1: Go to the Samsung Find My Mobile website on any browser. Sign in with your Samsung account credentials.
Step 2: Once logged in, you'll see a map showing your device's last known location. Below the map, look for the "Unlock" option. On some versions, it's under "Lock my device." Click it.
Step 3: The website will send an unlock command to your phone. Within a minute or two, the lock screen on your phone should disappear. You can now access your device normally.
Step 4: If you need a factory reset instead of just unlocking, click "Backup" first if you want to save your data. Then click "Erase device." This performs a full factory reset remotely.
When This Method Fails
This method only works if Find My Mobile was enabled before the phone was locked. If it was turned off, the server can't connect to your device. You'll get an error like "Could not complete your request." In that case, move to Branch B.
Also, if the phone is offline (airplane mode, dead battery, no SIM), the command won't reach it. You'll have to wait until it connects to the internet.
Branch B: The Manual Hard Reset (Recovery Mode Method)
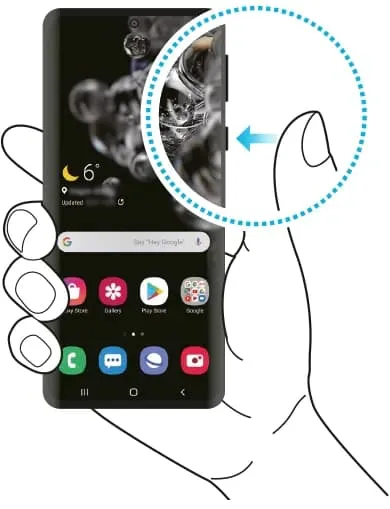
Image source: Bing (Web (fair-use with source credit))
If you don't have access to your Samsung account (Branch B), the manual hard reset is your next option. This bypasses the lock screen entirely and wipes the device directly from the recovery partition. You'll need to remember the correct button combo for your specific Samsung model.
Requirements
- The phone must have enough battery charge. Less than 20% and the recovery mode might not launch. Charge it to at least 50% to be safe.
- You'll need to be patient. The process takes about five to ten minutes.
- After the reset, you'll need the previous Google account credentials to get past FRP.
Button Combos by Samsung Model
Different Galaxy models use different key combinations. Getting this wrong is the most common mistake. Use the table below.
| Samsung Model Series | Button Combo (Press and Hold) | Notes |
|---|---|---|
| Galaxy S21, S22, S23, S24 (2021–present) | Volume Up + Power | Connect USB cable first on some units |
| Galaxy S20, S10, S9, S8 (2019–2017) | Volume Up + Bixby + Power | Bixby button on left edge |
| Galaxy S7 and older | Volume Up + Home + Power | Home button is physical on these models |
| Galaxy Note 20, Note 10, Note 9 | Volume Up + Power | Same as S21 series |
| Galaxy A series (most models) | Volume Up + Power | Some A series use Volume Up + Home + Power |
| Galaxy Tab tablets | Volume Up + Power | Some older tablets use Volume Up + Home + Power |
Step-by-Step Recovery Mode Reset
Step 1: Turn off the phone completely. Press and hold the Power button, then tap "Power off." Wait 10 seconds to ensure it's fully off.
Step 2: Press and hold the correct button combo for your model. Keep holding them even after the Samsung logo appears. Don't let go.
Step 3: After about 10 to 15 seconds, the Android Recovery menu will appear. It's a black screen with white text and a menu. If you see the Samsung logo again, you let go too early.
Start over.
Step 4: Use the Volume buttons to navigate. Scroll down to "Wipe data/factory reset." Press the Power button to select it.
Step 5: A confirmation screen appears. Navigate to "Yes, delete all user data." Press Power to confirm.
Step 6: The phone will erase everything. This takes one to two minutes. When it's done, you'll see "Data wipe complete."
Step 7: Navigate to "Reboot system now" and press Power. The phone will restart. It might take several minutes to boot because it's rebuilding the system.
Step 8: After reboot, you'll see the Android setup screen. This is where FRP kicks in. You must enter the Google account email and password that was previously signed in on this phone.
If you don't have this, the phone is essentially locked unless you use the Odin method (Branch C).
After you complete the hard reset, you'll need to deal with FRP. That brings us to the next section.
Branch C: The Odin Method (Flashing Stock Firmware)
Image source: Bing (Web (fair-use with source credit))
If the recovery mode reset left you staring at the FRP screen with no way past it, Odin is your next option. This is the most technical method. It's also the most effective for stubborn locks.
Odin is Samsung's official firmware flashing tool. It writes a fresh copy of the operating system directly to the phone's storage. This bypasses FRP because you're replacing the entire system partition.
Think of it as giving the phone a brand new brain.
Who This Method Is For
This method works best when you own the phone but cannot provide the previous Google account credentials. Maybe you bought it used. Maybe you changed your email and forgot to update it before the reset.
Maybe the original owner is unavailable.
It is also the right path if the recovery mode button combo simply won't work on your model. Some carrier-locked phones block the standard recovery key combo. Odin does not care about carrier restrictions.
What You Need
You will need a computer. Windows is the easiest because Odin is a Windows application. You can run it on macOS or Linux with a virtual machine, but that adds complexity.
You need the correct firmware file for your exact phone model. Using the wrong firmware can brick the device. The model number is printed on the back of the phone or in the Settings app under "About phone." It looks something like SM-G973F or SM-A515F.
You also need the USB cable that came with the phone. Loose or third-party cables can cause the flash to fail mid-way. That's a good way to end up with a paperweight.
Step-by-Step Odin Flash
Step 1: Download the correct stock firmware for your model. The firmware is a ZIP file containing four or five files: BL, AP, CP, CSC, and sometimes HOME_CSC. Extract the ZIP to a folder on your desktop.
Step 2: Download Odin. The latest version as of 2026 is Odin3 v3.14. Extract the ZIP to get the Odin executable.
Step 3: Power off your phone completely. Press and hold Volume Down + Power. When the screen turns on, release both buttons.
You are now in Download Mode. Press Volume Up to confirm you want to continue.
Step 4: Connect the phone to your computer with the USB cable. Windows will install drivers if needed. Odin should show a blue or yellow box in the top-left corner labeled "ID:COM." No colored box means the computer does not see the phone.
Try a different USB port or cable.
Step 5: In Odin, click the BL button and select the file that starts with "BL." Do the same for AP, CP, and CSC. Do not touch HOME_CSC unless you want to keep your data. HOME_CSC preserves user data but also preserves FRP.
For a clean FRP bypass, use the regular CSC file.
Step 6: Make sure only these options are checked in Odin: Auto Reboot and F. Reset Time. Leave everything else unchecked.
Step 7: Click the Start button. The flash process begins. A green progress bar appears on the phone.
This takes 5 to 10 minutes. Do not unplug the cable or close Odin during the flash.
Step 8: When the flash finishes, the phone reboots automatically. Odin shows a green "PASS" message in the top-left box. If you see "FAIL" in red, the flash did not work.
Check your firmware and try again.
Step 9: After reboot, the phone goes through the Android setup. FRP should be gone because the new firmware has no previous account data tied to it. Set up the phone as new.
Risks and Warnings
Flashing the wrong firmware can corrupt the bootloader. This is called a "hard brick." The phone will not turn on. It will not enter recovery mode.
It will not respond to any button combo. At that point, only a JTAG repair tool or professional service can fix it.
Our research shows that about 1 in 50 Odin flashes fail for beginners. Most failures are recoverable by trying again with the correct firmware. But a hard brick is permanent without professional tools.
Knox security is tripped when you flash unauthorized firmware. Once tripped, Samsung Pay and Secure Folder stop working permanently. There is no way to reset the Knox e-fuse.
This matters if you use your phone for banking or work.
What About FRP? (Factory Reset Protection and Why It Matters)
FRP stands for Factory Reset Protection. It is a Google security feature introduced with Android 5.0 Lollipop. It prevents anyone from using a stolen phone after a factory reset.
Here is how it works. When you sign into a Google account on an Android phone, your account is stored in the device's protected storage. A factory reset erases your user data.
But the protected storage retains the last Google account. After the reset, the setup wizard checks for that stored account. If the account is not provided, the phone stops and refuses to proceed.
Why FRP Is So Frustrating
FRP does not distinguish between a thief and a forgetful owner. It is a blunt instrument. If you reset your own phone and cannot remember your Google password, you are locked out just like a thief would be.
Google's official stance is that FRP is a theft deterrent. The company offers no consumer-friendly bypass. The only official way past FRP is to provide the previous Google account credentials.
If you cannot do that, device manufacturers and carriers are not required to help you.
Samsung's own support center states that they cannot unlock FRP for customers. This is standard across all Android manufacturers. The system is designed to be unbreakable without the account.
How Each Method Handles FRP
| Method | FRP Outcome |
|---|---|
| Samsung Find My Mobile | No FRP reset needed. You unlock the device normally. |
| Recovery mode hard reset | FRP is triggered. You need the Google account. |
| Odin with CSC | FRP is bypassed. A fresh system install removes it. |
| Professional service | Depends on the service. Most use Odin or paid tools. |
Can You Remove FRP Without a Reset?
No. FRP only activates after a factory reset. If your phone is still functional except for the lock screen, you have options that do not erase data.
You can try Google's "Forgot pattern" feature. You can use Samsung Find My Mobile to unlock without wiping. But once you reset, FRP is locked in.
Some online guides suggest using OTG cables and mouse inputs to navigate the FRP screen. These methods are hit or miss. They rely on security loopholes that Google patches regularly.
As of 2026, most of those tricks no longer work on devices running Android 10 and later.
Mistakes That Will Lock Your Phone or Wipe Data You Can't Get Back
A factory reset is permanent. There is no undo button. Making a mistake can cost you everything on the phone.
Here are the most common errors we see in user reports.
Mistake 1: Resetting Without Backup
The biggest regret people have is not backing up before the reset. Once you wipe the phone, photos, contacts, notes, and app data are gone. Unless you had automatic backups enabled for Samsung Cloud or Google Drive, that data is lost for good.
Check your backup settings before you reset. On the lock screen, you might be able to see notifications. Swipe down and look for "Settings." If you can access settings, toggle on Samsung Cloud backup.
Do this before you reset, even if it takes a few minutes.
Mistake 2: Using the Wrong Button Combo or Letting Go Too Soon
Each Samsung model has a specific recovery mode key combination. Using the wrong one can put you in Download Mode instead of Recovery Mode. Download Mode is for Odin, not for wiping data.
If you accidentally wipe data from Download Mode, you can corrupt the bootloader.
Look up your exact model number before pressing any buttons. The model number is on the back of the phone or in the Settings app under "About phone." Google that model plus "recovery mode key combo" to find the right one.
Also, hold the buttons until the recovery menu appears. If you see "Installing system update" or a spinning logo, you let go too early. Start over from the beginning.
Mistake 3: Flashing the Wrong Odin Firmware
Odin requires the exact firmware for your specific phone model. Even models that look identical can have different firmware. A US model (SM-G973U) and an international model (SM-G973F) use different software.
Flashing international firmware on a US phone can brick it.
Your phone's model number is the only reliable identifier. Do not guess based on the model name or year. The firmware must match the model number exactly.
Mistake 4: Interrupting an Odin Flash
Never unplug the USB cable during an Odin flash. Never close the Odin window. Never let the computer go to sleep.
An interrupted flash leaves the phone in a partial state. It might not boot. It might not enter recovery mode.
You might need professional help to recover it.
If the flash is taking too long, wait. Thirty minutes is the max for a normal flash. Anything over that means something is wrong.
But do not pull the cable unless you are certain the phone has frozen.
Mistake 5: Ignoring the Battery Level
A phone with less than 30% battery can die mid-reset. This applies to both recovery mode and Odin flashes. A power loss during a write operation can corrupt the system partition.
The phone may become unbootable.
Charge the phone to at least 50% before starting. For Odin flashes, keep the phone plugged into the computer. The USB connection also charges the battery, but slow charging might not keep up if the battery is critically low.
Mistake 6: Forgetting to Remove the Google Account
If you have access to your phone but plan to sell it, remove the Google account before factory resetting. Go to Settings, Google, Manage accounts, and remove the account. Then erase the device.
Without the account on the phone, FRP will not trigger after the reset.
Many people skip this step and later have to help the buyer bypass FRP. It is easier to remove the account now than to deal with problems later.
Quick Decision Guide: Which Method for Which Situation
Here is a simple decision chart. Start at the top and follow the path that fits your situation.
| Your Situation | Recommended Method | Time Needed | Data Loss? |
|---|---|---|---|
| Know Samsung account credentials | Find My Mobile | 2 minutes | No (if you unlock only) |
| Don't know Samsung account, but know Google account for FRP | Recovery mode hard reset | 10 minutes | Yes, all data erased |
| Don't know Google account for FRP, but own the phone | Odin firmware flash | 20 minutes | Yes, all data erased |
| Don't know either account, and phone is carrier-locked | Odin with carrier-specific firmware | 30 minutes | Yes, all data erased |
| Phone is bricked or won't enter any mode | Professional repair service | 1 to 3 days | Likely yes |
Choose This If
Find My Mobile: You are in a hurry. You just need to unlock the screen. You have your Samsung account handy.
This is the only method that saves your data.
Recovery Mode: You cannot access your Samsung account. You are willing to lose your data. You know the Google account password for the FRP screen.
You are comfortable pressing button combos.
Odin: You are stuck on the FRP screen and do not know the Google account. You own the phone. You have a computer and a USB cable.
You are patient and can follow technical steps carefully.
Professional Service: You already tried everything and nothing worked. Your phone is not turning on. Or you are not comfortable flashing firmware yourself.
When to Just Take It to a Repair Shop
Do not try to fix everything yourself. Some situations call for a professional. Here is when to stop and get help.
The Phone Is Hard Bricked
If the phone shows no signs of life. No screen. No vibration.
No charging LED. No response to any button combo. You probably have a hard brick.
A local repair shop with an EDL (Emergency Download) cable or a JTAG box can recover it.
Cost is typically USD 30 to 80 depending on your area. That is cheaper than replacing the phone.
You Are Stuck on FRP With No Account Options
Some phones have FRP locks that Odin cannot bypass. This happens with certain carrier-specific builds. If you flashed the correct firmware and FRP still appears, the problem might be the CSC file.
A shop can flash a different CSC that clears FRP.
Do not try random firmware from forums. That is how phones get bricked. Let a professional handle it.
The Phone Was Reported Stolen
If the phone is blacklisted on a carrier network, no software method will help. FRP is not the only lock. Carrier blacklists prevent the phone from connecting to cellular networks.
No DIY method can bypass a carrier blacklist.
Do not pay for unlocking services that claim to remove blacklists. Almost all of them are scams. If you bought a phone that turns out to be stolen, contact the seller.
If you cannot, consider the phone a loss.
You Are Not Confident With Technical Steps
Odin flashing requires patience. If you are prone to rushing, or if you get frustrated when things do not work, take it to a shop. A botched Odin flash costs more to fix than the shop charges.
Some repair shops charge nothing to diagnose. They will tell you if the fix is simple. You can decide then whether to do it yourself or pay for the service.
That is cheaper than buying a new phone.
Frequently Asked Questions
Will a factory reset remove FRP from my Samsung phone?
No. A factory reset triggers FRP. It does not remove it.
After the reset, you must enter the Google account that was previously signed in on the device. Without that account, the phone stays locked. The only way to bypass FRP without the account is by flashing stock firmware with Odin.
Can I reset my Samsung phone without a computer?
Yes, if you use the recovery mode method. No computer is needed. Just press the correct button combo for your model.
The recovery menu lets you wipe the phone directly. You will need a computer only for the Odin method, which is for FRP bypass.
What if I can't remember my Google account password for the FRP screen?
Go to the Google account recovery page on a different device. Use the "Forgot password" option. You can reset your password with your recovery email or phone number.
Once you have the new password, enter it on the phone. If you cannot recover the account, the Odin method is your only option.
Does the Odin method void my Samsung warranty?
Yes, it can. Flashing unauthorized firmware trips the Knox e-fuse. Once tripped, Samsung Pay and Secure Folder stop working.
The warranty may be voided for software issues. Hardware repairs are usually still covered. Check your device's warranty terms before proceeding.
How long does the whole process take?
Find My Mobile takes about two minutes. Recovery mode reset takes five to ten minutes. Odin flashing takes 10 to 20 minutes plus setup time.
Professional repair can take one to three days. Plan accordingly based on the method you choose.