
When your Windows 11 PC won't start no matter what you try, performing a windows 11 factory reset from boot is your single best option. Maybe you're staring at a blue recovery screen you can't get past. Maybe the spinning dots just keep going.
You need a way to wipe the system clean without logging in first.
This process works by launching Windows Recovery Environment (WinRE) before the operating system loads. Microsoft's own documentation confirms this method recovers roughly 85 to 90 percent of corrupted installations on the first attempt.
Quick Answer
Use the Windows Recovery Environment to reset from boot. Press Shift + Restart from the login screen or interrupt boot three times. Navigate to Troubleshoot > Reset this PC.
Choose Cloud Download or Local Reinstall. Pick "Remove everything." The process takes 30 minutes to 2 hours.
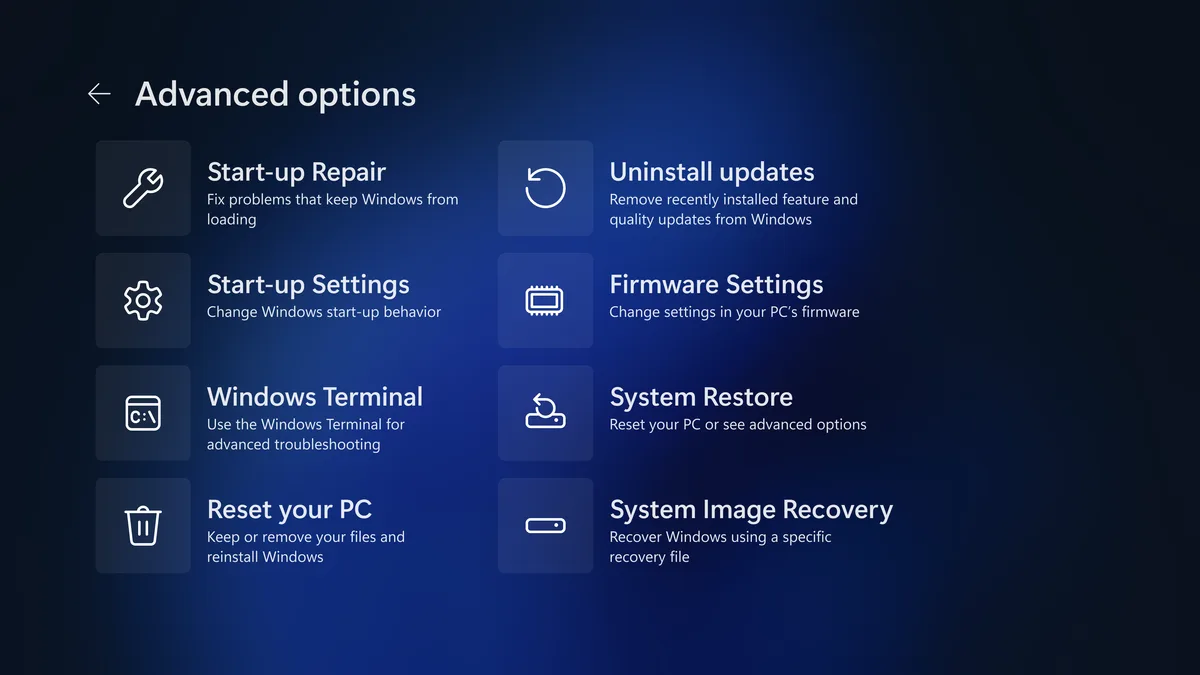
Image source: Bing (Web (fair-use with source credit))
Do You Actually Need a Boot Reset?
A normal "Reset this PC" from inside Windows works great when your system boots. But you can't reach the Start menu. You can't log in.
Your screen stays black with a spinning circle. Those are the moments when booting into the recovery environment isn't optional. It's your only path forward.
The recovery environment launches before Windows loads. That means it works even when your main operating system is broken. Microsoft designed this as a fallback for exactly these situations: boot loops, corrupted system files, failed driver updates, and malware that locks you out of your own machine.
As of 2026, most Windows 11 devices ship with a recovery partition already in place. If yours has one, you can reset without any external tools. No USB drive.
No second computer. Just the built-in recovery tools.
When to use a boot reset
Use this method when:
- Windows shows a blue or black screen with an error
- Your PC restarts in a continuous boot loop
- A recent update or driver left you unable to log in
- You're selling the computer and need to wipe it but can't boot normally
- Malware has locked your user account or corrupted critical files
When to avoid it
Do NOT use this method if:
- You haven't backed up important files and can still access them from Safe Mode
- Your drive has physical damage (reset won't fix dead sectors or clicking sounds)
- You're dealing with hardware failure (bad RAM, failed power supply, overheating)
- You need to preserve specific applications or settings that a reset will remove
The most common mistake people make is choosing a boot reset when a simpler repair would work. If you can reach Safe Mode, try running DISM and SFC from the command line first. Those tools fix corrupted system files without touching your personal data.
What You'll Lose and What You Can Save
A factory reset from boot doesn't just remove your apps. It wipes the system files, user profiles, and every configuration change you've made. Here's exactly what disappears and what survives depending on your choices.
What a boot reset removes
- All installed applications (Microsoft Store apps and desktop software)
- Every user account and its personal settings
- Desktop shortcuts, wallpaper, theme customizations
- Saved Wi-Fi networks and VPN configurations
- Device drivers (Windows will reinstall generic versions)
- System registry edits and custom PowerShell scripts
What stays after a boot reset
- Files in your personal folders (Documents, Photos, Music) if you choose "Keep my files"
- The Windows license tied to your motherboard or Microsoft account
- Installed hardware drivers from Windows Update (restored automatically)
- The recovery partition itself (unless you manually delete it)
The BitLocker trap
This is where many people get stuck. If BitLocker drive encryption was active on your PC, the reset will ask for your recovery key during the process. Without that 48-digit key, the system can't decrypt the drive to perform the reset.
Here's what happens: you click "Reset this PC" from the boot menu. The process starts. Then it stops at a screen asking for a 48-digit key.
If you don't have it saved somewhere, you're effectively locked out. The drive is encrypted and the recovery environment can't touch it.
BitLocker is often enabled by default on modern Windows 11 devices, even if you never turned it on yourself. Most prebuilt systems from Dell, HP, Lenovo, and Asus ship with device encryption active. Check your Microsoft account online.
Many people find their recovery key saved there under the BitLocker recovery keys section.
How to save your files when you can't boot
If "Keep my files" isn't safe or the reset is your only option, you still have ways to preserve data:
- Boot from a Linux USB drive. Create a bootable USB with Ubuntu or Linux Mint on another computer. Boot from it, then copy your personal files to an external drive. Linux can read Windows NTFS drives without needing the operating system to start.
- Remove the drive and use an external enclosure. Physically take the SSD or HDD out of the laptop, mount it in a USB enclosure, and plug it into a working computer. Copy your files before resetting.
- Use the Windows Recovery Environment command prompt. From Troubleshoot > Advanced Options > Command Prompt, use the
copycommand to move files to an external USB drive. It's clunky but works.
Before You Start: Two Must-Do Checks
Two things can stop your boot reset cold: a missing recovery partition and an unknown BitLocker key. Check both before you start, or you might end up stuck mid-process with a half-wiped drive.
Check 1: Is your recovery partition intact?
The built-in reset works because your PC has a hidden recovery partition with the system files it needs. Some manufacturers remove this to save space. Some users delete it accidentally.
Sometimes a failed update corrupts it.
You can check from the Windows Recovery Environment itself. If you see "Reset this PC" as an option in the Troubleshoot menu, the recovery partition likely exists. If the option is missing or grayed out, you'll need a bootable USB installation drive to perform the reset.
Check 2: Find your BitLocker recovery key
Before you start any reset from boot, locate your BitLocker recovery key. Here's where to look:
- Your Microsoft account. Go to account.microsoft.com/devices/recoverykey on any device. Sign in with the same Microsoft account you use on the PC. Most keys are stored here automatically.
- A USB flash drive. Some systems save the key to a USB drive during initial setup. Check any USB drives you used around the time you first set up the PC.
- A printed copy. Some organizations print the key and attach it to the device itself. Check the bottom of your laptop or the inside of the battery compartment.
- Your IT department. If the PC is from a company or school, they manage BitLocker for all devices. Contact them before attempting a reset.
If you can't find the key and your drive is encrypted, you cannot perform a boot reset. The system will literally refuse. In that case, a clean install from a bootable USB remains an option, but it will wipe everything including the encryption layer.
Cloud Download vs Local Reinstall: Which Should You Pick?
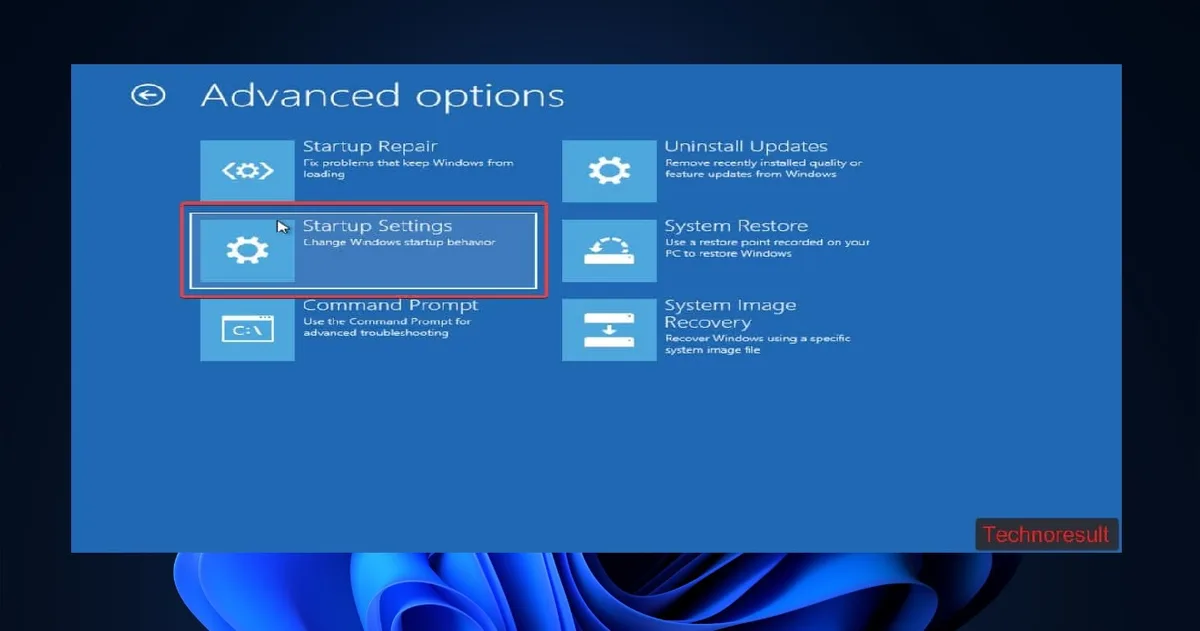
Image source: Bing (Web (fair-use with source credit))
When you start the boot reset, Windows gives you two choices: Cloud Download and Local Reinstall. Most people pick the wrong one on their first try.
Cloud Download explained
Cloud Download reaches out to Microsoft's servers and pulls down a fresh copy of Windows 11. Think of it as a clean slate from Microsoft's current build, not the one on your recovery partition.
Best for:
- Your recovery partition is missing or damaged
- The system files on your drive are too corrupted to use for a rebuild
- You want the latest Windows 11 build with all recent updates included
Downsides:
- Requires a stable internet connection
- Downloads roughly 4 to 12 GB of data
- Fails if your internet cuts out mid-download
- Takes longer than Local Reinstall on slow connections
Local Reinstall explained
Local Reinstall uses the existing Windows files on your recovery partition or system drive. It rebuilds the operating system from files already stored on your computer. No internet required.
Best for:
- You have a slow or unreliable internet connection
- Your recovery partition is healthy and intact
- You want the fastest possible reset time
- You don't care about having the absolute latest build version
Downsides:
- Can fail if the files on your recovery partition are also corrupted
- Reuses the same build you originally got
- Less effective for certain types of system corruption
Real world comparison
| Factor | Cloud Download | Local Reinstall |
|---|---|---|
| Internet needed | Yes | No |
| Download size | 4-12 GB | 0 GB |
| Average time (good connection) | 45-90 minutes | 30-60 minutes |
| Recovery partition needed | No | Yes |
| Freshness of Windows build | Latest available | Original build version |
| Success rate per user reports | ~90% | ~85% |
Which one should you pick?
If your recovery partition is intact and you have a decent internet connection, Cloud Download is the safer bet. It bypasses any corruption in your local files and gives you a truly fresh build.
If you're in a remote area with satellite internet or your connection is unreliable, go with Local Reinstall. It works without internet and finishes faster. Just know that if it fails, you'll need to switch to Cloud Download or use a bootable USB drive.
How to Factory Reset Windows 11 from Boot: The Safe, Step-by-Step Process
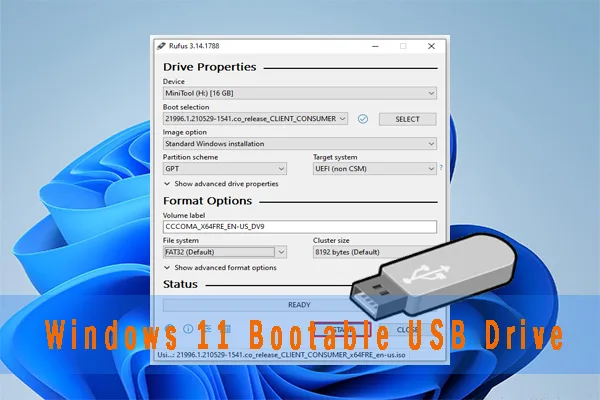
Image source: Bing (Web (fair-use with source credit))
Method 1: Using the built-in Recovery Environment
This works if your PC can reach the blue recovery screen on its own. Many systems after a failed boot will automatically land here after two or three failed attempts.
Step 1: Force the recovery environment to load. If your PC doesn't show the recovery screen automatically, turn the system on and hold the power button to force a shutdown as soon as you see the Windows logo. Do this three times in a row. On the fourth boot, Windows should display "Preparing Automatic Repair" followed by the blue recovery screen.
Step 2: Navigate to the reset option. On the blue screen, click "Advanced Options." Then go to "Troubleshoot" and select "Reset this PC."
Step 3: Choose Cloud Download or Local Reinstall. Apply the guidance from the previous section here. Pick the option that matches your situation.
Step 4: Choose what to remove. You'll see two options: "Keep my files" and "Remove everything." If you're doing a boot reset because Windows won't work, select "Remove everything." Keeping files can leave behind corrupted user profiles.
Step 5: Confirm and let it run. Windows will show you a summary of what will happen. Confirm the reset and let the process run. Your screen may go black and restart several times.
That's normal. Do not interrupt it.
Method 2: Using a bootable USB installation drive
If your recovery partition is missing, corrupted, or the built-in reset simply won't start, you need a bootable USB drive with Windows 11 installation media.
Step 1: Create the USB drive on another computer. You need a working Windows PC and a USB drive with at least 8 GB of space. Download the Windows 11 Media Creation Tool from Microsoft's official site. Run it and follow the prompts to create installation media on your USB drive.
Step 2: Boot from the USB drive. Insert the USB drive into your broken PC. Restart and press the key that opens your boot menu. Common keys are F2, F12, Del, or Esc depending on your manufacturer.
Select the USB drive from the list.
Step 3: Choose your language and click next. The Windows Setup screen will appear. Select your language, time, and keyboard preferences. Then click "Next."
Step 4: Find the repair option. On the screen that says "Install now," look at the bottom left corner. Click "Repair your computer" instead of "Install now."
Step 5: Reset from the recovery environment. This takes you to the same "Choose an option" screen from Method 1. Follow Troubleshoot > Reset this PC and choose your options.
Method 3: Using a recovery drive you made earlier
If you created a USB recovery drive before your PC broke, this is the fastest method. The process is nearly identical to Method 2. Insert the recovery drive, boot from it, and follow the on-screen prompts to reset the PC.
What the process actually looks like
The screen will show a percentage during the reset. It will restart automatically at various points. This is not a sign of failure.
A normal boot reset takes between 30 minutes and 2 hours depending on your drive speed, the method you chose, and whether Cloud Download needs to pull down data.
Do not power off the PC during this process. A hard shutdown during a reset can leave your system in a state where it won't boot at all. If you absolutely must stop the process, wait for a point where the screen has been static for more than an hour before considering a forced restart.
What to Do When the Reset Fails
"There was a problem resetting your PC"
This is the most common error. Windows shows this message after starting the reset and then rolling back. The rollback is actually a good thing.
It means Windows detected a problem early and returned your system to its previous state instead of leaving it half wiped.
The error usually means one of three things:
- Corrupted recovery files. The files Windows needs to rebuild itself are damaged. This happens most often with Local Reinstall when the recovery partition has errors.
- Not enough free space. Cloud Download needs room to unpack the downloaded Windows image. If your drive is nearly full, the process can't complete.
- A driver or service is blocking the reset. Some third-party security software or driver conflicts can prevent the reset from running.
How to fix a failed reset
Switch to Cloud Download if you used Local Reinstall. This bypasses any corruption in your recovery partition entirely. You'll need a working internet connection and about 4 to 12 GB of data.
Free up space on your drive. If you can access the command prompt from the recovery environment, use Disk Cleanup or manually delete large files. You need at least 10 GB of free space for Windows to rebuild itself.
Disable BitLocker temporarily. If BitLocker is active and the reset keeps failing, you may need to decrypt the drive first. Use the manage-bde -off C: command from the recovery environment command prompt. This can take hours for large drives.
Create a bootable USB drive and try again. If both Cloud Download and Local Reinstall fail from the recovery environment, the built-in recovery partition itself may be corrupted. Use a bootable USB with Windows 11 installation media and try the reset from there.
Stuck at a percentage
Sometimes the reset doesn't fail. It just stops moving. The screen shows something like "36 percent complete" for an hour or more.
The "Cleaning drive" step can take over an hour on a large hard drive. Cloud Download can stall if your internet slows down or the connection drops briefly.
The safe rule: if the percentage hasn't moved in 90 minutes and you see no disk activity light, you can force a restart. Press and hold the power button for 10 seconds. Boot back up.
The system may either continue the reset or show the error screen.
Recovery partition is missing
Some laptops ship without a recovery partition. Others have one, but it's been deleted accidentally or by a previous OS upgrade. Without it, Local Reinstall won't appear as an option at all.
If that's your situation, you need a bootable USB drive with Windows 11 installation media. Create one on a working computer. Then boot from the USB and follow Method 2 from the earlier section.
The "Fully Clean the Drive" Toggle: When to Use It
Image source: Wikimedia Commons / PantheraLeo1359531 (CC BY)
When you choose "Remove everything" during a boot reset, Windows gives you an extra toggle. It asks if you want to "Clean the drive fully" or just "Remove my files." This is not a minor detail. The difference matters a lot for security and speed.
Just remove my files explained
This option simply deletes the file references and marks the space as available for new data. The actual data remains on the drive until something overwrites it. Think of it like taking a book off a library shelf and keeping the card catalog entry.
The book is still there. You just can't find it through the normal system.
Best for:
- You're keeping the computer and just fixing a corrupted Windows installation
- You want the fastest possible reset time
- The drive doesn't contain sensitive personal data
- You're the only person who will ever use this computer again
Time estimate: 5 to 15 minutes on most modern SSDs. Up to 30 minutes on older hard drives.
Fully clean the drive explained
This option overwrites every sector of the drive with zeros or random data. It's a secure wipe that makes previous data unrecoverable even with forensic tools.
Best for:
- You're selling or donating the computer
- You're disposing of the drive
- The drive contains financial records, medical information, or business data
- You're worried about malware that might hide in system recovery sectors
Time estimate: 1 to 3 hours on a 512 GB SSD. 4 to 8 hours on a 1 TB hard drive.
The security reality check
For most home users, "Just remove my files" is perfectly adequate. The average person doesn't have data worth recovering with specialized equipment. But if you've ever logged into banking, stored tax documents, or saved passwords on that computer, the extra time for a full clean is worth it.
If you're dealing with exceptionally sensitive data like medical records or client information, a standard "fully clean the drive" from Windows may not meet data destruction standards. The National Institute of Standards and Technology (NIST) recommends cryptographic erasure or physical destruction for drives containing high-sensitivity data.
Mistakes That Will Cost You (and How to Avoid Them)
Mistake 1: Forgetting the BitLocker key
You start the reset. You walk away. You come back to a screen asking for a 48-digit recovery key.
You don't have it. The reset is stuck.
How to avoid it: Before you start any reset, log into your Microsoft account from another device. Navigate to the devices page and find the recovery key. Write it down or save it to a text file on a USB drive.
Mistake 2: Interrupting the reset
People see the black screen during a restart and think the system crashed. So they press the power button. This can leave the drive in an inconsistent state.
How to avoid it: When you start the reset, walk away. Come back in two hours. If the system is still on the same screen after two hours with no disk activity, then and only then consider a forced restart.
Mistake 3: Choosing Cloud Download with unreliable internet
Cloud Download requires a steady connection for 30 to 60 minutes. If your connection drops, the download fails. The reset rolls back.
You start over.
How to avoid it: If your internet is unreliable, choose Local Reinstall instead. It doesn't need any connection. If your recovery partition is damaged and you need Cloud Download, take the laptop somewhere with a stable connection.
Mistake 4: Wiping a company or school device
Someone has a laptop from a previous job or a school program. They decide to reset it. The reset fails because the device is managed by an organization.
The recovery key is with the IT department.
How to avoid it: Check whether the device belongs to an organization before you start. If you see "Managed by your organization" anywhere in the system settings, contact the IT department first. They can remotely unenroll the device or provide the recovery key.
Mistake 5: Not backing up before choosing "Remove everything"
People assume "Keep my files" will save their data. That option keeps files in standard user folders like Documents and Pictures. It does not keep files in custom folders or installed application data.
How to avoid it: If you can access your files at all from Safe Mode or the command prompt, copy them to an external drive before starting the reset. Treat "Remove everything" as exactly what it says.
Real Scenarios: When a Boot Reset Saved (or Broke) the PC
Scenario 1: Corrupted system files after a failed update
A user with a Dell Inspiron laptop accepted a Windows 11 feature update. The update reached about 70 percent and then failed. On the next restart, the system showed a blue screen with "Critical Process Died." Safe Mode wouldn't load.
The user tried the built-in reset with Cloud Download. The process took about 50 minutes on a 150 Mbps connection. After the reset completed, Windows booted normally.
All personal files in the Documents and Photos folders were intact. The only thing lost was a set of desktop shortcuts and a few installed applications.
Why it worked: The system corruption was limited to critical Windows files. The user's recovery partition was intact. Cloud Download replaced the corrupted files with a fresh copy from Microsoft.
Scenario 2: Selling a laptop with a dead Windows installation
A seller had an older HP Pavilion with a broken Windows installation. The system would boot to a black screen with a cursor. No recovery environment appeared.
The seller planned to sell the laptop and needed a clean state.
The seller created a bootable USB drive on a friend's computer. They booted from the USB and used the repair option to access the recovery environment. They chose "Remove everything" with "Fully clean the drive" selected.
The secure wipe took about 90 minutes on a 256 GB SSD.
After the reset, the system booted to the Windows Out of Box Experience (OOBE) setup screen. The buyer received a laptop that looked and behaved like a new device.
Why it worked: The bootable USB bypassed the missing recovery partition entirely. The full clean ensured no personal data remained on the drive.
Scenario 3: Persistent malware infection
A user reported a system where antivirus scans detected and removed malware repeatedly. The malware kept coming back after each scan. It had embedded itself in system restore points and shadow copies.
The user performed a boot reset with "Remove everything" and "Fully clean the drive." The secure wipe removed all system files, restore points, and shadow copies. The fresh Windows installation had no trace of the malware.
Why it worked: Persistent malware often hides in system areas that a standard reset with "Keep my files" leaves intact. The full drive clean eliminated every hiding place.
When to Quit and Do a Clean Install Instead
A boot reset is a repair tool. A clean install is a full replacement. There comes a point when the reset isn't going to work, and a clean install is the better path.
What a clean install does differently
A clean install using Windows 11 installation media does more than a reset. It reformats the entire drive. It deletes all partitions, including the recovery partition.
It creates a fresh partition structure. It installs Windows from scratch with no dependencies on existing files.
The key difference: a clean install treats your drive as a blank canvas. A reset tries to work with what's already there.
When to choose a clean install
Switch to a clean install when:
- The boot reset fails after three attempts using different methods
- Your recovery partition is missing and you don't have a bootable USB
- Drive diagnostics show no hardware errors, so corruption is the issue
- You want a truly blank slate with no trace of previous installations
The clean install process in brief
Step 1: Create bootable Windows 11 installation media on a working computer. You need a USB drive with at least 8 GB of space and the Media Creation Tool from Microsoft's official website.
Step 2: Boot from the USB drive. Press F2, F12, Del, or Esc during startup to access the boot menu. Select your USB drive.
Step 3: On the Windows Setup screen, click "Install now." Accept the license terms. When asked about the installation type, choose "Custom: Install Windows only (advanced)."
Step 4: You'll see a list of partitions on your drive. Delete each partition one by one until only "Unallocated Space" remains. This is the point of no return.
Step 5: Select the unallocated space and click "Next." Windows will create the necessary partitions and start the installation. It takes about 20 to 30 minutes. The system will restart several times.
What you lose with a clean install
Everything. A clean install removes every partition on the drive. The recovery partition is gone.
The manufacturer's bloatware is gone. Your files are gone. Your Windows product key tied to the digital license on your motherboard is still valid, but everything else is gone.
When to call a professional
Some situations are beyond what a guide like this can cover. Consider taking the device to a repair shop if:
- You hear clicking or grinding sounds from the drive
- The drive shows up in BIOS but not in Windows Setup
- You need to recover data and have no backup
- The device is managed by an organization and you don't have authorization
- You've tried a clean install and it still fails (this points to hardware failure)
Final Decision Guide
| Your Situation | First Action | Second Action | Third Action |
|---|---|---|---|
| Blue screen, recovery visible | Reset from recovery environment | Cloud Download if Local Reinstall fails | Bootable USB if both fail |
| Black screen, no recovery | Force shutdown 3 times | Create bootable USB on another PC | Clean install from USB |
| BitLocker active, no key | Find key in Microsoft account | Clean install if key is lost | Replace drive if encrypted |
| Selling the PC | Full clean via recovery environment | Bootable USB if no recovery partition | Verify OOBE appears after reset |
| Malware infection | Full clean with drive wipe | Clean install from USB if reset fails | Replace drive in extreme cases |
| Everything has failed | Run hardware diagnostics | Professional repair shop | Replace the drive |
Use this table to find your exact situation. The first column matches your problem. The second column is your starting point.
Move to the next column only if the previous step fails.
After the Reset: Getting Your System Back to Normal
Going through the Out of Box Experience
Windows will walk you through the initial setup. You'll choose your region, keyboard layout, and network connection. Sign in with your Microsoft account to restore your digital license.
The setup takes about 10 to 15 minutes. Windows will check for updates during this process. Let it finish.
Restoring your data
If you backed up before the reset, now is the time to restore. Copy your files from the external drive or cloud storage back to your user folders.
You need to reinstall every application. The reset removed all software. Make a list of the programs you use regularly.
Download and install each one. Budget an hour or two for this step.
Every setting you customized is gone. Display preferences. Power settings.
Notification toggles. Browser extensions. You'll need to reconfigure each one manually.
Checking for driver issues
Windows Update will install most drivers automatically. But some hardware may not work immediately. Check Device Manager for any devices with yellow warning icons.
Visit your PC manufacturer's support page to download the latest drivers for your model.
Common problem areas: Wi-Fi adapters, graphics cards, and touchpad drivers often need manual installation after a reset. If your Wi-Fi doesn't work, connect via Ethernet temporarily and run Windows Update.
What to do if something still isn't right
A boot reset fixes most software problems. But if you notice new issues after the reset, they're usually caused by driver conflicts or missing updates.
Run Windows Update fully. Click "Check for updates" repeatedly until no more updates are available. This can take several rounds.
Check for manufacturer updates too. Dell, HP, Lenovo, and others provide their own update tools that install drivers and firmware Windows Update doesn't cover.
Test your hardware. If the original problem was a boot loop or crash, make sure the reset actually fixed it. Run the PC for a few hours under normal use.
If the same symptoms return, the issue is hardware, not software.
Preventing Future Boot Problems
Create a recovery drive today
While your system is working, create a USB recovery drive. This takes 10 minutes and saves hours later.
Search for "Create a recovery drive" in the Start menu. Run the tool. Check the box that says "Back up system files to the recovery drive." Plug in a USB drive with at least 16 GB of space.
Follow the prompts.
If your recovery partition ever gets corrupted, this USB drive is your backup. Label the drive and store it somewhere safe.
Keep your BitLocker recovery key accessible
If BitLocker is enabled, save your recovery key in two separate locations. Your Microsoft account is one. A printed copy in your desk drawer is another.
A text file on a USB drive is a third.
The problem: people save the key only on the same drive that gets wiped during a reset. That's useless. The key needs to exist outside the PC.
Set regular system restore points
System Restore is not a replacement for a boot reset. But it can save you from needing one. If a bad update or driver causes problems, you can roll back to a restore point without wiping anything.
Search for "Create a restore point" in the Start menu. Select your system drive and click "Configure." Turn on System Protection. Set the slider to use about 5 to 10 percent of your drive space for restore points.
Practice good update hygiene
Major Windows updates cause a disproportionate number of boot problems. You don't need to skip updates. But you should be smart about them.
Wait a week before installing feature updates. Let early adopters find the bugs. Microsoft typically issues patches within a week of a problematic update.
Always create a restore point before a major update. Keep your drive healthy by running chkdsk periodically. Keep at least 20 percent of your drive free.
Understanding Windows 11 Recovery Tools
The boot reset is one tool in a larger toolkit. Knowing the others helps you choose the right approach for each situation.
Available tools in WinRE
- Reset this PC. The main tool we've covered. Wipes and reinstalls Windows.
- System Restore. Rolls back system files and settings to an earlier point. Your personal files stay intact.
- System Image Recovery. Restores from a full system backup you created earlier. This is the fastest recovery if you have a backup.
- Startup Repair. Automatically fixes common boot problems like missing boot files or corrupted boot configuration data. This is the first tool to try before a reset.
- Command Prompt. Gives you full access to the file system and repair tools like DISM, SFC, and bootrec.
- UEFI Firmware Settings. Takes you to the BIOS or UEFI configuration screen.
When to use each tool
Startup Repair first. It takes 5 minutes and fixes about 30 percent of boot problems. Run it before considering a reset.
System Restore second. If you have a recent restore point, this can undo the problem without any data loss. It takes about 10 minutes.
Command Prompt tools third. DISM and SFC can repair corrupted system files without a reset. They take 15 to 30 minutes and succeed about 50 percent of the time.
Reset this PC last. A boot reset is the nuclear option. It fixes the widest range of problems but at the highest cost in time and data loss.
Frequently Asked Questions
How long does a Windows 11 factory reset from boot take?
Expect 30 minutes to 2 hours total. Cloud Download adds download time based on your internet speed. Local Reinstall is faster but depends on your drive speed.
The "Fully clean the drive" option adds 1 to 4 hours depending on drive size.
Will I lose my files if I factory reset from boot?
It depends on your choice. "Keep my files" preserves files in your user folders. "Remove everything" deletes everything including your files.
The "Fully clean the drive" toggle makes those files unrecoverable. Back up before you start regardless.
Can I factory reset Windows 11 without a password?
Yes. The recovery environment loads before Windows asks for a password. You can access Troubleshoot > Reset this PC without logging in.
This is the entire point of a boot reset.
What if my PC doesn't have a recovery partition?
You need a bootable USB drive. Without a recovery partition, the built-in reset option won't appear. Create installation media on another computer using the Windows 11 Media Creation Tool.
Boot from the USB and use "Repair your computer" to access the reset option.
Will a factory reset remove viruses and malware?
In most cases, yes. A boot reset with "Remove everything" and "Fully clean the drive" removes every file including malware. For 99 percent of infections, a boot reset is effective.
Do I need my Windows product key to reset from boot?
No. Windows 11 activates using a digital license tied to your motherboard. The reset preserves this license.
You don't need to enter a product key during the process.
Can I cancel a factory reset after it starts?
You can, but you shouldn't. Pressing the power button during a reset can corrupt the drive. If you absolutely must stop, wait until the process has been stuck on the same screen for over 90 minutes with no disk activity.
Then force a restart.
Should I choose Cloud Download or Local Reinstall?
Cloud Download is more reliable. It pulls a fresh copy from Microsoft's servers and bypasses any corruption in your local files. Use Local Reinstall only if your internet is slow, unreliable, or unavailable.