
We've got a Microsoft Surface sitting in front of you, and you can't get past the login screen. Maybe you bought it used and the previous owner never removed their account. Or maybe you just plain forgot the password.
Either way, you need to perform a microsoft surface factory reset without password, and you need to do it now.
As of 2026, every Surface model ships with Windows 10 or 11, and BitLocker device encryption is turned on by default. That little fact matters a lot when you try to reset without a password. It decides whether the process takes 20 minutes or hits a wall.
Let's work through your situation step by step.
Quick Answer
You can factory reset a Surface without a password by using a USB recovery drive. Boot from the USB in the Surface UEFI menu. Choose "Troubleshoot" then "Reset this PC." You'll need a BitLocker recovery key if encryption is active.
Know your 48-digit key before you start.
Why You Might Need to Reset a Surface Without a Password
There are a few common scenarios where you find yourself locked out and needing a fresh start.
- You forgot your password or PIN. It happens. Maybe you changed it and didn't write it down. Now you're staring at the lock screen.
- You bought a used Surface. The previous seller promised to wipe it, but they didn't. You turn it on and see their account. You can't log in, and you don't have their credentials.
- You inherited a Surface from work or family. The original IT admin or the previous owner set up the device, and nobody remembers the password.
- You're stuck in a boot loop or system corruption. Windows won't load properly, and the only way out is a full reset.
Each of these situations leads to the same question: how do I wipe the device when I can't log in? The answer isn't one-size-fits-all. It depends on what you still have access to and whether you saved your BitLocker recovery key.
Our editorial team follows strict guidelines for accuracy. You can read our Editorial Policy to see how we verify technical instructions like these.
The Two Main Paths: Can You Still Get Into Windows?
Before you do anything, pause and assess your access level. There are two entirely different paths depending on whether you can get past the lock screen, even temporarily.
Path 1, You can still reach the Windows desktop. This includes situations where:
- You know the password for a different user account on the same Surface, like a hidden admin account.
- You're logged in but forgot the Microsoft account password for the primary user. You can reset it online while staying logged in.
- You have a password reset disk. These are rare these days, but possible.
Path 2, You're completely locked out. You see the login screen and nothing else. You don't know any account password. You can't get past the lock screen under any normal method.
If you're on Path 1, you can often reset using the built-in Windows settings. If you're on Path 2, you must use the recovery environment. Either by booting from a USB drive or forcing the Surface into recovery mode.
We'll cover both paths in detail below. A quick rule of thumb: if you have any way into Windows, try that first. It's faster and doesn't require a separate USB drive.
Path 1 – You Can Access Windows (But Forgot Your Password)
Let's say you're sitting at the desktop on a different user account. Or you can log in via Safe Mode. Here's how to reset the Surface without your current password.
Reset password using your Microsoft account online
This works if you use a Microsoft account to sign in. Not a local account.
- Go to account.live.com/password/reset on any device.
- Follow the recovery prompts. You'll need access to the recovery email or phone number on file.
- Once you reset the password online, wait a minute. Then use the new password on the Surface login screen.
This method doesn't involve wiping the device at all. You just regain access.
Use another admin account
If there's a second admin account on the Surface, even one you forgot about, log into that account instead. Then:
- Open Settings > Accounts > Other users.
- Select the locked-out account and choose Change account type to make it standard. Or simply reset its password if the option is available.
Keep in mind that Windows 10/11 Home doesn't show the "Change password" option for other users. You'd need Pro or a workaround via Computer Management.
Reset this PC from Settings
If you're logged into any account with admin rights, you can factory reset the whole machine.
- Go to Settings > Update & Security > Recovery.
- Under "Reset this PC", click Get started.
- Choose Remove everything.
- Select either Cloud download or Local reinstall.
Heads up: This wipes all user data, including the locked-out account's files. It also removes all other accounts on the device. The Surface will restart and go through the out-of-box experience, ready for a new setup.
When Path 1 doesn't work
If you don't have any admin access at all, not even a secondary account, you're on Path 2. Move on.
Path 2 – You're Completely Locked Out (Can't Log In At All)
This is the hard route. You see the lock screen. You've tried every password you can think of.
Nothing works. Maybe the Surface belongs to someone else. Or the previous owner never removed their account.
You have two options: a USB recovery drive or the built-in recovery environment triggered by failed boots.
Option A: Force the recovery environment (no USB required)
Windows 10 and 11 have a hidden recovery environment that triggers automatically after three failed boot attempts.
- Turn off the Surface completely.
- Turn it back on. As soon as you see the Windows logo or spinning dots, press and hold the Power button to force a shutdown.
- Repeat this three times. On the fourth boot, Windows should display "Preparing Automatic Repair."
- Wait for the automatic repair screen, then click Advanced options.
This lands you in the Choose an option menu. From there:
- Go to Troubleshoot > Reset this PC.
- Choose Remove everything.
- If prompted, select Only the drive where Windows is installed.
- Follow the on-screen prompts.
Important: If BitLocker is active, you'll be asked for your recovery key. We'll cover that in a later section.
Option B: Use a USB recovery drive
This is the most reliable method. It works even if the forced boot trick fails.
You need a USB drive. 16 GB minimum. And access to another computer to create the recovery media.
Microsoft provides official Surface recovery images on their support site. You'll need the Surface's serial number. It's found on the back or under the kickstand.
We'll walk through creating that USB in the next section.
Option C: Reset from Surface UEFI (if you can't even reach the automatic repair)
Some Surface devices allow you to boot directly from a USB drive through the UEFI menu. This bypasses Windows entirely.
Before you proceed, understand one thing. If the Surface is tied to a previous owner's Microsoft account, you may be asked for that account's password after the reset. This is a protection against theft.
If you don't have that password, the device becomes a brick.
We've covered this in our Terms And Conditions note about ownership verification. For now, assume you need to prove ownership.
How to Use Surface UEFI to Bypass the Login Screen
The Surface UEFI is the low-level menu that controls hardware settings and boot order. You can access it without any password. Even if Windows is completely locked.
Steps to access Surface UEFI
- Turn off the Surface completely. Hold the power button for 10 seconds to ensure it's off.
- Press and hold the Volume Up button.
- While holding Volume Up, press and release the Power button.
- Keep holding Volume Up until the UEFI screen appears. Usually within 5 to 10 seconds. Release the button once you see the menu.
You'll see a blue screen with several tabs: PC information, Devices, Boot configuration, Security, and Management.
Change the boot order to USB
To boot from a USB recovery drive:
- Go to the Boot configuration tab.
- Look for Boot order or Boot devices.
- Move USB to the top of the list. Use the Volume buttons to navigate and the Power button to select.
- Save changes and exit. Usually under the Exit tab.
Note: On newer Surface models, you may also need to disable Secure Boot under the Security tab before the USB will boot. Some third-party recovery tools require this. Official Microsoft recovery images typically work with Secure Boot on.
Boot from the USB
- Insert the USB recovery drive into the Surface.
- Restart the device. It should boot from the USB automatically if the boot order is correct.
- If it doesn't, go back into UEFI and check that "USB" is listed first.
Once the Surface boots from the USB, you'll see the Windows Setup screen. Choose your language and keyboard layout. Then select Repair your computer in the bottom-left corner.
From the Choose an option screen, select Troubleshoot. Then Reset this PC.
Image source: Bing (Web (fair-use with source credit))
What if UEFI doesn't detect the USB?
This is a common roadblock. Try these fixes:
- Use a USB 2.0 port if available. Some Surface models have trouble with USB 3.0 drives in UEFI.
- Format the USB as FAT32. Not NTFS. Windows' own recovery media tool usually handles this. If you created the drive manually, double check.
- Use the official Surface Recovery Image from Microsoft. A generic Windows installer may lack Surface-specific drivers for booting.
If none of these work, the USB drive itself may be faulty. Or the Surface's USB port could have hardware issues. Try a different USB drive and a different port.
Creating a USB Recovery Drive on Another Computer
You need a USB recovery drive if you're stuck on the login screen and the forced boot trick doesn't work. This is the most reliable tool for a factory reset without a password.
What you'll need
| Item | Requirement |
|---|---|
| USB flash drive | 16 GB minimum (32 GB recommended) |
| USB format | FAT32 (the Surface UEFI reads FAT32 reliably) |
| A working computer | Any Windows PC, Mac, or Linux machine (Windows is easiest) |
| Surface serial number | Found on the back of the device, under the kickstand, or in the original box |
Microsoft provides official Surface Recovery Images for every model. These images contain the exact Windows version and drivers your Surface shipped with. Third-party generic Windows installers often lack Surface-specific drivers and may fail to boot.
Step 1: Find your Surface model and serial number
Before you download anything, confirm your Surface model. Common models include Surface Pro 7, Pro 8, Pro 9, Surface Laptop 4, Laptop 5, Surface Go 3, and Surface Book 3.
The serial number is usually 12 characters long. It starts with a letter followed by numbers. You can find it printed on the back of the device or under the kickstand on Pro models.
Step 2: Download the recovery image
Go to the official Microsoft Surface Recovery Image download page. You'll need to enter your Surface serial number. Microsoft checks this to serve the correct image.
The download is a large ZIP file. Typically 6 to 8 GB. It may take 30 to 60 minutes on a standard broadband connection.
Step 3: Prepare the USB drive
Insert the USB drive into the working computer.
- Open File Explorer and right-click the USB drive.
- Select Format.
- Choose FAT32 as the file system.
- Quick format is fine.
Important: FAT32 has a 4 GB file size limit per file. The recovery ZIP file may exceed this when extracted. If that happens, you'll need to use a tool that splits files.
Or use Microsoft's own recovery media creation tool, which handles this automatically.
Step 4: Create the recovery drive
Windows has a built-in tool for this.
- Search for Create a recovery drive in the Start menu.
- Open the tool and check Back up system files to the recovery drive. Optional, but recommended for completeness.
- Uncheck Back up system files if you just want a bootable reset drive.
- Select your USB drive from the list.
- Click Create. The process takes 10 to 20 minutes.
Alternatively, use the Windows Media Creation Tool to download Windows 10 or 11 and create installation media. This works, but you'll miss Surface-specific drivers. For a true factory reset, the Surface Recovery Image is better.
Step 5: Boot from the USB on the locked Surface
Insert the USB into the locked Surface.
- Hold Volume Up + Power to enter UEFI.
- Change boot order to USB as described earlier.
- Save and exit.
The Surface should boot into the recovery environment. If it doesn't, try a different USB port or a USB 2.0 flash drive if available.
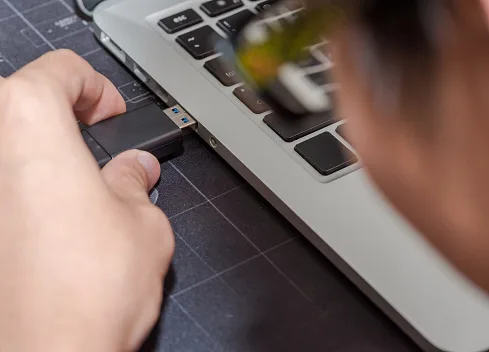
Image source: Bing (Web (fair-use with source credit))
Troubleshooting USB boot failures
- USB not detected in UEFI: Try a different USB port. Surface devices sometimes boot only from the left-side USB-C port.
- Black screen after boot: The recovery image may be corrupted. Re-download it.
- "No bootable device" error: The USB may not be formatted correctly. Or Secure Boot may be blocking it. Disable Secure Boot in UEFI under the Security tab.
What to Do When BitLocker Asks for a Recovery Key
BitLocker is the most common obstacle in a passwordless factory reset. Every Surface sold since 2016 has BitLocker device encryption enabled by default. You can't avoid it.
When you try to reset from the recovery environment, the Surface may display a blue screen asking for a 48-digit recovery key. Without this key, you cannot access the drive. The reset cannot proceed.
Where to find your BitLocker recovery key
Microsoft automatically stores one copy of your recovery key in your Microsoft account. Here's how to retrieve it:
- Go to https://account.microsoft.com/devices/recoverykey on any browser.
- Sign in with the Microsoft account that was used on the Surface. The same account you're locked out of.
- Look for the entry that matches your Surface device name or a partial serial number.
- The recovery key is a long string of digits, grouped in sets of six.
If you don't have access to that Microsoft account, you have a serious problem. The key is unique to the device. Without it, the drive remains encrypted and unreadable.
Other places the key might be stored
- Your email inbox. Search for "BitLocker recovery key" in your email history.
- A printed copy. Some users print the key during initial setup and keep it with the device manual.
- Your employer or school. If the Surface is company or school owned, IT may have a copy on file.
- A text file saved locally. Check any USB drives or external hard drives you may have used.
What happens if you can't find the key
You hit a brick wall. The encrypted drive is essentially scrambled. Without the key, the factory reset cannot access the partitions to wipe them.
Your options are limited:
- Contact Microsoft Support with proof of purchase. They may be able to retrieve the key from their records if the device is linked to a Microsoft account you can verify.
- Send the Surface back to the previous owner. If you bought it used, ask them to provide the key.
- Replace the SSD. On some Surface models, you can remove the SSD and wipe it on another computer. But newer Surface devices have soldered storage. You can't remove it.
If you have the key
Type it carefully. Each digit matters. One wrong digit and the system rejects it.
Once entered, the drive unlocks. You can proceed with the factory reset normally.
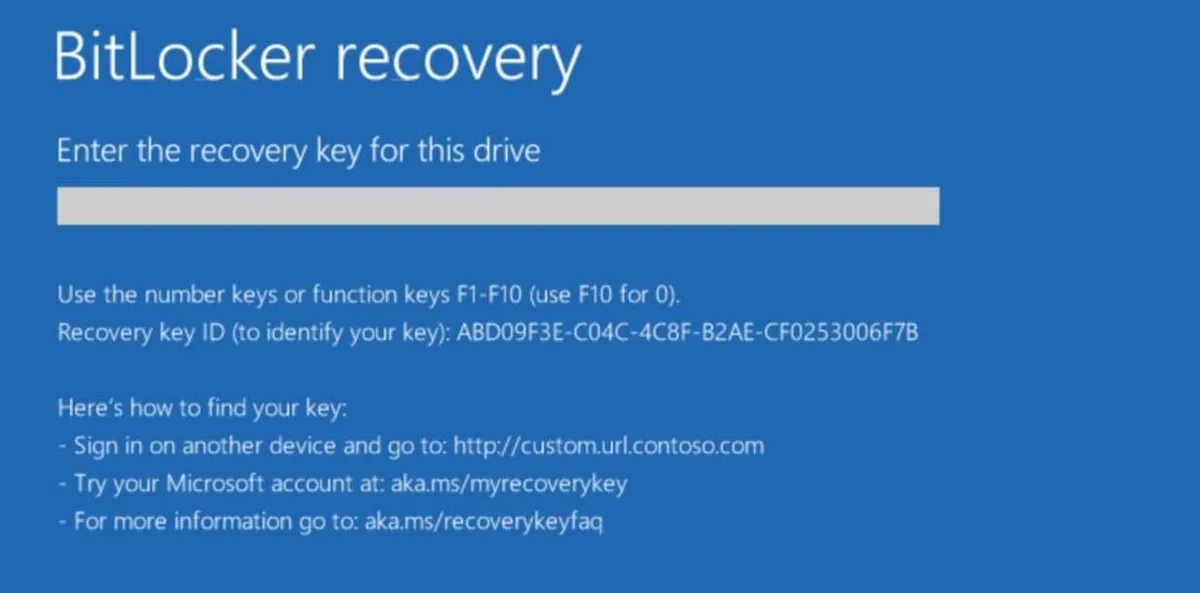
Image source: Bing (Web (fair-use with source credit))
A note on device encryption vs. BitLocker
Windows 10 and 11 Home use "device encryption" which works differently from full BitLocker. Device encryption stores a recovery key in your Microsoft account automatically. Full BitLocker, available in Pro and Enterprise, may also use a local key stored in Active Directory for domain-joined devices.
In practice, both ask for a 48-digit key at the same point. The solution is the same. Find it in your Microsoft account.
The "Three Failed Boots" Trick to Trigger Recovery
This trick doesn't require a USB drive. It forces Windows to launch the automatic repair environment. That gives you access to the reset tools.
How it works
Windows 10 and 11 monitor boot attempts. If the system fails to boot normally three times in a row, Windows assumes something is wrong. It displays the "Preparing Automatic Repair" screen.
Step-by-step
- Turn off the Surface completely. Hold the power button for 10 seconds until the screen goes black.
- Turn it back on. Watch the screen. As soon as you see the Windows logo or spinning dots, press and hold the Power button again to force a shutdown.
- Repeat this process two more times. Each time, let the Surface begin to boot, then force a shutdown.
- On the fourth boot, Windows should display "Preparing Automatic Repair" with a spinning circle. Let it load.
What happens next
The Surface may take a minute or two to prepare. You'll then see a blue screen with "Automatic Repair" and options like "Restart" and "Advanced options."
Click Advanced options. This brings you to the Choose an option screen.
From there:
- Select Troubleshoot.
- Select Reset this PC.
- Choose Remove everything.
This bypasses the need for a password entirely. The reset runs from the recovery partition built into your Surface.
When this trick fails
- The Surface boots normally. If you didn't interrupt the boot early enough, Windows may load fully. Try again with quicker timing.
- The Surface shows a black screen instead. Some Surface models, particularly older ones like the original Surface Book, may not trigger automatic repair this way. The UEFI might override the boot count.
- BitLocker still asks for a key. Yes, even with this method, you'll need the recovery key before the reset can proceed.
Is this method safe?
Yes. You're not damaging the hardware. Forcing a shutdown during the boot process is safe for modern SSDs.
The risk is data loss if you have files you want to keep on the locked account. Since you're locked out anyway, that risk likely doesn't apply.
Step-by-Step: Factory Reset From the Recovery Environment
Once you've reached the recovery environment, either via USB boot or the three boot trick, the actual reset process is straightforward.
Step 1: Choose your language and keyboard layout
If you booted from USB, the first screen asks for language, time, and keyboard settings. Select your region and keyboard. Then click Next.
Click Repair your computer in the bottom left corner.
Step 2: Select Troubleshoot
From the Choose an option screen, click Troubleshoot.
Step 3: Choose Reset this PC
Click Reset this PC.
Step 4: Choose whether to keep files or remove everything
You'll see two options:
- Keep my files: This reinstalls Windows but preserves personal files in the user folders. It requires a password for the user account. Since you're locked out, this option may not work. It can also fail if the user profile is corrupted.
- Remove everything: This wipes all personal files, apps, and settings. It does not require a password. This is the option you want.
Select Remove everything.
Step 5: Choose the drive to clean
You'll see:
- Only the drive where Windows is installed (typically C:)
- All drives
Choose Only the drive where Windows is installed. The other option wipes recovery partitions and any secondary drives.
Step 6: Choose how to clean the drive
- Just remove my files: Quick. Files are not securely erased. Data recovery software could retrieve them.
- Remove files and clean the drive: Slower, takes an extra hour or two. Overwrites the drive with zeros, making data recovery nearly impossible.
If you're selling or giving away the Surface, choose the clean option. If you plan to keep using it, "just remove my files" is fine and faster.
Step 7: Click Reset
The Surface will restart and begin the reset. A progress bar shows "Resetting this PC" with a percentage.
Do not interrupt this process. Do not shut down the Surface. Do not remove the USB drive until instructed.
Step 8: Wait for completion
A typical reset takes 30 to 90 minutes. Older Surface models or those with slower processors take longer. The Surface may restart multiple times during the process.
When finished, the Surface boots to the out-of-box experience. You're asked to choose a region, connect to Wi-Fi, and create a new user account.
What if BitLocker asks for the key during this process?
The key request can appear at different points:
- Right after booting from USB
- During the reset when Windows tries to access the encrypted drive
- At the first restart after the reset begins
If you see the key prompt, enter the 48-digit key. The reset continues.
Common Mistakes That Break the Reset Process
Many people run into avoidable problems. Here are the most common ones and how to sidestep them.
Mistake 1: Not creating a recovery drive before you need it
You're reading this after you're locked out. That's fine. But if you had created a recovery drive when the Surface was working, you'd save yourself the hassle of borrowing another computer.
Fix: If you have a friend's or family member's Windows PC, use it to create the drive now.
Mistake 2: Using a generic Windows USB instead of a Surface-specific image
A standard Windows 10 or 11 installer may boot and even offer a reset. But it often lacks Surface drivers for the trackpad, keyboard, Wi-Fi, or display. You may end up with a Surface that works poorly or can't connect to the internet during setup.
Fix: Always download the official Surface Recovery Image for your exact model.
Mistake 3: Forgetting to format the USB as FAT32
NTFS-formatted USBs are common because they support large files. But Surface UEFI may not detect an NTFS drive.
Fix: Format as FAT32. If the recovery image is larger than 4 GB, use a tool like Rufus to split the file. Or use Microsoft's recovery media creation tool.
Mistake 4: Ignoring the BitLocker recovery key until it's too late
You start the reset. Five minutes in, a blue screen asks for the key. You don't have it.
The reset can't proceed. You're stranded.
Fix: Find your BitLocker recovery key before you begin. Check your Microsoft account online. Write it down or take a photo.
Mistake 5: Interrupting the reset (power loss or USB removal)
A sudden power loss during a reset can corrupt the system partition. The Surface may become unbootable even from USB.
Fix: Ensure the Surface is plugged into a charger throughout the process. If using a USB drive, leave it inserted until the Surface restarts away from the recovery environment.
Mistake 6: Choosing "Keep my files" when locked out
This option tries to preserve user files. It often requires the original user password to complete. If you don't have it, the reset fails.
Fix: Always choose Remove everything.
Mistake 7: Not disabling Secure Boot when booting from third-party USB
Some recovery tools and bootable USB creators don't work with Secure Boot enabled. The Surface shows a "No bootable device" error.
Fix: In Surface UEFI, go to Security and set Secure Boot to Disabled. After the reset, you can re-enable it.
Mistake 8: Assuming the reset removes the Microsoft account lock
After a successful factory reset, the Surface boots to the out-of-box experience. But if the device was linked to a previous owner's Microsoft account and that account hasn't been removed, the Surface may ask for that password during setup. This is an anti-theft feature.
Fix: Before resetting, ask the original owner to remove the device from their Microsoft account at account.microsoft.com/devices. If you bought it used and can't contact them, you may be stuck. Microsoft Support may help with proof of purchase.
Quick reference: Reset checklist
| Task | Completed? |
|---|---|
| USB recovery drive created (if needed) | ⬜ |
| BitLocker recovery key retrieved | ⬜ |
| Surface plugged into charger | ⬜ |
| Secure Boot disabled (if using third-party USB) | ⬜ |
| USB formatted as FAT32 | ⬜ |
| Previous owner's Microsoft account removed | ⬜ |
When the Reset Fails or Gets Stuck – What to Try Next
Sometimes the factory reset doesn't go smoothly. The progress bar stops moving. The Surface restarts into a boot loop.
Or you get an error message you've never seen before.
Don't panic. Most failures have a fix.
The reset hangs at a specific percentage
If the progress bar stops at 32%, 64%, or 99%, wait at least 30 minutes. Some Surface models pause during driver reinstallation. The system may still be working.
If nothing changes after 30 minutes, force a shutdown by holding the power button for 10 seconds. Then restart the Surface. It may boot into the recovery environment again.
Try the reset again from scratch.
"There was a problem resetting your PC. No changes were made."
This error usually means the recovery partition is corrupted or missing. The built-in reset resources aren't usable.
Your only option is a USB recovery drive. Create one on another computer as described earlier. Boot from the USB and try the reset again.
The Surface boots into a black screen after the reset
A black screen after the reset indicates a driver issue. The display driver may not have installed correctly.
Force a shutdown. Then boot into Safe Mode by holding the Shift key while restarting. Or use the UEFI menu to boot into the recovery environment.
From Safe Mode, uninstall the display driver in Device Manager. Restart normally. Windows should redetect the display and install a generic driver.
The reset asks for a product key
You shouldn't see this with a Surface Recovery Image. The product key is embedded in the Surface's UEFI firmware. Windows detects it automatically.
If you see a product key prompt, you're using a generic Windows installer instead of the official Surface Recovery Image. Cancel the installation. Download the correct image from Microsoft's support site.
The Surface won't boot at all after a failed reset
This is the worst case. The boot loader may be damaged. The Surface may not even reach the UEFI menu.
Try this sequence:
- Press and hold Volume Down + Power for 15 seconds. Release both. This forces a hardware reset on some Surface models.
- If that doesn't work, try the UEFI access method (Volume Up + Power) again. If UEFI loads, you can boot from a USB drive.
- If UEFI doesn't load, the firmware may be corrupted. You'll need to contact Microsoft Support for service.
When to give up and seek professional help
If you've tried multiple USB drives, different recovery images, and the Surface still won't reset, the hardware may have a fault. Common hardware issues include:
- A dead SSD
- Corrupted UEFI firmware
- Failed memory modules
- Damaged USB ports
Microsoft Support can run diagnostics remotely. They may offer a replacement or repair under warranty. If the Surface is out of warranty, a local repair shop may be cheaper than a new device.
For more guidance, check our Contact Us page if you need help finding authorized service providers in your area.
Decision Guide: Which Reset Method Should You Use?
Your situation determines the best path. Here's how to choose.
You can log into Windows (any account)
Use the Settings method. It's the fastest and requires no extra tools.
Go to Settings > Update & Security > Recovery > Reset this PC. Choose Remove everything. Done.
You're locked out but have the BitLocker recovery key
Use the three failed boots trick first. It doesn't need a USB drive. If that works, you're done in about an hour.
If the trick fails, go straight to the USB recovery drive method.
You're locked out and don't have the BitLocker recovery key
You cannot reset the Surface without the key. The encrypted drive is inaccessible.
Your only options:
- Retrieve the key from your Microsoft account
- Contact the previous owner or your IT department
- Contact Microsoft Support with proof of purchase
Without the key, the Surface is a brick.
You're locked out and the Surface is from a previous owner
You must ask the previous owner to remove the device from their Microsoft account. Even after a factory reset, the Surface may ask for their password during setup.
If you can't reach them, you're stuck. Microsoft Support may help with a proof of purchase showing you own the device.
You have a USB drive and another computer available
Use the USB recovery drive method. It's the most reliable. It works even if the built-in recovery partition is damaged.
Create the drive on the other computer. Boot from it on the Surface. Reset.
You have no USB drive and no other computer
Use the three failed boots trick. It doesn't require any external tools. It works on most Surface models.
If it doesn't work, you'll need to borrow a computer to create a recovery drive.
Quick Reference – What You Need for Each Path
| Reset Method | Requires Password? | Requires USB Drive? | Requires BitLocker Key? | Time to Complete |
|---|---|---|---|---|
| Settings (from Windows) | No (if you're logged in) | No | No | 30-60 minutes |
| Three failed boots | No | No | Yes (if encrypted) | 45-90 minutes |
| USB recovery drive | No | Yes (16 GB+) | Yes (if encrypted) | 60-120 minutes |
| UEFI boot from USB | No | Yes | Yes (if encrypted) | 60-120 minutes |
| Safe Mode reset | Yes (need admin password) | No | No | 30-60 minutes |
What to have ready before you start
| Item | When You Need It |
|---|---|
| Surface charger | Always. A power loss during reset can corrupt the system. |
| BitLocker recovery key | If device encryption was enabled. Assume it's needed. |
| USB flash drive (16 GB+) | If you're locked out and the boot trick doesn't work. |
| Access to another Windows PC | To create the USB recovery drive. |
| Previous owner's Microsoft account password | If the device is still linked to their account. |
For official documentation on Surface recovery, Microsoft's support site provides the most up-to-date recovery images and firmware tools. We recommend using their official resources rather than third-party recovery tools.
Our Privacy Policy explains how we handle any personal data you share when contacting us for help.
Frequently Asked Questions
Can I factory reset a Surface without a Microsoft account password?
Yes, if you use the recovery environment. You can force a boot into recovery using the three failed boots trick or a USB drive. You don't need any account password to run the reset from there.
What if I don't have a BitLocker recovery key?
You cannot reset the Surface if BitLocker asks for the key and you don't have it. The drive remains encrypted. Your best bet is to check your Microsoft account online at account.microsoft.com/devices/recoverykey.
Will a factory reset remove the previous owner's account?
The reset wipes the local user accounts. But if the device was linked to a Microsoft account, that association may persist in the firmware. After resetting, the Surface may still ask for that account's password during setup.
The original owner must remove the device from their Microsoft account.
How long does a Surface factory reset take?
A typical reset takes 45 to 90 minutes. USB recovery drive resets can take up to two hours. The "Remove everything and clean the drive" option adds another hour.
Can I cancel a reset once it starts?
Do not interrupt a reset. If you cancel mid-way, the Surface may become unbootable. Let it finish even if it takes longer than expected.
Does a factory reset fix a Surface that won't turn on?
No. A factory reset only works if the device can at least boot to the recovery environment or UEFI. If the Surface has no power or the screen stays black, it's a hardware issue.
Final Reminders and Next Steps
You now have everything you need to reset a locked Surface. Let's recap the key points before you start.
Always retrieve your BitLocker recovery key first. It's the single most common reason resets fail. Check your Microsoft account now.
Use the official Surface Recovery Image from Microsoft's support site. Generic Windows installers miss Surface-specific drivers and may cause boot problems after the reset.
Keep the Surface plugged in during the entire reset. A power loss mid-reset can corrupt the system permanently.
If you bought the Surface used, contact the seller before resetting. Ask them to remove the device from their Microsoft account. If they don't, you may end up with a Surface that asks for their password after the reset.
If all else fails, contact Microsoft Support. They can run diagnostics. With proof of purchase, they may help you if the device is tied to an account you can't access.
Resetting a Surface without a password is doable. It just requires the right tool and a little patience. Our About Resetlibs page explains how we test these methods to ensure they work on current Surface hardware.
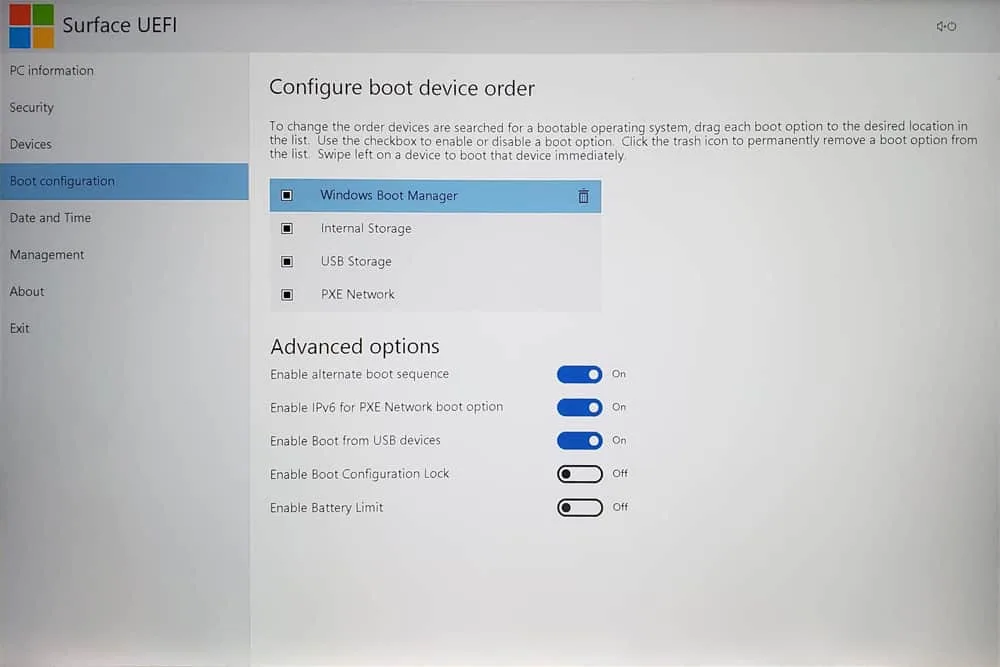
Image source: Bing (Web (fair-use with source credit))